Lexmark X925 Lexmark Document Distributor - Page 54
Configuring advanced properties, Simulator properties
 |
View all Lexmark X925 manuals
Add to My Manuals
Save this manual to your list of manuals |
Page 54 highlights
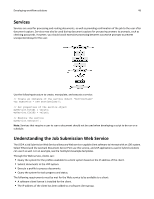
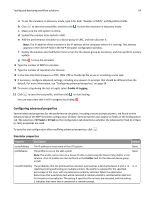
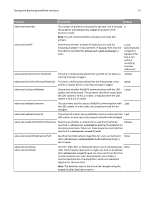
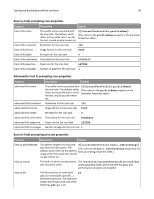
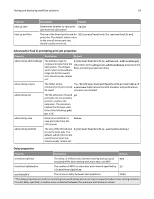
Testing and deploying workflow solutions 54 a To set the simulator to discovery mode, type 0 for both "Number of MFPs" and Repetitions fields. b Click to save the test profile, and then click to start the simulator in discovery mode. c Make sure the LDD system is online. d Upload the solution to be tested in LMC. e Add the performance simulator to a device group in LMC, and then discover it. Note: The IP address of the simulator is the IP address of the computer where it is running. This address appears in the Client IP field in the MFP Simulator configuration window. f Deploy the solution and modify the home screen for the device group as necessary, and then perform a policy update. g Click to stop the simulator. 6 Type the number of MFPs to simulate. 7 Type the number of repetitions for the test. 8 In the Scan File field, browse to a TIFF, JPEG, PDF or PostScript file to use in simulating a scan task. 9 If necessary, configure advanced settings, including any answers to prompts that should be different than the default. For more information, see "Configuring advanced properties" on page 54. 10 To create a log during the test in Log4J, select Enable UI Logging. 11 Click to save the test profile, and then click to start testing. You can stop a test that is still in progress by clicking . Configuring advanced properties Several advanced properties for the performance simulator, including custom prompt answers, are found on the Advanced tab of the MFP Simulator configuration window. Some properties also appear as fields on the Configuration tab. The selection of E‑Task2 or E‑Task on the Configuration tab determines whether the Advanced (e‑Task 2) or Basic (e‑Task) properties are used. To save the test configuration after modifying advanced properties, click . Simulator properties Property Description Default serverAddress The IP address or host name of the LDD system None profileName The profile to run on the LDD system None Note: The profile name refers to a Device Profile created using the Device Policy Editor in the solution. A list of profiles can also be found in the Profiles task for the relevant device group in LMC. cancelProbability The probability that the profile will be canceled, expressed as a decimal between 0 and 1. In 0.0 repetitive testing and testing on multiple printers, the profile is canceled for the specified percentage of the tests, with canceled tests randomly selected. When the application determines that a particular test will be canceled, a random prompt is selected within that test for the point of cancellation. The setting 0 specifies that no tests are canceled, and the setting 1 indicates that every test is canceled at a random prompt.
-
 1
1 -
2
-
3
-
4
-
5
-
6
-
7
-
8
-
9
-
10
-
11
-
12
-
13
-
14
-
15
-
16
-
17
-
18
-
19
-
20
-
21
-
22
-
23
-
24
-
25
-
26
-
27
-
28
-
29
-
30
-
31
-
32
-
33
-
34
-
35
-
36
-
37
-
38
-
39
-
40
-
41
-
42
-
43
-
44
-
45
-
46
-
47
-
48
-
 49
49 -
 50
50 -
 51
51 -
 52
52 -
 53
53 -
 54
54 -
 55
55 -
 56
56 -
 57
57 -
 58
58 -
 59
59 -
60
-
61
-
62
-
63
-
64
-
65
-
66
-
67
-
68
-
69
-
70
-
71
-
72
-
73
-
74
-
75
-
76
-
77
-
78
-
79
-
80
-
81
-
82
 |
 |
