Lexmark X925 Lexmark Document Distributor - Page 66
Deploying a solution directly to an LDD server system, Scan File, Notes, Project, Build Project
 |
View all Lexmark X925 manuals
Add to My Manuals
Save this manual to your list of manuals |
Page 66 highlights
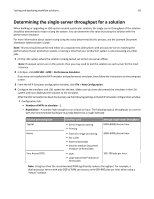
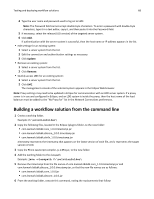
Testing and deploying workflow solutions 66 - Scan File-If a scan task is part of the profile, then a TIFF, JPEG, PDF, or PostScript file is required to simulate the task. Note: If different files must be used for separate scan tasks for an e‑Task 2 solution, then use the advanced property advanced.scanfilesN instead. • Advanced tab: - basic.promptAnswers/advanced.promptAnswers-This is the list of answers to prompts that results in the logic path with the heaviest possible processing load. This setting may be omitted if the default answer to each prompt results in the logic path with the heaviest possible processing load. Note: You can change any other properties that help simulate your system more accurately. 5 Click to save the test profile, and then click Let the test to run for an hour. to start testing. Deploying a solution directly to an LDD server system Notes: • Solutions can only be deployed directly from Eclipse when using LDD 4.3 or later. • Proxy settings may need to be updated in Eclipse for communication with the LDD server system. If a proxy server is in use and configured in Eclipse, and the LDD system is inside the proxy, then the host name of the load balancer must be added to the "No Proxy for" list in the Network Connections preferences. • If a solution performs several actions using an auto‑configure script, then you may need to increase the value of the Solution Export Wait Time setting in the Lexmark preferences to allow enough time for deployment. 1 Select the solution you want in the Package Explorer pane. 2 If Build Automatically is not enabled on the Project menu, then click Project > Build Project. 3 Click File > Export. 4 Expand the Lexmark folder, and then select Deploy to LDD 4.3+ Server. 5 Click Next. 6 If the server has not been accessed from Eclipse before, then do the following: a Select Deploy to new LDD System. b Type either the host name or IP address of the load balancer. c Type the user name and password used to log in to LMC. Note: The Password field cannot accept double‑byte characters. To enter a password with double‑byte characters, type it in a text editor, copy it, and then paste it into the Password field. d Click Add. 7 Select Deploy to existing LDD System. 8 Select the server from the list. 9 Click Finish.
-
 1
1 -
2
-
3
-
4
-
5
-
6
-
7
-
8
-
9
-
10
-
11
-
12
-
13
-
14
-
15
-
16
-
17
-
18
-
19
-
20
-
21
-
22
-
23
-
24
-
25
-
26
-
27
-
28
-
29
-
30
-
31
-
32
-
33
-
34
-
35
-
36
-
37
-
38
-
39
-
40
-
41
-
42
-
43
-
44
-
45
-
46
-
47
-
48
-
49
-
50
-
51
-
52
-
53
-
54
-
55
-
56
-
57
-
58
-
59
-
60
-
 61
61 -
 62
62 -
 63
63 -
 64
64 -
 65
65 -
 66
66 -
 67
67 -
 68
68 -
 69
69 -
 70
70 -
 71
71 -
72
-
73
-
74
-
75
-
76
-
77
-
78
-
79
-
80
-
81
-
82
 |
 |
