Lexmark X925 Lexmark Document Distributor - Page 68
Building a workflow solution from the command line, Update, Remove
 |
View all Lexmark X925 manuals
Add to My Manuals
Save this manual to your list of manuals |
Page 68 highlights
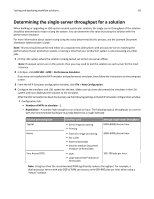
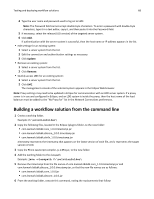
Testing and deploying workflow solutions 68 4 Type the user name and password used to log on to LMC. Note: The Password field cannot accept double‑byte characters. To enter a password with double‑byte characters, type it in a text editor, copy it, and then paste it into the Password field. 5 If necessary, select the release (LDD version) of the targeted server system. 6 Click Add. If authentication with the server system is successful, then the host name or IP address appears in the list. • Edit settings for an existing system: 1 Select a server system from the list. 2 Edit the connection and authentication settings as necessary. 3 Click Update. • Remove an existing system: 1 Select a server system from the list. 2 Click Remove. • Quickly access LMC for an existing system: 1 Select a server system from the list. 2 Click LMC. The management console of the selected system appears in the Eclipse Web browser. Note: Proxy settings may need to be updated in Eclipse for communication with an LDD server system. If a proxy server is in use and configured in Eclipse, and an LDD system is inside the proxy, then the host name of the load balancer must be added to the "No Proxy for" list in the Network Connections preferences. Building a workflow solution from the command line 1 Create a working folder. Example: C:\solutionfolder\ 2 Copy the following files, located in the Eclipse \plugins folder, to the new folder: • com.lexmark.lddsdk.core_1.0.0.timestamp.jar • com.lexmark.lddsdk.sbtcore_1.0.0.timestamp.jar • com.lexmark.lddsdk.sbt4x_1.0.0.timestamp.jar timestamp represents the timestamp that appears on the latest version of each file, and x represents the target version of LDD. 3 Copy the Rhino JavaScript compiler, js-1.6R1.jar, to the new folder. 4 Add the working folder to the classpath. Example: java ‑classpath C:\solutionfolder\ 5 Remove the timestamp from the file names of com.lexmark.lddsdk.core_1.0.0.timestamp.jar and com.lexmark.lddsdk.sbtcore_1.0.0.timestamp.jar, so that the new file names are as follows: • com.lexmark.lddsdk.core_1.0.0.jar • com.lexmark.lddsdk.sbtcore_1.0.0.jar 6 From the working folder, execute this command, noting the replacements that follow:
-
 1
1 -
2
-
3
-
4
-
5
-
6
-
7
-
8
-
9
-
10
-
11
-
12
-
13
-
14
-
15
-
16
-
17
-
18
-
19
-
20
-
21
-
22
-
23
-
24
-
25
-
26
-
27
-
28
-
29
-
30
-
31
-
32
-
33
-
34
-
35
-
36
-
37
-
38
-
39
-
40
-
41
-
42
-
43
-
44
-
45
-
46
-
47
-
48
-
49
-
50
-
51
-
52
-
53
-
54
-
55
-
56
-
57
-
58
-
59
-
60
-
61
-
62
-
 63
63 -
 64
64 -
 65
65 -
 66
66 -
 67
67 -
 68
68 -
 69
69 -
 70
70 -
 71
71 -
 72
72 -
 73
73 -
74
-
75
-
76
-
77
-
78
-
79
-
80
-
81
-
82
 |
 |
