Lexmark X925 Lexmark Document Distributor - Page 52
Testing and deploying workflow solutions, Testing with the MFP emulator and performance simulator
 |
View all Lexmark X925 manuals
Add to My Manuals
Save this manual to your list of manuals |
Page 52 highlights
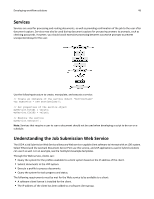
Testing and deploying workflow solutions 52 Testing and deploying workflow solutions Testing with the MFP emulator and performance simulator The MFP emulator and performance simulator are used to test LDD solutions without a physical printer. The emulator interactively emulates an e-Task 2 printer control panel, and the performance simulator allows you to set parameters and quickly run multiple tests simulating either an e-Task or an e-Task 2 printer. The interactive emulator is useful for preliminary debugging, and the performance simulator is useful for comprehensive functional and stress testing. Accessing the MFP emulator or performance simulator • To access the interactive MFP emulator: In Eclipse, click LDD SDK > MFP > Emulator (eTask2). • To access the performance simulator: In Eclipse, click LDD SDK > MFP > Performance Simulator. If you are running the MFP emulator or performance simulator for the first time, then the installation window appears: 1 If necessary, change the folder where to install the application. Note: The installation path cannot contain double‑byte characters. 2 To launch the emulator or performance simulator after installation (depending on your initial selection) , select Launch Emulator. 3 Click Finish. If you selected Launch Emulator or if the MFP emulator is already installed, then the interactive MFP Emulator or MFP Simulator configuration window appears. Using the interactive MFP emulator Using the interactive MFP emulator with an LDD system 1 From the MFP Emulator configuration window, click Interactive Mode > MFP > Emulator (eTask2). The home screen window appears, and the emulator is accessible as a printer from LMC. 2 Make sure the LDD system is online. 3 Upload the solution to be tested in LMC. For more information about uploading a solution to the LDD system, see the Lexmark Document Distributor Administrator's Guide. 4 Add the MFP emulator to a device group in LMC, and then discover it. Note: The IP address of the emulator is the IP address of the computer where it is running. This address appears beside Client IP in the MFP Emulator configuration window, as well as in the upper‑left corner of the home screen. 5 Deploy the solution and modify the home screen for the device group as necessary, and then perform a policy update.
-
 1
1 -
2
-
3
-
4
-
5
-
6
-
7
-
8
-
9
-
10
-
11
-
12
-
13
-
14
-
15
-
16
-
17
-
18
-
19
-
20
-
21
-
22
-
23
-
24
-
25
-
26
-
27
-
28
-
29
-
30
-
31
-
32
-
33
-
34
-
35
-
36
-
37
-
38
-
39
-
40
-
41
-
42
-
43
-
44
-
45
-
46
-
 47
47 -
 48
48 -
 49
49 -
 50
50 -
 51
51 -
 52
52 -
 53
53 -
 54
54 -
 55
55 -
 56
56 -
 57
57 -
58
-
59
-
60
-
61
-
62
-
63
-
64
-
65
-
66
-
67
-
68
-
69
-
70
-
71
-
72
-
73
-
74
-
75
-
76
-
77
-
78
-
79
-
80
-
81
-
82
 |
 |
