Marantz AV7005 AV7005 User Manual - English - Page 14
Calculation, Check, Store, Measurement - 12 audyssey
 |
View all Marantz AV7005 manuals
Add to My Manuals
Save this manual to your list of manuals |
Page 14 highlights
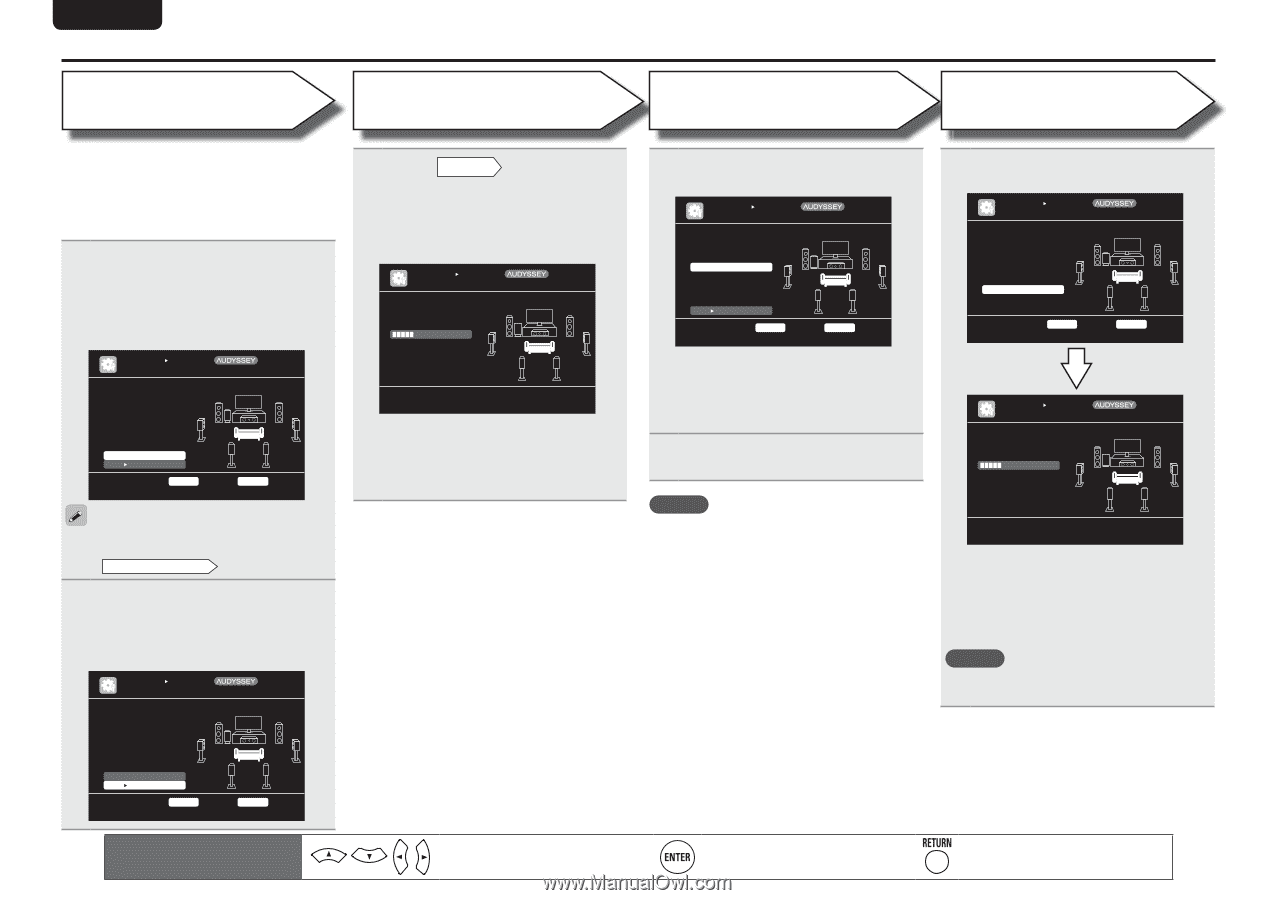
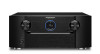
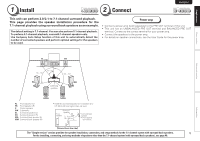
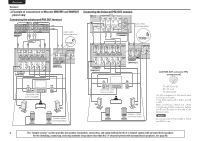
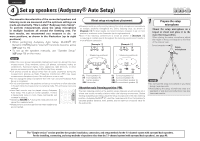
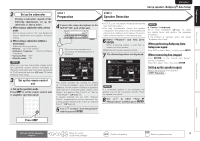
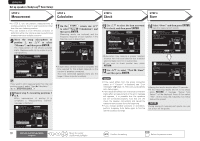
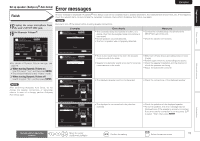
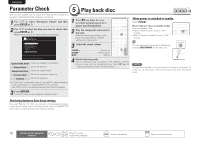
ENGLISH DEUTSCH FRANÇAIS Set up speakers (Audyssey® Auto Setup) ITALIANO STEP 3 Measurement STEP 4 Calculation ESPAÑOL NEDERLANDS SVENSKA STEP 5 Check STEP 6 Store • In STEP 3, you will perform measurements at multiple positions (two to eight positions) other than the main listening position. • You can achieve a more effective correction of distortion within the listening area by performing measurements at multiple positions. 9 Move the setup microphone to position 2, use ui to select "Measure", and then press ENTER. The measurement of the second position starts. Measurements can be made in up to eight positions. AUTO SETUP AUDYSSEY AUTO SETUP STEP3 Measurement Please place the microphone at ear height at 2nd listening position. MultEQ XT [3/6] Measure Next Calculation ENTER Enter RETURN Cancel Start next measurement. Test Tone will start 11 On the STEP3 screen, use ui to select "Next 1 Calculation", and then press ENTER. Measuring results are analyzed, and the frequency response of each speaker in the listening room is determined. AUTO SETUP AUDYSSEY AUTO SETUP STEP4 Calculation Now calculating... Please wait. MultEQ XT [4/6] 25% • Analysis takes several minutes to complete. The time required for this analysis depends on the number of speakers connected. The more connected speakers there are, the longer it takes to perform analysis. If you want to omit measurements from the next position onward, select "Next 1 Calculation". (Go to STEP4 Calculation ) 10 Repeat step 9, measuring positions 3 to 8. When measurement of position 8 is completed, a "Measurements finished." message is displayed. AUTO SETUP AUDYSSEY AUTO SETUP STEP3 Measurement Measurements finished. MultEQ XT [3/6] 12 Use ui to select the item you want to check, and then press ENTER. AUTO SETUP AUDYSSEY AUTO SETUP MultEQ XT STEP5 Check Check processing results. To proceed,press "Next" Spkr Config Check Distance Check Ch. Level Check Crossover Check [5/6] Next Store ENTER Enter Select item to check RETURN Cancel • Subwoofers may measure a greater reported distance than the actual distance due to added electrical delay common in subwoofers. • If you want to check another item, press RETURN. 13 Use ui to select "Next 1 Store" and then press ENTER. 14 Select "Store" and then press ENTER. Save the measurement results. AUTO SETUP AUDYSSEY AUTO SETUP STEP6 Store Press "Store" to store calculation results. MultEQ XT [6/6] Store ENTER Enter RETURN Cancel Apply and store measurement result AUTO SETUP AUDYSSEY AUTO SETUP STEP6 Store Now storing... Please wait. MultEQ XT 25% [6/6] NOTE • If the result differs from the actual connection status, or if "Caution!" is displayed, see "Error messages" (vpage 11). Then carry out Audyssey Auto Setup again. • If the result still differs from the actual connection status after remeasurement or the error message still appears, it is possible that the speakers are not connected properly. Turn this unit off, check the speaker connections and repeat the measurement process from the beginning. • If you change speaker positions or orientation, perform Audyssey Auto Setup again to find the optimal equalizer settings. • Saving the results requires about 10 seconds. • If the measuring results are not to be saved, press RETURN. A message "Cancel Auto Setup?" will be displayed. Press o then select "Yes". All the measured Audyssey Auto Setup data will be erased. NOTE During saving of measurement results, be sure not to turn off the power. Retry Next Calculation ENTER Enter Proceed to Step 4 (Analyze) RETURN Cancel 10 Remote control operation buttons Move the cursor (Up/Down/Left/Right) Confirm the setting Return to previous menu
-
 1
1 -
2
-
3
-
4
-
5
-
6
-
7
-
8
-
 9
9 -
 10
10 -
 11
11 -
 12
12 -
 13
13 -
 14
14 -
 15
15 -
 16
16 -
 17
17 -
 18
18 -
 19
19 -
20
-
21
-
22
-
23
-
24
-
25
-
26
-
27
-
28
-
29
-
30
-
31
-
32
-
33
-
34
-
35
-
36
-
37
-
38
-
39
-
40
-
41
-
42
-
43
-
44
-
45
-
46
-
47
-
48
-
49
-
50
-
51
-
52
-
53
-
54
-
55
-
56
-
57
-
58
-
59
-
60
-
61
-
62
-
63
-
64
-
65
-
66
-
67
-
68
-
69
-
70
-
71
-
72
-
73
-
74
-
75
-
76
-
77
-
78
-
79
-
80
-
81
-
82
-
83
-
84
-
85
-
86
-
87
-
88
-
89
-
90
-
91
-
92
-
93
-
94
-
95
-
96
-
97
-
98
-
99
-
100
-
101
-
102
-
103
-
104
-
105
-
106
-
107
-
108
-
109
-
110
-
111
-
112
-
113
-
114
-
115
-
116
-
117
-
118
-
119
-
120
-
121
-
122
-
123
-
124
-
125
-
126
-
127
-
128
 |
 |