Marantz AV7005 AV7005 User Manual - English - Page 71
Auto Preset, Preset Skip, Parental Lock
 |
View all Marantz AV7005 manuals
Add to My Manuals
Save this manual to your list of manuals |
Page 71 highlights
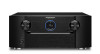
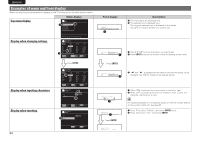
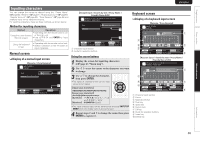
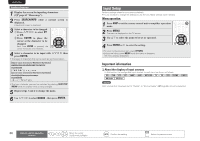
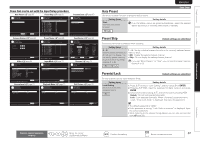
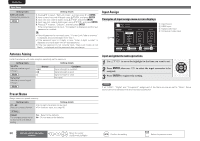
Simple version Basic version SVENSKA NEDERLANDS ESPAÑOL ITALIANO FRANÇAIS DEUTSCH ENGLISH Items that can be set with the Input Setup procedure Auto Preset (vpage 67) Preset Skip (vpage 67) Parental Lock (vpage 67) INPUT SETUP AUTO PRESET Start ENTER Enter Start the auto preset process RETURN Return Antenna Aiming (vpage 68) INPUT SETUP PRESET SKIP [1/7] Block A Block Presets A1 FM 87.50MHz A2 FM 87.90MHz A3 FM 89.10MHz A4 FM 93.30MHz A5 FM 97.90MHz A6 AM 98.10MHz A7 AM 98.90MHz A8 AM 100.10MHz Change memory blocks A ON ON ON ON ON ON ON ON ON RETURN Return Preset Name (vpage 68) INPUT SETUP PARENTAL LOCK Lock Setting Edit Lock Code Set a listening limit to any channel Input Assign (vpage 68) INPUT SETUP ANTENNA AIMING Satellite Terrestrial INPUT SETUP PRESET NAME Block A1 FM 87.50MHz A2 FM 87.90MHz A3 FM 89.10MHz A4 FM 93.30MHz A5 FM 97.90MHz A6 AM 98.10MHz A7 AM 98.90MHz A8 AM 100.10MHz [1/7] A [ ] [ ] [ ] [ ] [ ] [ ] [ ] [ ] INPUT SETUP INPUT ASSIGN Default [ HDMI ] BD DVD VCR SAT GAME AUX1 TV HDMI1 HDMI2 HDMI4 HDMI3 HDMI5 HDMI6 None [ DIGITAL ] None Coax1 None Coax2 None Opt3 Opt1 [ COMP ] 1-RCA 2-RCA 4-RCA 3-RCA None None None RETURN Return Adjust antenna position for best signal Video (vpage 69) INPUT SETUP VIDEO Change memory blocks RETURN Return Input Mode (vpage 71) INPUT SETUP INPUT MODE Select ENTER Enter RETURN Return Change HDMI input connector assignment Rename (vpage 71) INPUT SETUP RENAME Video Select Video Mode Video Convert i/p Scaler Resolution(Analog) Resolution(HDMI) Progressive Mode Aspect Source Auto ON Analog & HDMI Auto Auto Auto Full Input Mode Decode Mode Auto Auto DVD Default DVD Select desired video input source RETURN Return Source Level (vpage 71) INPUT SETUP SOURCE LEVEL RETURN Return Automatically detect input signal and playback Playback Mode (vpage 71) INPUT SETUP PLAYBACK MODE RETURN Return Still Picture (vpage 72) INPUT SETUP STILL PICTURE Analog Input 0dB Digital Input 0dB Repeat OFF Random OFF Slide Show Interval OFF 5sec RETURN Return Compensate analog audio input playback level Cancel repeat mode RETURN Return RETURN Return Display only the selected still picture image Auto Preset Input Setup Use the auto preset function to program radio stations. Setting items Start Start the auto preset process. Setting details If an FM station cannot be preset automatically, select the desired station by tuning it in manually, then preset it manually. HD Radio Preset Skip Default settings are underlined. Set preset channel to be skipped when selecting. Setting items A - G Set the preset channels you do not want to display. You can set by preset memory block (A to G) or by preset channel (1 to 8). SIRIUS HD Radio Setting details 1 - 8 : Set by individual preset channels in the currently selected preset memory block. • ON : Display the selected preset channel. • Skip : Do not display the selected preset channel. If you set "Block Presets" to "Skip", you can skip the preset memory blocks (A to G). Parental Lock Default settings are underlined. For any channel, set the radio reception limits. Setting items Lock Setting Set the channel radio reception limits. SIRIUS Setting details 1. Press ui to select "Lock Setting", and then press p or ENTER. 2. Pressing uio p, input the password (4 digits number) and press ENTER. 3. Select channel by pressing ui, and set the lock by pressing o p. Unlock : Do not lock selected channel(s). Lock : Lock selected channel(s). When a Parental Locked channel is tuned, "Enter Lock Code" is displayed, then input the password. • The default password is "0000". • If the password is wrong, "Lock Code is incorrect" is displayed. Input the correct password. • While listening to the channel being played, you can also set parental lock (vpage 32). Advanced version Information Remote control operation buttons Move the cursor (Up/Down/Left/Right) Confirm the setting Return to previous menu 67
-
 1
1 -
2
-
3
-
4
-
5
-
6
-
7
-
8
-
9
-
10
-
11
-
12
-
13
-
14
-
15
-
16
-
17
-
18
-
19
-
20
-
21
-
22
-
23
-
24
-
25
-
26
-
27
-
28
-
29
-
30
-
31
-
32
-
33
-
34
-
35
-
36
-
37
-
38
-
39
-
40
-
41
-
42
-
43
-
44
-
45
-
46
-
47
-
48
-
49
-
50
-
51
-
52
-
53
-
54
-
55
-
56
-
57
-
58
-
59
-
60
-
61
-
62
-
63
-
64
-
65
-
 66
66 -
 67
67 -
 68
68 -
 69
69 -
 70
70 -
 71
71 -
 72
72 -
 73
73 -
 74
74 -
 75
75 -
 76
76 -
77
-
78
-
79
-
80
-
81
-
82
-
83
-
84
-
85
-
86
-
87
-
88
-
89
-
90
-
91
-
92
-
93
-
94
-
95
-
96
-
97
-
98
-
99
-
100
-
101
-
102
-
103
-
104
-
105
-
106
-
107
-
108
-
109
-
110
-
111
-
112
-
113
-
114
-
115
-
116
-
117
-
118
-
119
-
120
-
121
-
122
-
123
-
124
-
125
-
126
-
127
-
128
 |
 |