Netgear WNR1000v3 User Manual - Page 121
Restoring the Default Configuration and Password, admin, password - router password reset
 |
View all Netgear WNR1000v3 manuals
Add to My Manuals
Save this manual to your list of manuals |
Page 121 highlights
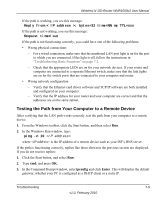
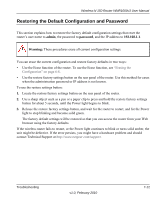
Wireless-N 150 Router WNR1000v3 User Manual Restoring the Default Configuration and Password This section explains how to restore the factory default configuration settings that reset the router's user name to admin, the password to password, and the IP address to 192.168.1.1. Warning: These procedures erase all current configuration settings. You can erase the current configuration and restore factory defaults in two ways: • Use the Erase function of the router. To use the Erase function, see "Erasing the Configuration" on page 6-8. • Use the restore factory settings button on the rear panel of the router. Use this method for cases when the administration password or IP address is not known. To use the restore settings button: 1. Locate the restore factory settings button on the rear panel of the router. 2. Use a sharp object such as a pen or a paper clip to press and hold the restore factory settings button for about 5 seconds, until the Power light begins to blink. 3. Release the restore factory settings button, and wait for the router to restart, and for the Power light to stop blinking and become solid green. The factory default settings will be restored so that you can access the router from your Web browser using the factory defaults. If the wireless router fails to restart, or the Power light continues to blink or turns solid amber, the unit might be defective. If the error persists, you might have a hardware problem and should contact Technical Support at http://www.netgear.com/support. Troubleshooting v1.0, February 2010 7-12
-
 1
1 -
2
-
3
-
4
-
5
-
6
-
7
-
8
-
9
-
10
-
11
-
12
-
13
-
14
-
15
-
16
-
17
-
18
-
19
-
20
-
21
-
22
-
23
-
24
-
25
-
26
-
27
-
28
-
29
-
30
-
31
-
32
-
33
-
34
-
35
-
36
-
37
-
38
-
39
-
40
-
41
-
42
-
43
-
44
-
45
-
46
-
47
-
48
-
49
-
50
-
51
-
52
-
53
-
54
-
55
-
56
-
57
-
58
-
59
-
60
-
61
-
62
-
63
-
64
-
65
-
66
-
67
-
68
-
69
-
70
-
71
-
72
-
73
-
74
-
75
-
76
-
77
-
78
-
79
-
80
-
81
-
82
-
83
-
84
-
85
-
86
-
87
-
88
-
89
-
90
-
91
-
92
-
93
-
94
-
95
-
96
-
97
-
98
-
99
-
100
-
101
-
102
-
103
-
104
-
105
-
106
-
107
-
108
-
109
-
110
-
111
-
112
-
113
-
114
-
115
-
 116
116 -
 117
117 -
 118
118 -
 119
119 -
 120
120 -
 121
121 -
 122
122 -
 123
123 -
 124
124 -
 125
125 -
 126
126 -
127
-
128
-
129
-
130
 |
 |