Netgear WNR1000v3 User Manual - Page 40
Using Push 'N' Connect (Wi-Fi Protected Setup), Push Button Configuration - setup manual
 |
View all Netgear WNR1000v3 manuals
Add to My Manuals
Save this manual to your list of manuals |
Page 40 highlights
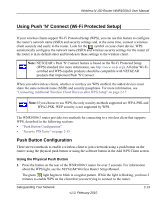
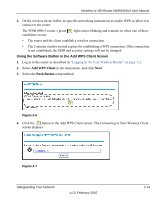
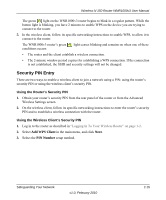
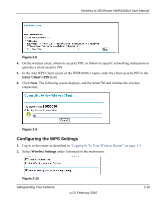
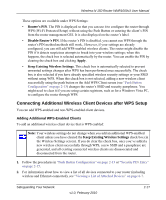
Wireless-N 150 Router WNR1000v3 User Manual . Using Push 'N' Connect (Wi-Fi Protected Setup) If your wireless clients support Wi-Fi Protected Setup (WPS), you can use this feature to configure the router's network name (SSID) and security settings and, at the same time, connect a wireless client securely and easily to the router. Look for the symbol on your client device. WPS automatically configures the network name (SSID) and wireless security settings for the router (if the router is in its default state) and broadcasts these settings to the wireless client. Note: NETGEAR's Push 'N' Connect feature is based on the Wi-Fi Protected Setup (WPS) standard (for more information, see http://www.wi-fi.org). All other Wi-Ficertified and WPS-capable products should be compatible with NETGEAR products that implement Push 'N' Connect. When you add wireless clients, whether or not they are WPS enabled, the added devices must share the same network name (SSID) and security passphrase. For more information, see "Connecting Additional Wireless Client Devices after WPS Setup" on page 2-17. Note: If you choose to use WPS, the only security methods supported are WPA-PSK and WPA2-PSK. WEP security is not supported by WPS. The WNR1000v3 router provides two methods for connecting to a wireless client that supports WPS, described in the following sections: • "Push Button Configuration" • "Security PIN Entry" on page 2-15 Push Button Configuration There are two methods to enable a wireless client to join a network using a push button on the router: using the physical push button or using the software button in the Add WPS Client screen. Using the Physical Push Button 1. Press the button on the rear of the WNR1000v3 router for over 5 seconds. For information about the WPS light, see the NETGEAR Wireless Router Setup Manual. The green light begins to blink in a regular pattern. While the light is blinking, you have 2 minutes to enable WPS on the client that you are trying to connect to the router. Safeguarding Your Network v1.0, February 2010 2-13
-
 1
1 -
2
-
3
-
4
-
5
-
6
-
7
-
8
-
9
-
10
-
11
-
12
-
13
-
14
-
15
-
16
-
17
-
18
-
19
-
20
-
21
-
22
-
23
-
24
-
25
-
26
-
27
-
28
-
29
-
30
-
31
-
32
-
33
-
34
-
 35
35 -
 36
36 -
 37
37 -
 38
38 -
 39
39 -
 40
40 -
 41
41 -
 42
42 -
 43
43 -
 44
44 -
 45
45 -
46
-
47
-
48
-
49
-
50
-
51
-
52
-
53
-
54
-
55
-
56
-
57
-
58
-
59
-
60
-
61
-
62
-
63
-
64
-
65
-
66
-
67
-
68
-
69
-
70
-
71
-
72
-
73
-
74
-
75
-
76
-
77
-
78
-
79
-
80
-
81
-
82
-
83
-
84
-
85
-
86
-
87
-
88
-
89
-
90
-
91
-
92
-
93
-
94
-
95
-
96
-
97
-
98
-
99
-
100
-
101
-
102
-
103
-
104
-
105
-
106
-
107
-
108
-
109
-
110
-
111
-
112
-
113
-
114
-
115
-
116
-
117
-
118
-
119
-
120
-
121
-
122
-
123
-
124
-
125
-
126
-
127
-
128
-
129
-
130
 |
 |