Netgear WNR1000v3 User Manual - Page 44
Connecting Additional Wireless Client Devices after WPS Setup, Router's PIN, Disable Router's PIN - not working
 |
View all Netgear WNR1000v3 manuals
Add to My Manuals
Save this manual to your list of manuals |
Page 44 highlights
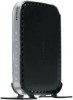
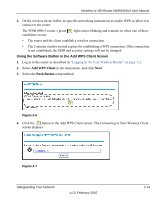
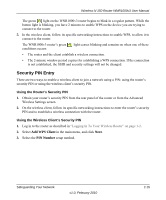
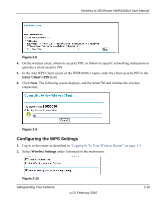
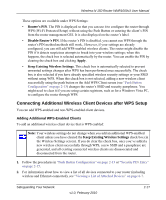
Wireless-N 150 Router WNR1000v3 User Manual These options are available under WPS Settings: • Router's PIN. The PIN is displayed so that you can use it to configure the router through WPS (Wi-Fi Protected Setup) without using the Push Button or entering the client's PIN from the router management GUI. It is also displayed on the router's label. • Disable Router's PIN. If the router's PIN is disabled, you cannot run WPS through the router's PIN method.methods still work,. However, if your settings are already configured, you can still add WPS-enabled wireless clients. The router might disable the PIN if it detects suspicious attempts to break into your wireless settings; when this happens, the check box is selected automatically by the router. You can enable the PIN by clearing the check box and clicking Apply. • Keep Existing Wireless Settings. This check box is automatically selected to prevent unwanted settings changes after WPS has been performed once successfully. The check box is also selected if you have already specified wireless security settings or your SSID without using WPS. When this check box is not selected, adding a new wireless client successfully using the push button or the Add WPS Client screen (see "Push Button Configuration" on page 2-13) changes the router's SSID and security passphrase. You might need to clear it if you are using certain registrars, such as for a Windows Vista PC, to configure the router through WPS. Connecting Additional Wireless Client Devices after WPS Setup You can add WPS-enabled and non-WPS-enabled client devices. Adding Additional WPS-Enabled Clients To add an additional wireless client device that is WPS enabled: Note: Your wireless settings do not change when you add an additional WPS-enabled client unless you have cleared the Keep Existing Wireless Settings check box (in the Wireless Settings screen). If you do clear the check box, once you've added a new wireless client successfully through WPS, a new SSID and a passphrase are generated, and all existing connected wireless clients are disassociated and disconnected from the router. 1. Follow the procedures in "Push Button Configuration" on page 2-13 or "Security PIN Entry" on page 2-15. 2. For information about how to view a list of all devices connected to your router (including wireless and Ethernet-connected), see "Viewing a List of Attached Devices" on page 6-7. Safeguarding Your Network v1.0, February 2010 2-17
-
 1
1 -
2
-
3
-
4
-
5
-
6
-
7
-
8
-
9
-
10
-
11
-
12
-
13
-
14
-
15
-
16
-
17
-
18
-
19
-
20
-
21
-
22
-
23
-
24
-
25
-
26
-
27
-
28
-
29
-
30
-
31
-
32
-
33
-
34
-
35
-
36
-
37
-
38
-
 39
39 -
 40
40 -
 41
41 -
 42
42 -
 43
43 -
 44
44 -
 45
45 -
 46
46 -
 47
47 -
 48
48 -
 49
49 -
50
-
51
-
52
-
53
-
54
-
55
-
56
-
57
-
58
-
59
-
60
-
61
-
62
-
63
-
64
-
65
-
66
-
67
-
68
-
69
-
70
-
71
-
72
-
73
-
74
-
75
-
76
-
77
-
78
-
79
-
80
-
81
-
82
-
83
-
84
-
85
-
86
-
87
-
88
-
89
-
90
-
91
-
92
-
93
-
94
-
95
-
96
-
97
-
98
-
99
-
100
-
101
-
102
-
103
-
104
-
105
-
106
-
107
-
108
-
109
-
110
-
111
-
112
-
113
-
114
-
115
-
116
-
117
-
118
-
119
-
120
-
121
-
122
-
123
-
124
-
125
-
126
-
127
-
128
-
129
-
130
 |
 |