Nikon COOLPIX L610 Reference Manual - Page 173
Slide Show, Print Date
 |
View all Nikon COOLPIX L610 manuals
Add to My Manuals
Save this manual to your list of manuals |
Page 173 highlights
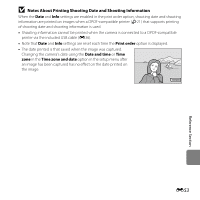
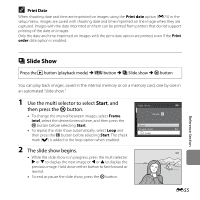
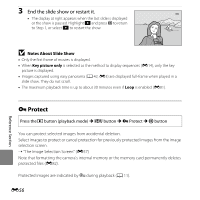
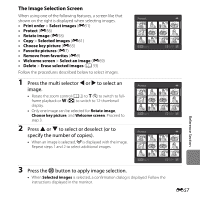
C Print Date When shooting date and time are imprinted on images using the Print date option (E75) in the setup menu, images are saved with shooting date and time imprinted on the image when they are captured. Images with the date imprinted on them can be printed from printers that do not support printing of the date on images. Only the date and time imprinted on images with the print date option are printed, even if the Print order date option is enabled. Reference Section b Slide Show Press the c button (playback mode) M d button M b Slide show M k button You can play back images, saved in the internal memory or on a memory card, one by one in an automated "slide show." 1 Use the multi selector to select Start, and then press the k button. Slide show • To change the interval between images, select Frame Pause intvl, select the desired interval time, and then press the k button before selecting Start. Start • To repeat the slide show automatically, select Loop and Frame intvl 3s then press the k button before selecting Start. The check Loop mark (w) is added to the loop option when enabled. 2 The slide show begins. • While the slide show is in progress, press the multi selector K or I to display the next image or J or H to display the previous image. Hold down either button to fast forward or rewind. • To end or pause the slide show, press the k button. E55
-
 1
1 -
2
-
3
-
4
-
5
-
6
-
7
-
8
-
9
-
10
-
11
-
12
-
13
-
14
-
15
-
16
-
17
-
18
-
19
-
20
-
21
-
22
-
23
-
24
-
25
-
26
-
27
-
28
-
29
-
30
-
31
-
32
-
33
-
34
-
35
-
36
-
37
-
38
-
39
-
40
-
41
-
42
-
43
-
44
-
45
-
46
-
47
-
48
-
49
-
50
-
51
-
52
-
53
-
54
-
55
-
56
-
57
-
58
-
59
-
60
-
61
-
62
-
63
-
64
-
65
-
66
-
67
-
68
-
69
-
70
-
71
-
72
-
73
-
74
-
75
-
76
-
77
-
78
-
79
-
80
-
81
-
82
-
83
-
84
-
85
-
86
-
87
-
88
-
89
-
90
-
91
-
92
-
93
-
94
-
95
-
96
-
97
-
98
-
99
-
100
-
101
-
102
-
103
-
104
-
105
-
106
-
107
-
108
-
109
-
110
-
111
-
112
-
113
-
114
-
115
-
116
-
117
-
118
-
119
-
120
-
121
-
122
-
123
-
124
-
125
-
126
-
127
-
128
-
129
-
130
-
131
-
132
-
133
-
134
-
135
-
136
-
137
-
138
-
139
-
140
-
141
-
142
-
143
-
144
-
145
-
146
-
147
-
148
-
149
-
150
-
151
-
152
-
153
-
154
-
155
-
156
-
157
-
158
-
159
-
160
-
161
-
162
-
163
-
164
-
165
-
166
-
167
-
 168
168 -
 169
169 -
 170
170 -
 171
171 -
 172
172 -
 173
173 -
 174
174 -
 175
175 -
 176
176 -
 177
177 -
 178
178 -
179
-
180
-
181
-
182
-
183
-
184
-
185
-
186
-
187
-
188
-
189
-
190
-
191
-
192
-
193
-
194
-
195
-
196
-
197
-
198
-
199
-
200
-
201
-
202
-
203
-
204
-
205
-
206
-
207
-
208
-
209
-
210
-
211
-
212
-
213
-
214
-
215
-
216
-
217
-
218
-
219
-
220
-
221
-
222
-
223
-
224
-
225
-
226
-
227
-
228
-
229
-
230
-
231
-
232
-
233
-
234
-
235
-
236
-
237
-
238
-
239
-
240
-
241
-
242
-
243
-
244
-
245
-
246
-
247
-
248
-
249
-
250
-
251
-
252
 |
 |
