Oki ML591 Troy Etherwind 802.11b Print Server Users Guide - Page 12
Connecting the EtherWind to an RS-232 Serial Device, Transmit Data
 |
View all Oki ML591 manuals
Add to My Manuals
Save this manual to your list of manuals |
Page 12 highlights
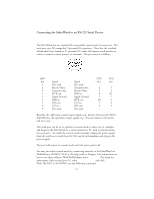
Connecting the EtherWind to an RS-232 Serial Device Note: Skip this section if you are not using the EtherWind serial port. The EtherWind has one standard PC-compatible 9-pin female D-connectors. The serial port uses PC-compatible 9-pin male D-connectors. Note that the standard off-the-shelf 9-pin female to 25-pin male PC cables will require a null modem in order to connect to most printers or terminals. The pin-outs are as follows: DB9 pin Signal 1 Not used 2 Receive Data 3 Transmit Data 4 DTR out 5 Signal Ground 6 DSR in 7 RTS out 8 CTS in 9 Not used Signal Not used Transmit Data Receive Data DSR in Signal Ground DTR out CTS in RTS out Not used DTE pin 2 3 6 7 20 5 4 - DCE pin 3 2 20 7 6 4 5 - Basically, the cable must connect input signals (e.g., Receive Data) on the TROY EtherWind to the equivalent output signals (e.g., Transmit Data) on the device and vice-versa. The serial port can be set to operate in console mode to allow you to configure and diagnose the EtherWind via a serial terminal (or PC with a terminal emulation program). To enable the console mode manually, unplug the power supply from the serial server, hold down the Test switch and simultaneously plug in the power supply. The port will remain in console mode until the unit is power off. You may also nable console mode by connecting remotely to the EtherWind via WebXAdmin, TELNET, NCP, or XConfig (refer to Chapter 3 for information on how to use these utilities). With WebXAdmin, select Configure Port from the main menu, click on serial port S1, select Console Mode, and click Submit. With TELNET or XCONFIG, use the following command: 1-4
-
 1
1 -
2
-
3
-
4
-
5
-
6
-
 7
7 -
 8
8 -
 9
9 -
 10
10 -
 11
11 -
 12
12 -
 13
13 -
 14
14 -
 15
15 -
 16
16 -
 17
17 -
18
-
19
-
20
-
21
-
22
-
23
-
24
-
25
-
26
-
27
-
28
-
29
-
30
-
31
-
32
-
33
-
34
-
35
-
36
-
37
-
38
-
39
-
40
-
41
-
42
-
43
-
44
-
45
-
46
-
47
-
48
-
49
-
50
-
51
-
52
-
53
-
54
-
55
-
56
-
57
-
58
-
59
-
60
 |
 |