Oki ML591 Troy Etherwind 802.11b Print Server Users Guide - Page 30
Start, Programs, IPX/SPX, Filters, Devices, Search, Active Devices, ACCESS, NetWare P1, Queue Server
 |
View all Oki ML591 manuals
Add to My Manuals
Save this manual to your list of manuals |
Page 30 highlights
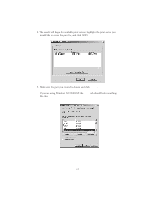
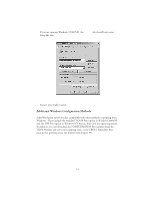
2. Click Start, select Programs, select the XAdmin32 folder, and then select XAdmin32. 3. Click on the IPX/SPX icon under Filters to set the operating mode to IPX/SPX (TCP/IP mode will not allow you to configure NetWare print queues directly). The EtherWind should appear in the list of available printers. If it does not, try selecting Devices from the menu bar and then Search Active Devices. 4. Double click the printer you want to configure, enter the configuration password (ACCESS is the default), and click OK. 5. A series of index card tabs will be displayed. Click on the NetWare P1 tab. 6. If it is not already selected, select Queue Server as the operating mode. 7. Click on the inverted triangle button and select the NDS tree. 8. Click the Change... button to select the NDS context where the queue will reside. (If you are using the Microsoft client, you must type in the name of the context.) The box labeled "Print Server" contains the name of the NetWare Print Server. If you are configuring any other port, this box contains the name of the NDS Printer. If desired, you can change these names. You may now create a print queue. Follow these steps: 1. Click on the Change NDS Queues... button to configure an NDS print queue or click the Change Bindery Queues... to configure a bindery mode queue. 2. Two windows will appear: Available Print Queues and Serviced Print Queues. Go to the Available Print Queues window. 3. If you are configuring an NDS queue, click on the context where the print queue will reside. 4. If you are configuring a bindery queue, click on the volume where the queue will reside (a volume name will have a file server icon next to it). 6-2
-
 1
1 -
2
-
3
-
4
-
5
-
6
-
7
-
8
-
9
-
10
-
11
-
12
-
13
-
14
-
15
-
16
-
17
-
18
-
19
-
20
-
21
-
22
-
23
-
24
-
 25
25 -
 26
26 -
 27
27 -
 28
28 -
 29
29 -
 30
30 -
 31
31 -
 32
32 -
 33
33 -
 34
34 -
 35
35 -
36
-
37
-
38
-
39
-
40
-
41
-
42
-
43
-
44
-
45
-
46
-
47
-
48
-
49
-
50
-
51
-
52
-
53
-
54
-
55
-
56
-
57
-
58
-
59
-
60
 |
 |