Oki ML591 Troy Etherwind 802.11b Print Server Users Guide - Page 31
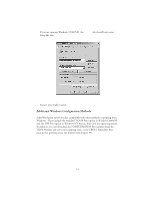
New Queue, Queue, Browse, Available Print Queues, Serviced Print Queues, Close, NDS Browse, Tools
 |
View all Oki ML591 manuals
Add to My Manuals
Save this manual to your list of manuals |
Page 31 highlights
5. Click on New Queue. Enter any unique name for the Queue name. If you are configuring a bindery queue, click OK and proceed to step 8. If you are configuring an NDS queue, click Browse, select the file server volume where you want the queue to reside (a volume name will have a file server icon next to it), and click OK. 6. The queue name will now appear in the Available Print Queues under the selected volume (for bindery mode) or in the selected context (for NDS mode). Click on the desired queue and click Add. The name will now appear in the Serviced Print Queues window. 7. Click Close and then OK. You can now use the print queue from your NetWare workstation. If you want to configure additional queues and ports, you must use the Novell NWAdmin utility (this program is usually found in the Public directory on the NetWare file server). Follow these steps: 1. Start the NWAdmin utility and make sure you are in the right context. (If not, select NDS Browser from the Tools menu and then browse for the desired context.) 2. Select the container where you want the print queue to reside. 3. Select Print Services Quick Setup from the Tools menu. 4. Browse for the NetWare Print Server by clicking on the button next to the Print Server Name window. 5. Enter the name of the NDS Printer for the desired port in the Name box (for example, XCD_04ECBA_P1). 6. The Type box should be left at the default Parallel setting. 7. Select the desired banner type. 8. Enter any desired name for the print queue. 9. If necessary, browse for the volume. 10. Click Create to create the print queue. You are now ready to use the queue from a NetWare workstation. 6-3
-
 1
1 -
2
-
3
-
4
-
5
-
6
-
7
-
8
-
9
-
10
-
11
-
12
-
13
-
14
-
15
-
16
-
17
-
18
-
19
-
20
-
21
-
22
-
23
-
24
-
25
-
 26
26 -
 27
27 -
 28
28 -
 29
29 -
 30
30 -
 31
31 -
 32
32 -
 33
33 -
 34
34 -
 35
35 -
 36
36 -
37
-
38
-
39
-
40
-
41
-
42
-
43
-
44
-
45
-
46
-
47
-
48
-
49
-
50
-
51
-
52
-
53
-
54
-
55
-
56
-
57
-
58
-
59
-
60
 |
 |
