Oki ML591 Troy Etherwind 802.11b Print Server Users Guide - Page 17
Installing the Software, Install TROY EtherWind, Utilities
 |
View all Oki ML591 manuals
Add to My Manuals
Save this manual to your list of manuals |
Page 17 highlights
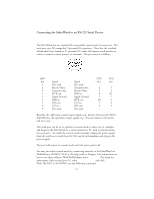
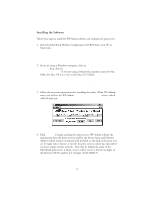
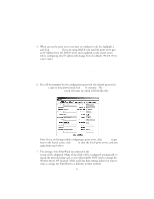
Installing the Software Follow these steps to install the WP-Admin software and configure the print server. 1. Insert the EtherWind Wireless Configuration CD-ROM into your PC or Macintosh. Note: There is also a Linux version of the WP-Admin utility available on the TROY website (www.troygroup.com). 2. If you are using a Windows computer, click on Install TROY EtherWind Utilities, then click on Install EtherWind Configuration Utilities and Printing Software. If you are using a Macintosh computer, open the Mac folder (for Mac OS 8.x or 9.x) or the Mac OS X folder. Note: If you are using Windows and don't have the Java Runtime installed on your system, you will be prompted to install it, click Continue. 3. Follow the on-screen instructions for installing the utility. When WP-Admin starts, you will see the WP-Admin Wireless Server Search screen, which will look like this: 4. Click START to begin searching for print servers. WP-Admin will get the information from the print server(s) and list the Server Name and Ethernet Address (which should correspond with the label on the back of the print server). It might take a minute or two for the print server to show up, especially if you have a large wireless network. Note that by default the name of the EtherWind print server is XCD_xxxxxx, where xxxxxx is the last six digits of the Ethernet (MAC) address (for example, XCD_08B2C7). 2-3
-
 1
1 -
2
-
3
-
4
-
5
-
6
-
7
-
8
-
9
-
10
-
11
-
 12
12 -
 13
13 -
 14
14 -
 15
15 -
 16
16 -
 17
17 -
 18
18 -
 19
19 -
 20
20 -
 21
21 -
 22
22 -
23
-
24
-
25
-
26
-
27
-
28
-
29
-
30
-
31
-
32
-
33
-
34
-
35
-
36
-
37
-
38
-
39
-
40
-
41
-
42
-
43
-
44
-
45
-
46
-
47
-
48
-
49
-
50
-
51
-
52
-
53
-
54
-
55
-
56
-
57
-
58
-
59
-
60
 |
 |
