Oki ML591 Troy Etherwind 802.11b Print Server Users Guide - Page 18
Wireless Mode, RF Channel, SSID, and Data Rate settings unless you want to, Con access
 |
View all Oki ML591 manuals
Add to My Manuals
Save this manual to your list of manuals |
Page 18 highlights
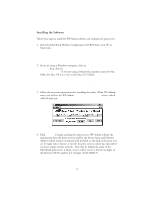
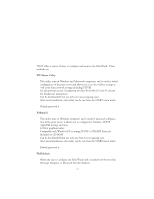
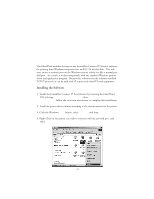
Note: If you don't see the print server in the list, hold down the button for more than 5 seconds to reset it to factory defaults and try the search again. If you still don't see it, check the troubleshooting section (chapter 11). 5. When you see the print server you want to configure in the list, highlight it and click Configure. If you are using DHCP, wait until the print server gets an IP Address from the DHCP server and is updated on the search screen before configuring (the IP address will change from the default 192.0.0.192 to a new value). Note: If the wireless signal is less than 50% on the search screen, printing performance could be affected. To improve the signal strength, try moving the print server closer to the computer or access point and away from other radio devices such as BluetoothTM wireless devices, microwave ovens, or cordless phones. 6. You will be prompted for the configuration password (the default password is access), type in the password and click OK to continue. The Wireless Server Configuration screen will come up which will look like this: Note: If you are having trouble configuring a print server, click Cancel to get back to the Search screen, click Clear to clear the list of print servers, and start again from step 4 above. 7. The settings of the EtherWind you selected in the Wireless Server Search screen will be displayed. Many of the fields will be configured automatically to match the network being used, so you will probably NOT need to change the Wireless Mode, RF Channel, SSID, and Data Rate settings unless you want to want to change the EtherWind to a different wireless network. 2-4
-
 1
1 -
2
-
3
-
4
-
5
-
6
-
7
-
8
-
9
-
10
-
11
-
12
-
 13
13 -
 14
14 -
 15
15 -
 16
16 -
 17
17 -
 18
18 -
 19
19 -
 20
20 -
 21
21 -
 22
22 -
 23
23 -
24
-
25
-
26
-
27
-
28
-
29
-
30
-
31
-
32
-
33
-
34
-
35
-
36
-
37
-
38
-
39
-
40
-
41
-
42
-
43
-
44
-
45
-
46
-
47
-
48
-
49
-
50
-
51
-
52
-
53
-
54
-
55
-
56
-
57
-
58
-
59
-
60
 |
 |
