Olympus C 4000 C-4000 Zoom Reference Manual (8.2 MB) - Page 109
Exposure compensation, ISO sensitivity Cont. - standard
 |
View all Olympus C 4000 manuals
Add to My Manuals
Save this manual to your list of manuals |
Page 109 highlights
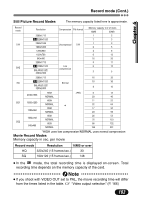
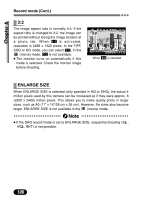
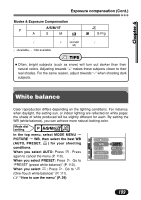
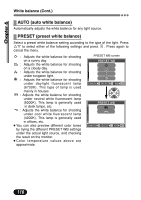
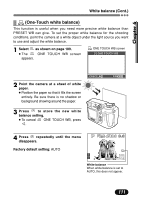
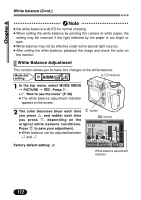
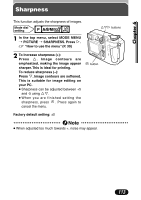
Chapter 6 ISO sensitivity (Cont.) Note ● Higher ISO settings can produce more electrical noise. ● ISO is standardized based on the sensitivity of normal camera film. The scale is approximate. ● When ISO is set to AUTO and you are shooting in dark conditions without a flash, ISO automatically increases; otherwise the shutter speed will be reduced, possibly resulting in blurred images due to camera movement. ● If a subject is too far away for the flash illumination to reach it when the ISO is set to AUTO, the ISO is automatically increased. ● When using slow synchronization in the P, A or S mode, the slowest available shutter speed varies depending on the ISO setting. Exposure compensation This function allows you to make fine changes to the present exposure setting. In some situations, you may get better results when the exposure that the camera sets is compensated (adjusted) manually. You can adjust between +/-2.0 in 1/3 steps. When the setting is changed, you can check the result on the monitor. Mode dial setting Éíbuttons É Adjusts towards - (images become darker) í Adjusts towards + (images become brighter) - 2.0 108 0.0 (Factory default setting) + 2.0
-
 1
1 -
2
-
3
-
4
-
5
-
6
-
7
-
8
-
9
-
10
-
11
-
12
-
13
-
14
-
15
-
16
-
17
-
18
-
19
-
20
-
21
-
22
-
23
-
24
-
25
-
26
-
27
-
28
-
29
-
30
-
31
-
32
-
33
-
34
-
35
-
36
-
37
-
38
-
39
-
40
-
41
-
42
-
43
-
44
-
45
-
46
-
47
-
48
-
49
-
50
-
51
-
52
-
53
-
54
-
55
-
56
-
57
-
58
-
59
-
60
-
61
-
62
-
63
-
64
-
65
-
66
-
67
-
68
-
69
-
70
-
71
-
72
-
73
-
74
-
75
-
76
-
77
-
78
-
79
-
80
-
81
-
82
-
83
-
84
-
85
-
86
-
87
-
88
-
89
-
90
-
91
-
92
-
93
-
94
-
95
-
96
-
97
-
98
-
99
-
100
-
101
-
102
-
103
-
 104
104 -
 105
105 -
 106
106 -
 107
107 -
 108
108 -
 109
109 -
 110
110 -
 111
111 -
 112
112 -
 113
113 -
 114
114 -
115
-
116
-
117
-
118
-
119
-
120
-
121
-
122
-
123
-
124
-
125
-
126
-
127
-
128
-
129
-
130
-
131
-
132
-
133
-
134
-
135
-
136
-
137
-
138
-
139
-
140
-
141
-
142
-
143
-
144
-
145
-
146
-
147
-
148
-
149
-
150
-
151
-
152
-
153
-
154
-
155
-
156
-
157
-
158
-
159
-
160
-
161
-
162
-
163
-
164
-
165
-
166
-
167
-
168
-
169
-
170
-
171
-
172
-
173
-
174
-
175
-
176
-
177
-
178
-
179
-
180
-
181
-
182
-
183
-
184
-
185
-
186
-
187
-
188
-
189
-
190
-
191
-
192
-
193
-
194
-
195
-
196
-
197
-
198
-
199
-
200
-
201
-
202
-
203
-
204
-
205
-
206
-
207
-
208
-
209
-
210
-
211
-
212
-
213
-
214
-
215
-
216
-
217
-
218
-
219
-
220
-
221
-
222
-
223
-
224
-
225
-
226
-
227
-
228
-
229
-
230
-
231
-
232
-
233
-
234
-
235
-
236
-
237
-
238
-
239
-
240
-
241
-
242
-
243
-
244
-
245
 |
 |
