Olympus C 4000 C-4000 Zoom Reference Manual (8.2 MB) - Page 85
Metering modes, Metering the subject brightness Cont., button. The subject
 |
View all Olympus C 4000 manuals
Add to My Manuals
Save this manual to your list of manuals |
Page 85 highlights
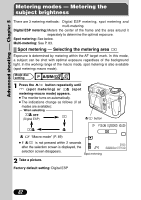
Chapter 5 Metering modes - Metering the subject brightness (Cont.) ∑ Using multi-metering 1 Point the AF target mark where you want to meter the exposure. Press the button. The subject's brightness can be metered at up to 8 different points. HQ ● A metering bar appears on the monitor. ● Brightness meter readings are ignored after the 9th reading. ● To cancel the locked multi-metering exposure, hold down over 1 second to display MEMO . Press it again and release it quickly. 2 Take a picture. e.g. : When metering 2 points (pressing twice). The average values for the aperture and shutter speed as calculated by metering 2 points. These values are recalculated every time another metering point is added. indicates the average for the 2 metering points. The average is always shown at the center of the bar. HQ The reading with pressed. ࡗindicates the number of times you have pressed the button ࡗindicates the difference between the metered and average readings. ᮢ indicates how much the present exposure you are metering is different from the average exposure value. The present exposure can be fixed by pressing the shutter button halfway down. (The present exposure is not added to the average value unless you press .) When ࡗ moves ±3 far from the center of the bar (the average reading), the red Éí appears. 84
-
 1
1 -
2
-
3
-
4
-
5
-
6
-
7
-
8
-
9
-
10
-
11
-
12
-
13
-
14
-
15
-
16
-
17
-
18
-
19
-
20
-
21
-
22
-
23
-
24
-
25
-
26
-
27
-
28
-
29
-
30
-
31
-
32
-
33
-
34
-
35
-
36
-
37
-
38
-
39
-
40
-
41
-
42
-
43
-
44
-
45
-
46
-
47
-
48
-
49
-
50
-
51
-
52
-
53
-
54
-
55
-
56
-
57
-
58
-
59
-
60
-
61
-
62
-
63
-
64
-
65
-
66
-
67
-
68
-
69
-
70
-
71
-
72
-
73
-
74
-
75
-
76
-
77
-
78
-
79
-
 80
80 -
 81
81 -
 82
82 -
 83
83 -
 84
84 -
 85
85 -
 86
86 -
 87
87 -
 88
88 -
 89
89 -
 90
90 -
91
-
92
-
93
-
94
-
95
-
96
-
97
-
98
-
99
-
100
-
101
-
102
-
103
-
104
-
105
-
106
-
107
-
108
-
109
-
110
-
111
-
112
-
113
-
114
-
115
-
116
-
117
-
118
-
119
-
120
-
121
-
122
-
123
-
124
-
125
-
126
-
127
-
128
-
129
-
130
-
131
-
132
-
133
-
134
-
135
-
136
-
137
-
138
-
139
-
140
-
141
-
142
-
143
-
144
-
145
-
146
-
147
-
148
-
149
-
150
-
151
-
152
-
153
-
154
-
155
-
156
-
157
-
158
-
159
-
160
-
161
-
162
-
163
-
164
-
165
-
166
-
167
-
168
-
169
-
170
-
171
-
172
-
173
-
174
-
175
-
176
-
177
-
178
-
179
-
180
-
181
-
182
-
183
-
184
-
185
-
186
-
187
-
188
-
189
-
190
-
191
-
192
-
193
-
194
-
195
-
196
-
197
-
198
-
199
-
200
-
201
-
202
-
203
-
204
-
205
-
206
-
207
-
208
-
209
-
210
-
211
-
212
-
213
-
214
-
215
-
216
-
217
-
218
-
219
-
220
-
221
-
222
-
223
-
224
-
225
-
226
-
227
-
228
-
229
-
230
-
231
-
232
-
233
-
234
-
235
-
236
-
237
-
238
-
239
-
240
-
241
-
242
-
243
-
244
-
245
 |
 |
