Olympus C 4000 C-4000 Zoom Reference Manual (8.2 MB) - Page 113
White Balance Adjustment
 |
View all Olympus C 4000 manuals
Add to My Manuals
Save this manual to your list of manuals |
Page 113 highlights
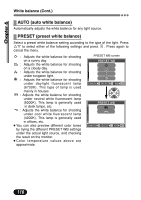
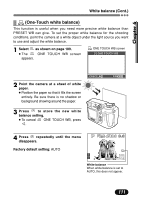
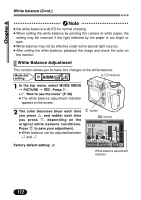
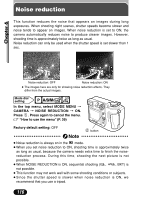
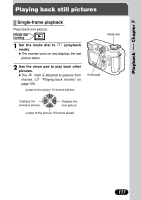
Chapter 6 White balance (Cont.) Note ● Set white balance to AUTO for normal shooting. ● When setting the white balance by pointing the camera at white paper, the setting may be incorrect if the light reflected by the paper is too bright or dark. ● White balance may not be effective under some special light sources. ● After setting the white balance, playback the image and check the color on the monitor. White Balance Adjustment This function allows you to make fine changes to the white balance. Mode dial setting Ññíbuttons 1 In the top menu, select MODE MENU T PICTURE T . Press í. ~ "How to use the menu" (P. 39) ● The white balance adjustment indicator appears on the screen. 2 The color becomes bluer each time you press Ñ, and redder each time you press ñ, depending on the original white balance conditions. Press to save your adjustment. ● White balance can be adjusted between +7 and -7. Factory default setting: ±0 button screen BLUE CANCEL ADJUST RED GO White balance adjustment indicator 112
-
 1
1 -
2
-
3
-
4
-
5
-
6
-
7
-
8
-
9
-
10
-
11
-
12
-
13
-
14
-
15
-
16
-
17
-
18
-
19
-
20
-
21
-
22
-
23
-
24
-
25
-
26
-
27
-
28
-
29
-
30
-
31
-
32
-
33
-
34
-
35
-
36
-
37
-
38
-
39
-
40
-
41
-
42
-
43
-
44
-
45
-
46
-
47
-
48
-
49
-
50
-
51
-
52
-
53
-
54
-
55
-
56
-
57
-
58
-
59
-
60
-
61
-
62
-
63
-
64
-
65
-
66
-
67
-
68
-
69
-
70
-
71
-
72
-
73
-
74
-
75
-
76
-
77
-
78
-
79
-
80
-
81
-
82
-
83
-
84
-
85
-
86
-
87
-
88
-
89
-
90
-
91
-
92
-
93
-
94
-
95
-
96
-
97
-
98
-
99
-
100
-
101
-
102
-
103
-
104
-
105
-
106
-
107
-
 108
108 -
 109
109 -
 110
110 -
 111
111 -
 112
112 -
 113
113 -
 114
114 -
 115
115 -
 116
116 -
 117
117 -
 118
118 -
119
-
120
-
121
-
122
-
123
-
124
-
125
-
126
-
127
-
128
-
129
-
130
-
131
-
132
-
133
-
134
-
135
-
136
-
137
-
138
-
139
-
140
-
141
-
142
-
143
-
144
-
145
-
146
-
147
-
148
-
149
-
150
-
151
-
152
-
153
-
154
-
155
-
156
-
157
-
158
-
159
-
160
-
161
-
162
-
163
-
164
-
165
-
166
-
167
-
168
-
169
-
170
-
171
-
172
-
173
-
174
-
175
-
176
-
177
-
178
-
179
-
180
-
181
-
182
-
183
-
184
-
185
-
186
-
187
-
188
-
189
-
190
-
191
-
192
-
193
-
194
-
195
-
196
-
197
-
198
-
199
-
200
-
201
-
202
-
203
-
204
-
205
-
206
-
207
-
208
-
209
-
210
-
211
-
212
-
213
-
214
-
215
-
216
-
217
-
218
-
219
-
220
-
221
-
222
-
223
-
224
-
225
-
226
-
227
-
228
-
229
-
230
-
231
-
232
-
233
-
234
-
235
-
236
-
237
-
238
-
239
-
240
-
241
-
242
-
243
-
244
-
245
 |
 |