Olympus C 4000 C-4000 Zoom Reference Manual (8.2 MB) - Page 28
Date/time setting, Set the mode dial to P., Press, on the arrow pad to select, MODE MENU. - c lens
 |
View all Olympus C 4000 manuals
Add to My Manuals
Save this manual to your list of manuals |
Page 28 highlights
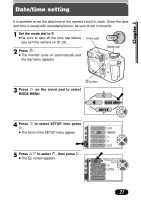
Chapter 1 Date/time setting It is possible to set the date/time of the camera's built-in clock. Since the date and time is saved with recorded pictures, be sure to set it correctly. 1 Set the mode dial to P. ● Be sure to take off the lens cap before you turn the camera on (P. 25). Arrow pad 2 Press . ● The monitor turns on automatically and the top menu appears. Mode dial 3 Press í on the arrow pad to select MODE MENU. button MODE MENU DRIVE 4 Press ñ to select SETUP, then press í. ● The items in the SETUP menu appear. 5 Press Ññ to select , then press í. ● The screen appears. SETUP CARD PIC CAM SETUP CARD PIC CAM ALL RESET PW ON SETUP PW OFF SETUP REC VIEW ON ENGLISH 1 1 ON '02.01.01 00:00 m/ft m VIDEO OUT NTSC SHORT CUT CUSTOM BUTTON 27
-
 1
1 -
2
-
3
-
4
-
5
-
6
-
7
-
8
-
9
-
10
-
11
-
12
-
13
-
14
-
15
-
16
-
17
-
18
-
19
-
20
-
21
-
22
-
 23
23 -
 24
24 -
 25
25 -
 26
26 -
 27
27 -
 28
28 -
 29
29 -
 30
30 -
 31
31 -
 32
32 -
 33
33 -
34
-
35
-
36
-
37
-
38
-
39
-
40
-
41
-
42
-
43
-
44
-
45
-
46
-
47
-
48
-
49
-
50
-
51
-
52
-
53
-
54
-
55
-
56
-
57
-
58
-
59
-
60
-
61
-
62
-
63
-
64
-
65
-
66
-
67
-
68
-
69
-
70
-
71
-
72
-
73
-
74
-
75
-
76
-
77
-
78
-
79
-
80
-
81
-
82
-
83
-
84
-
85
-
86
-
87
-
88
-
89
-
90
-
91
-
92
-
93
-
94
-
95
-
96
-
97
-
98
-
99
-
100
-
101
-
102
-
103
-
104
-
105
-
106
-
107
-
108
-
109
-
110
-
111
-
112
-
113
-
114
-
115
-
116
-
117
-
118
-
119
-
120
-
121
-
122
-
123
-
124
-
125
-
126
-
127
-
128
-
129
-
130
-
131
-
132
-
133
-
134
-
135
-
136
-
137
-
138
-
139
-
140
-
141
-
142
-
143
-
144
-
145
-
146
-
147
-
148
-
149
-
150
-
151
-
152
-
153
-
154
-
155
-
156
-
157
-
158
-
159
-
160
-
161
-
162
-
163
-
164
-
165
-
166
-
167
-
168
-
169
-
170
-
171
-
172
-
173
-
174
-
175
-
176
-
177
-
178
-
179
-
180
-
181
-
182
-
183
-
184
-
185
-
186
-
187
-
188
-
189
-
190
-
191
-
192
-
193
-
194
-
195
-
196
-
197
-
198
-
199
-
200
-
201
-
202
-
203
-
204
-
205
-
206
-
207
-
208
-
209
-
210
-
211
-
212
-
213
-
214
-
215
-
216
-
217
-
218
-
219
-
220
-
221
-
222
-
223
-
224
-
225
-
226
-
227
-
228
-
229
-
230
-
231
-
232
-
233
-
234
-
235
-
236
-
237
-
238
-
239
-
240
-
241
-
242
-
243
-
244
-
245
 |
 |

27
Chapter 1
1
Set the mode dial to P.
●
Be sure to take off the lens cap before
you turn the camera on (P. 25).
2
Press
.
●
The monitor turns on automatically and
the top menu appears.
3
Press
í
on the arrow pad to select
MODE MENU.
4
Press
ñ
to select SETUP, then press
í
.
●
The items in the SETUP menu appear.
5
Press
Ññ
to select
, then press
í
.
●
The
screen appears.
Date/time setting
It is possible to set the date/time of the camera’s built-in clock. Since the date
and time is saved with recorded pictures, be sure to set it correctly.
Mode dial
Arrow pad
button
DRIVE
MODE MENU
SETUP
CAM
CARD
PIC
ENGLISH
ENGLISH
ON
ON
1
1
ON
ON
PW ON SETUP
PW ON SETUP
ALL RESET
REC VIEW
PW OFF SETUP
PW OFF SETUP
SETUP
CAM
CARD
PIC
VIDEO OUT
CUSTOM BUTTON
CUSTOM BUTTON
m/ft
m/ft
’02.01.01
00:00
m
NTSC
NTSC
SHORT CUT