Olympus E620 E-620 Instruction Manual (English) - Page 23
Displaying the Custom Menu
 |
UPC - 050332167322
View all Olympus E620 manuals
Add to My Manuals
Save this manual to your list of manuals |
Page 23 highlights
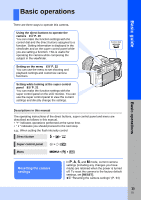
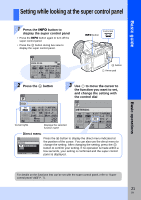
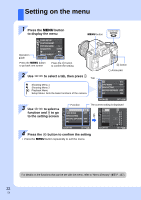
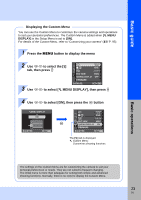
Basic guide Displaying the Custom Menu You can use the Custom Menu to customize the camera settings and operations to suit your personal preferences. The Custom Menu is added when [c MENU DISPLAY] in the Setup Menu is set to [ON]. For details of the Custom Menu, refer to "Customizing your camera" (gP. 95) 1 Press the MENU button to display the menu 2 Use fg to select the [d] tab, then press i W '09.03.01 14:01 ENG. s j±0 k±0 REC VIEW 5SEC cMENU DISPLAY OFF FIRMWARE BACK SET 3 Use fg to select [c MENU DISPLAY], then press i 4 Use fg to select [ON], then press the i button cMENU DISPLAY ON BACK SET i W '09.03.01 14:01 ENG. s j±0 k±0 REC VIEW 5SEC cMENU DISPLAY ON FIRMWARE BACK SET The [c] tab is displayed. c Custom Menu: Customizes shooting functions. Basic operations The settings on the Custom Menu are for customizing the camera to suit your personal preferences or needs. They are not suited to frequent changing. The initial menu is more than adequate for setting both simple and advanced shooting functions. Normally, there is no need to display the Custom Menu. 23 EN
-
 1
1 -
2
-
3
-
4
-
5
-
6
-
7
-
8
-
9
-
10
-
11
-
12
-
13
-
14
-
15
-
16
-
17
-
 18
18 -
 19
19 -
 20
20 -
 21
21 -
 22
22 -
 23
23 -
 24
24 -
 25
25 -
 26
26 -
 27
27 -
 28
28 -
29
-
30
-
31
-
32
-
33
-
34
-
35
-
36
-
37
-
38
-
39
-
40
-
41
-
42
-
43
-
44
-
45
-
46
-
47
-
48
-
49
-
50
-
51
-
52
-
53
-
54
-
55
-
56
-
57
-
58
-
59
-
60
-
61
-
62
-
63
-
64
-
65
-
66
-
67
-
68
-
69
-
70
-
71
-
72
-
73
-
74
-
75
-
76
-
77
-
78
-
79
-
80
-
81
-
82
-
83
-
84
-
85
-
86
-
87
-
88
-
89
-
90
-
91
-
92
-
93
-
94
-
95
-
96
-
97
-
98
-
99
-
100
-
101
-
102
-
103
-
104
-
105
-
106
-
107
-
108
-
109
-
110
-
111
-
112
-
113
-
114
-
115
-
116
-
117
-
118
-
119
-
120
-
121
-
122
-
123
-
124
-
125
-
126
-
127
-
128
-
129
-
130
-
131
-
132
-
133
-
134
-
135
-
136
-
137
-
138
-
139
-
140
-
141
-
142
-
143
-
144
-
145
-
146
-
147
-
148
-
149
-
150
-
151
-
152
-
153
-
154
-
155
-
156
 |
 |
