Olympus E620 E-620 Instruction Manual (English) - Page 31
Auto], Auto Pop Up], Picture Mode], Monotone], Grainy Film], Shadow Adj], Jpeg Edit]
 |
UPC - 050332167322
View all Olympus E620 manuals
Add to My Manuals
Save this manual to your list of manuals |
Page 31 highlights
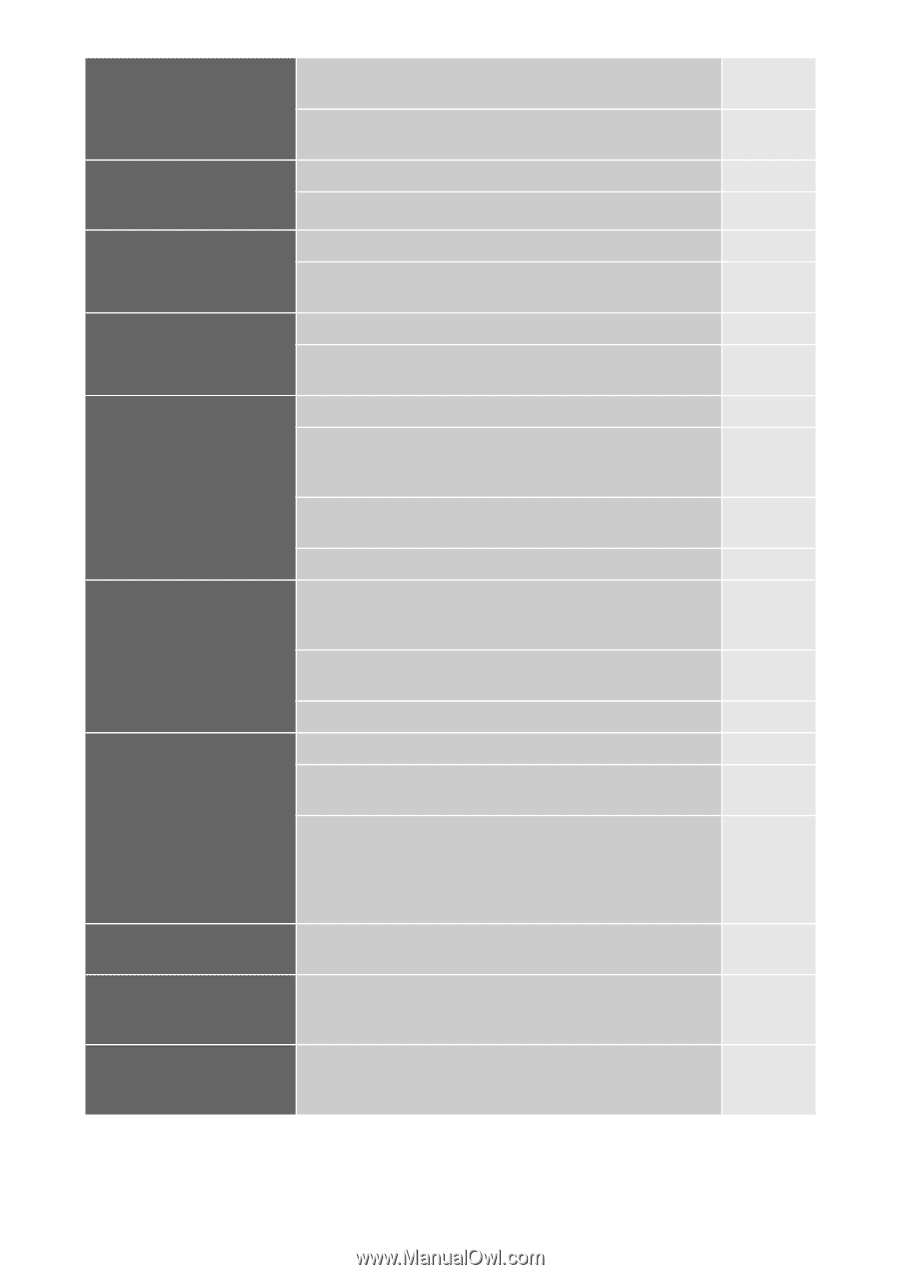
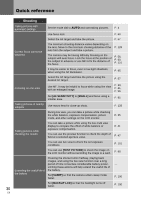
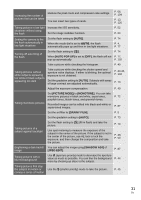
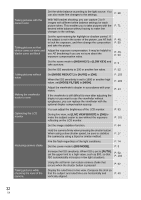
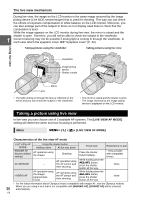
Increasing the number of pictures that can be taken Reduce the pixel count and compression rate settings. You can insert two types of cards. P. 66, P. 104 P. 13, P. 126 Taking pictures in low light Increase the ISO sensitivity. situations without using the flash Set the image stabilizer function. P. 52 P. 64 Setting the camera to fire the flash automatically in low light situations Turning off auto firing of the flash Set the flash setting to [AUTO]. P. 74 When the mode dial is set to AUTO, the flash automatically pops up and fires in low light situations. Set the flash setting to [$]. P. 4, P. 77 P. 74 When [AUTO POP UP] is set to [OFF], the flash will not P. 77, pop up automatically. P. 102 Take a picture while checking the histogram. P. 40 Taking pictures without white subjects appearing too white or black subjects appearing too dark Take a picture while checking the shutter speed and aperture value displays. If either is blinking, the optimal exposure is not obtained. Set the gradation setting to [AUTO]. Subjects with areas of large contrast are adjusted automatically. P. 43-45, P. 132 P. 73 Adjust the exposure compensation. P. 49 Taking monotone pictures Set [PICTURE MODE] to [MONOTONE]. You can take monotone pictures in black and white, sepia tones, purplish tones, bluish tones, and greenish tones. Recorded images can be edited into black-and-white or sepia-toned images. P. 72 P. 87 Set the art filter to [GRAINY FILM]. P. 5 Taking pictures of a subject against backlight Set the gradation setting to [AUTO]. Set the flash setting to [#] (fill-in flash) and take the picture. P. 73 P. 74 Use spot metering to measure the exposure of the subject in the center of the picture. If the subject is not in the center of the picture, use AE lock to lock the exposure, and then change the composition and take the picture. P. 48, P. 50 Brightening a dark backlit image Taking pictures with a blurred background You can adjust the image using [SHADOW ADJ] of [JPEG EDIT]. Use A (aperture priority) mode to decrease the aperture value as much as possible. You can blur the background more by shooting up close to the subject. P. 87 P. 44 Taking pictures that stop the subject in motion or convey a sense of motion Use the S (shutter priority) mode to take the picture. P. 45 31 EN
-
 1
1 -
2
-
3
-
4
-
5
-
6
-
7
-
8
-
9
-
10
-
11
-
12
-
13
-
14
-
15
-
16
-
17
-
18
-
19
-
20
-
21
-
22
-
23
-
24
-
25
-
 26
26 -
 27
27 -
 28
28 -
 29
29 -
 30
30 -
 31
31 -
 32
32 -
 33
33 -
 34
34 -
 35
35 -
 36
36 -
37
-
38
-
39
-
40
-
41
-
42
-
43
-
44
-
45
-
46
-
47
-
48
-
49
-
50
-
51
-
52
-
53
-
54
-
55
-
56
-
57
-
58
-
59
-
60
-
61
-
62
-
63
-
64
-
65
-
66
-
67
-
68
-
69
-
70
-
71
-
72
-
73
-
74
-
75
-
76
-
77
-
78
-
79
-
80
-
81
-
82
-
83
-
84
-
85
-
86
-
87
-
88
-
89
-
90
-
91
-
92
-
93
-
94
-
95
-
96
-
97
-
98
-
99
-
100
-
101
-
102
-
103
-
104
-
105
-
106
-
107
-
108
-
109
-
110
-
111
-
112
-
113
-
114
-
115
-
116
-
117
-
118
-
119
-
120
-
121
-
122
-
123
-
124
-
125
-
126
-
127
-
128
-
129
-
130
-
131
-
132
-
133
-
134
-
135
-
136
-
137
-
138
-
139
-
140
-
141
-
142
-
143
-
144
-
145
-
146
-
147
-
148
-
149
-
150
-
151
-
152
-
153
-
154
-
155
-
156
 |
 |