Olympus E620 E-620 Instruction Manual (English) - Page 98
My Mode Setup]
 |
UPC - 050332167322
View all Olympus E620 manuals
Add to My Manuals
Save this manual to your list of manuals |
Page 98 highlights
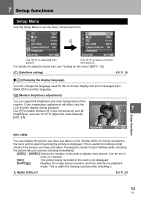
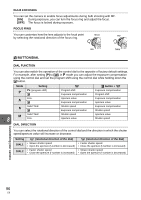
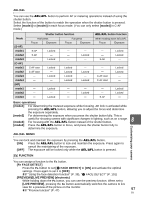
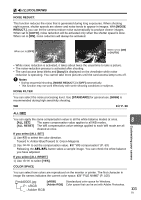
[V] Press the < button to acquire the WB value. g"Setting the one-touch white balance" (P. 70) [P HOME] Press the < button to switch to the registered AF home position. Press the button again to switch to the original AF target mode. If you turn off the camera while it is set to the AF home position, the original position will not be stored. g"Registering an AF target mode" (P. 59) [MF] Press the < button to switch AF mode to [MF]. Press the button again to switch to the original AF mode. [RAWK] Press the < button to switch from JPEG to JPEG+RAW or from JPEG+RAW to JPEG for the record mode. You can change the record mode by turning the control dial while holding down the < button. [TEST PICTURE] Pressing the shutter button while pressing the < button enables you to check the picture you have just taken on the monitor without having to record the picture to the card. This is useful when you want to see how a picture turned out without saving it. [MY MODE] While holding down the < button, you can take pictures using the camera settings registered in the [MY MODE SETUP]. g"MY MODE SETUP" (P. 98) [OFF] Does not allow function allocation. MY MODE SETUP Customizing your camera You can store two frequently used settings as My Mode. You can select which My Mode setting to use in advance by following the steps under "Executing" below. To use My Mode, set [; FUNCTION] to [MY MODE] and hold down the < button while shooting. g"; FUNCTION" (P. 97) 8 Registering 1) Select [MY MODE1] or [MY MODE2] and press i. 2) Select [SET] and press the i button. • The current settings are registered in the camera. For details on the functions that can be registered to My Mode, refer to "Functions that can be registered with My Mode and Custom Reset Setting" (gP. 136). • To cancel the registration, select [RESET]. Executing 1) Select [MY MODE1] or [MY MODE2] and press the i button. 2) Select [YES] and press the i button. • The selected My Mode is set. • When shooting, press the shutter button while holding down the < button. BUTTON TIMER The direct button may remain selected even after it is released. [3SEC]/[5SEC]/[8SEC] The button remains selected during the number of seconds indicated. [HOLD] The button remains selected until you press it again. • Buttons that can be set with [BUTTON TIMER] 98 ISO, F, WB, #, G, AF,
-
 1
1 -
2
-
3
-
4
-
5
-
6
-
7
-
8
-
9
-
10
-
11
-
12
-
13
-
14
-
15
-
16
-
17
-
18
-
19
-
20
-
21
-
22
-
23
-
24
-
25
-
26
-
27
-
28
-
29
-
30
-
31
-
32
-
33
-
34
-
35
-
36
-
37
-
38
-
39
-
40
-
41
-
42
-
43
-
44
-
45
-
46
-
47
-
48
-
49
-
50
-
51
-
52
-
53
-
54
-
55
-
56
-
57
-
58
-
59
-
60
-
61
-
62
-
63
-
64
-
65
-
66
-
67
-
68
-
69
-
70
-
71
-
72
-
73
-
74
-
75
-
76
-
77
-
78
-
79
-
80
-
81
-
82
-
83
-
84
-
85
-
86
-
87
-
88
-
89
-
90
-
91
-
92
-
 93
93 -
 94
94 -
 95
95 -
 96
96 -
 97
97 -
 98
98 -
 99
99 -
 100
100 -
 101
101 -
 102
102 -
 103
103 -
104
-
105
-
106
-
107
-
108
-
109
-
110
-
111
-
112
-
113
-
114
-
115
-
116
-
117
-
118
-
119
-
120
-
121
-
122
-
123
-
124
-
125
-
126
-
127
-
128
-
129
-
130
-
131
-
132
-
133
-
134
-
135
-
136
-
137
-
138
-
139
-
140
-
141
-
142
-
143
-
144
-
145
-
146
-
147
-
148
-
149
-
150
-
151
-
152
-
153
-
154
-
155
-
156
 |
 |