Olympus E620 E-620 Instruction Manual (English) - Page 88
Black & White] - memory card
 |
UPC - 050332167322
View all Olympus E620 manuals
Add to My Manuals
Save this manual to your list of manuals |
Page 88 highlights
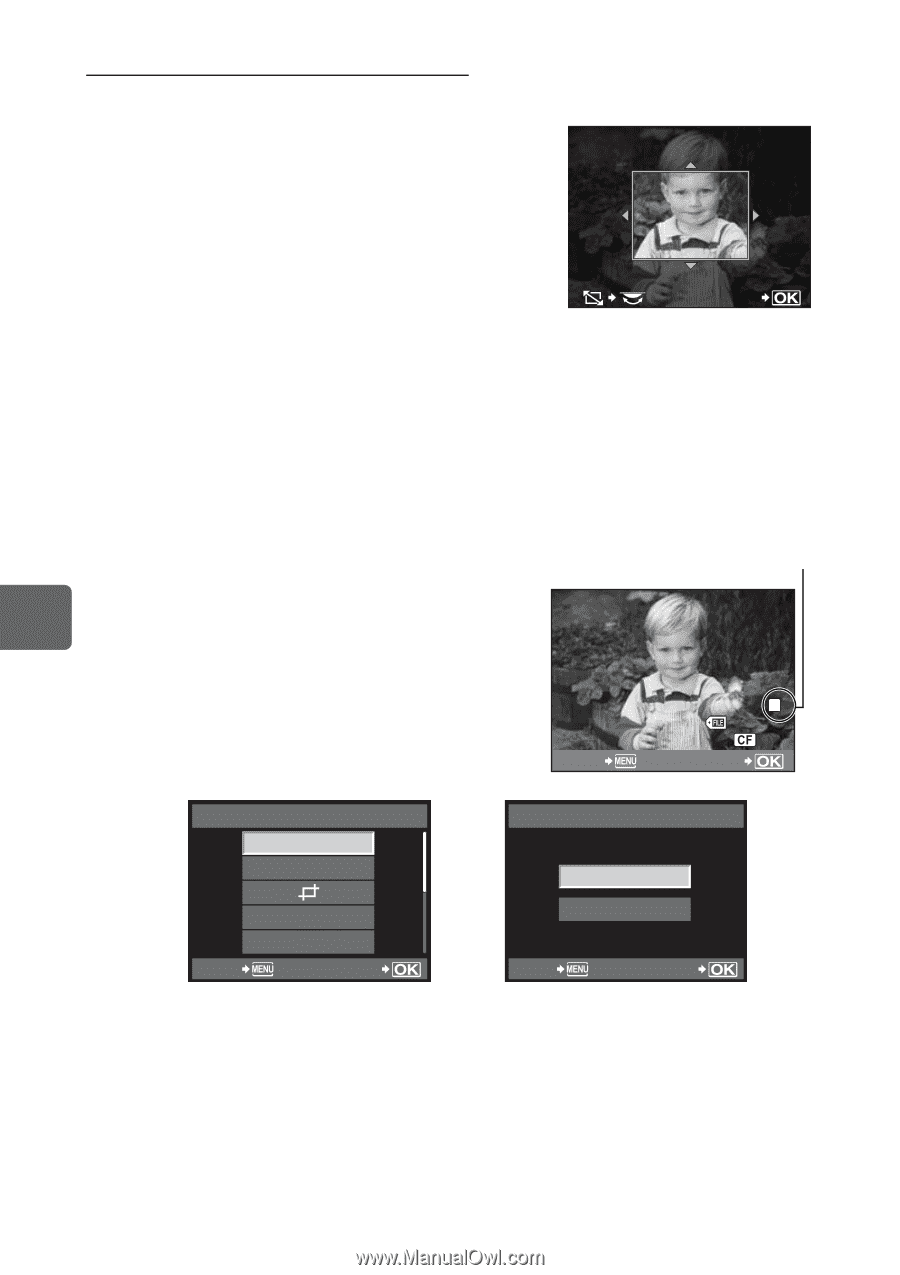
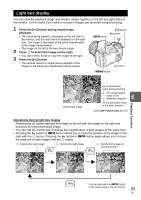
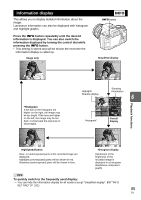
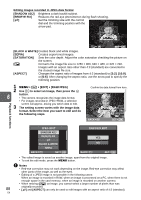
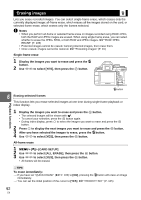
Editing images recorded in JPEG data format [SHADOW ADJ] Brightens a dark backlit subject. [REDEYE FIX] [P] Reduces the red-eye phenomenon during flash shooting. Set the trimming size with the control dial and the trimming position with the arrow pad. SET [BLACK & WHITE] Creates black and white images. [SEPIA] Creates sepia-toned images. [SATURATION] Sets the color depth. Adjust the color saturation checking the picture on [Q] the screen. Converts the image file size to 1280 × 960, 640 × 480, or 320 × 240. Images with an aspect ratio other than 4:3 (standard) are converted to the closest image file size. [ASPECT] Changes the aspect ratio of images from 4:3 (standard) to [3:2], [16:9], or [6:6]. After changing the aspect ratio, use the arrow pad to specify the trimming position. 1 MENU [q] [EDIT] [RAW/JPEG] 2 Use hi to select an image, then press the i 6 button. • The camera recognizes the image data format. • For images recorded in JPEG+RAW, a selection screen will appear, asking you which data to edit. 3 The setting screen varies with the image data format. Select the item you want to edit and do the following steps. Confirm the data format from here. BACK LN 100-0020 40 SET Playback functions JPEG EDIT SHADOW ADJ REDEYE FIX RAW DATA EDIT YES BLACK & WHITE SEPIA BACK SET BACK NO SET • The edited image is saved as another image, apart from the original image. • To exit the edit mode, press the MENU button. x Notes • Red-eye correction may not work depending on the image. Red-eye correction may affect other parts of the image, as well as the eyes. • Editing of a JPEG image is not possible in the following cases: When an image is recorded in RAW, when an image is processed on a PC, when there is not enough space in the card memory, when an image is recorded on another camera • When resizing ([Q]) an image, you cannot select a larger number of pixels than was 88 originally recorded. • [P] and [ASPECT] can only be used to edit images with an aspect ratio of 4:3 (standard). EN
-
 1
1 -
2
-
3
-
4
-
5
-
6
-
7
-
8
-
9
-
10
-
11
-
12
-
13
-
14
-
15
-
16
-
17
-
18
-
19
-
20
-
21
-
22
-
23
-
24
-
25
-
26
-
27
-
28
-
29
-
30
-
31
-
32
-
33
-
34
-
35
-
36
-
37
-
38
-
39
-
40
-
41
-
42
-
43
-
44
-
45
-
46
-
47
-
48
-
49
-
50
-
51
-
52
-
53
-
54
-
55
-
56
-
57
-
58
-
59
-
60
-
61
-
62
-
63
-
64
-
65
-
66
-
67
-
68
-
69
-
70
-
71
-
72
-
73
-
74
-
75
-
76
-
77
-
78
-
79
-
80
-
81
-
82
-
 83
83 -
 84
84 -
 85
85 -
 86
86 -
 87
87 -
 88
88 -
 89
89 -
 90
90 -
 91
91 -
 92
92 -
 93
93 -
94
-
95
-
96
-
97
-
98
-
99
-
100
-
101
-
102
-
103
-
104
-
105
-
106
-
107
-
108
-
109
-
110
-
111
-
112
-
113
-
114
-
115
-
116
-
117
-
118
-
119
-
120
-
121
-
122
-
123
-
124
-
125
-
126
-
127
-
128
-
129
-
130
-
131
-
132
-
133
-
134
-
135
-
136
-
137
-
138
-
139
-
140
-
141
-
142
-
143
-
144
-
145
-
146
-
147
-
148
-
149
-
150
-
151
-
152
-
153
-
154
-
155
-
156
 |
 |