Olympus E620 E-620 Instruction Manual (English) - Page 30
Quick reference
 |
UPC - 050332167322
View all Olympus E620 manuals
Add to My Manuals
Save this manual to your list of manuals |
Page 30 highlights
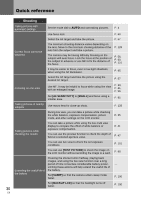
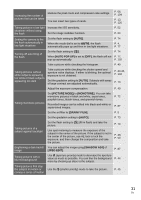
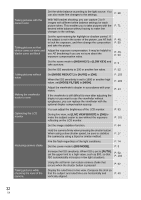
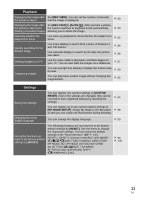
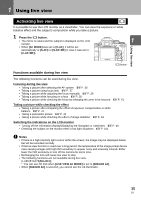
Quick reference Shooting Taking pictures with automatic settings Set the mode dial to AUTO and start taking pictures. P. 4 Use focus lock. P. 60 Select the AF target and take the picture. P. 57 Correct focus cannot be obtained The minimum shooting distance varies depending on the lens. Move to the minimum shooting distance of the P. 128 lens from the subject and take a picture. The camera may be having difficulty focusing on the subject with auto focus. Lock the focus at the position of the subject in advance or use MF to fix the distance of the focus. P. 56, P. 60, P. 121 It may be easier to focus, even in low light situations, when using the AF illuminator. P. 95 Select the AF target and take the picture using the desired AF target. P. 57 Focusing on one area Use MF. It may be helpful to focus while using live view with an enlarged image. P. 39, P. 41, P. 56 Set [AF SENSITIVITY] to [SMALL] and focus using a smaller area. P. 95 Taking pictures of nearby subjects Use macro lens for close-up shots. P. 128 During live view, you can take a picture while checking the white balance, exposure compensation, picture mode, and other settings on the LCD monitor. P. 35 Taking pictures while checking the results You can take a picture while using the live multi view display to compare the effect of white balance or exposure compensation. You can use the preview function to check the depth of field at a selected aperture value. P. 41 P. 47 You can use live view to check the set exposure conditions. P. 101 You can use [TEST PICTURE] to check the image on the LCD monitor without recording the image to a card. P. 98 Extending the useful life of the battery Pressing the shutter button halfway, playing back images, and using the live view function over a long period of time consumes considerable battery power. Limiting these actions will help extend the useful life of the battery. Set [SLEEP] so that the camera enters sleep mode faster. k P. 100 Set [BACKLIT LCD] so that the backlight turns off faster. P. 100 30 EN
-
 1
1 -
2
-
3
-
4
-
5
-
6
-
7
-
8
-
9
-
10
-
11
-
12
-
13
-
14
-
15
-
16
-
17
-
18
-
19
-
20
-
21
-
22
-
23
-
24
-
 25
25 -
 26
26 -
 27
27 -
 28
28 -
 29
29 -
 30
30 -
 31
31 -
 32
32 -
 33
33 -
 34
34 -
 35
35 -
36
-
37
-
38
-
39
-
40
-
41
-
42
-
43
-
44
-
45
-
46
-
47
-
48
-
49
-
50
-
51
-
52
-
53
-
54
-
55
-
56
-
57
-
58
-
59
-
60
-
61
-
62
-
63
-
64
-
65
-
66
-
67
-
68
-
69
-
70
-
71
-
72
-
73
-
74
-
75
-
76
-
77
-
78
-
79
-
80
-
81
-
82
-
83
-
84
-
85
-
86
-
87
-
88
-
89
-
90
-
91
-
92
-
93
-
94
-
95
-
96
-
97
-
98
-
99
-
100
-
101
-
102
-
103
-
104
-
105
-
106
-
107
-
108
-
109
-
110
-
111
-
112
-
113
-
114
-
115
-
116
-
117
-
118
-
119
-
120
-
121
-
122
-
123
-
124
-
125
-
126
-
127
-
128
-
129
-
130
-
131
-
132
-
133
-
134
-
135
-
136
-
137
-
138
-
139
-
140
-
141
-
142
-
143
-
144
-
145
-
146
-
147
-
148
-
149
-
150
-
151
-
152
-
153
-
154
-
155
-
156
 |
 |