Pfaff hobbymatic 917 Owner's Manual
Pfaff hobbymatic 917 Manual
 |
View all Pfaff hobbymatic 917 manuals
Add to My Manuals
Save this manual to your list of manuals |
Pfaff hobbymatic 917 manual content summary:
- Pfaff hobbymatic 917 | Owner's Manual - Page 1
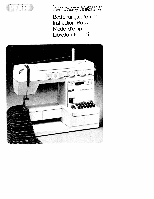
Bedlenungsanlejtun Instruction Boofr Mode d'empioj Libreo istruzionj - Pfaff hobbymatic 917 | Owner's Manual - Page 2
4 - Pfaff hobbymatic 917 | Owner's Manual - Page 3
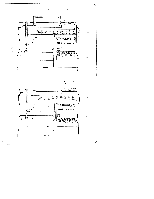
Parts of the sewing machine 101 Take-up lever 102 Bobbin winder tension 103 Carrying handle 104 Bobbin winder 105 Hand wheel 106 Stop motion knob 107 Stitch length key 108 Detachable work support with accessory compartment 109 Needle plate 110 Sewing foot holder with sewing foot 111 Threading - Pfaff hobbymatic 917 | Owner's Manual - Page 4
Pièces de Ia machine 101 Levier releveur de fil 102 Pretension du dévidoir 103 Poignee 104 Dévidoir 105 Volant 106 Disque de debrayage du volant 107 Regle-point 108 Plaque de rangement avec botte a accessoires 109 Plaque a aiguille 110 Support avec pied presseur 111 Fentes denfilage 112 Tension dii - Pfaff hobbymatic 917 | Owner's Manual - Page 5
maniglia. - Den Anlasser und die Bedienungsanlei tung aus dem Fach N nehmen, So wie die Abbildung oben zeigt, beides wieder einräumen. Take foot control and Instruction Book out of compartment N. Put back again as shown in the illustration above. a Retirer le rheostat pedale et a notice d'emploi de - Pfaff hobbymatic 917 | Owner's Manual - Page 6
ht die Pfaff. Electronic-Anlasser (Schalter 0) Stellung = halbe Endgeschwindigkeit Stellung 41 = voIle Endgeschwindigkeit Push master switch P; the sewing light goes on. Operating the foot control: The farther you press the pedal down the faster the machine runs. Electronic foot control (slide - Pfaff hobbymatic 917 | Owner's Manual - Page 7
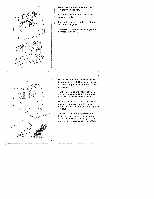
4Spulen vorbereiten: Verwandlungsnahfläche etwas anheben und herausnehmen. Preparation for bobbin winding: Lift detachable work support and remove it. Preparation des canettes: Lever quolque peu Ia boite de rangement et Ia sortir. Preparazione per avvolgere Ia spohna: Sollevare eggermente II piano - Pfaff hobbymatic 917 | Owner's Manual - Page 8
: Handrad 105 fest halten und Scheibe 106 nach vorn drehen. Disengaging the sewing mechanism: Hold the hand wheel steady and turn knob 106 toward you. 115 ganz hochziehen und Garnrolle aufstecken. Pull thread stand pins 115 up completely and place thread reels on them. Tirer les broches 115 - Pfaff hobbymatic 917 | Owner's Manual - Page 9
the bobbin in the direc tion of the arrow. Then actuate the foot control and wind the bobbin. The bobbin stops as soon as it is full. Push the full bobbin to the left, remove it and cut off the thread. Bobinage Tourner l'interrupteur general. Tirer le fil de Ia bobine dans - Pfaff hobbymatic 917 | Owner's Manual - Page 10
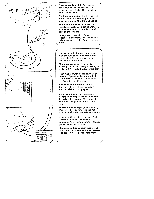
drehen. Dann Handrad nach vorne drehen, bis es einrastet. Engaging the sewing mechanism: Hold the hand wheel firmly and turn disk 106 toward den Schlitz 0 und bis zur Offnung P ziehen. Inserting the bobbin (N), with the thread unreeling tod the back. Mise en place de Ia canette (N), le fil so dé - Pfaff hobbymatic 917 | Owner's Manual - Page 11
ruckartig aufwartsbewegen. Sie muB stufenweise niedersinken. (Einstell schraube N nach links drehen = loser, nach rechts drehen = fester). Checking the bobbin thread tension: With a brief, sharp upward movement of your hand, the bobbin must gradually slip downwards. (Turn screw N counter-clock wise - Pfaff hobbymatic 917 | Owner's Manual - Page 12
off master switch 125. Both needle and take-up lever must be in the "up" position. Raise sew ing foot. Pull thread from spool and draw it into the bobbin tension stud, through opening N, slot 0, behind guiding piece P, upwards through slot 0. through take-up lever 101. back through slot Q. behind - Pfaff hobbymatic 917 | Owner's Manual - Page 13
Stich nähen bis Nadel und Faden hebel wieder oben stehen. Mit dem Ober faden den Uriterfaden nach oben ziehen. Drawing up the bobbin thread: Hold the needle thread taut. Turn the hand wheel towards you and sew etwa 10 cm). Place both threads towards the right under the sewing foot, (approx 10 cm). - Pfaff hobbymatic 917 | Owner's Manual - Page 14
boite de rangement contre Ia machine, comme le montre Ia flèche. Applicare ii piano variabile alla macchina, come indicato dalla freccia. Hauptschalter ausschalten. Stoff unter den NähfuB legen. • Switch off master switch 125. Place fabric under the sewing foot. • Tourner I'interrupteur gOnéral 125 - Pfaff hobbymatic 917 | Owner's Manual - Page 15
niedertreten. Je tiefer man drückt, urn so schneuer näht die Pfaff. Operating the foot control: The more you press down the pedal, the faster the machine runs. Abaisser Ia pedale du rheostat. Plus a pédale sera abaissée, plus Ia Pfaff coudra vite. Premere ii reostato: Piü a fondo Si preme ii pedale - Pfaff hobbymatic 917 | Owner's Manual - Page 16
tissu vers l'arrière. Alzare Ia leva alzapiedino 113. Togliere Ia stoffa verso dietro. 4 Fadenabschneider N. Fâden einlegen und nach unten ziehen. Thread cutter N. Draw the threads into the slot and pull them downwards. Coupe-Ill N. Coucher los hIs dans a fento at les tirer vers Ia bas. Tagblafblo - Pfaff hobbymatic 917 | Owner's Manual - Page 17
is 0 to 6 mm. Turn the control to set the number indicating the stitch length at :Obottom, shows how to set the stitch length control for sewing stretch stitches (red stitch symbols on push but tons). Réglage de Ia longueur du point Les chiffres sur le disque 107 indiquent Ia longueur du - Pfaff hobbymatic 917 | Owner's Manual - Page 18
ücken. Solange die Taste gedrückt wird, näht die Maschine rückwärts. Reverse sewing Press button 123. As long as you hold this button the machine sews back wards. Couture en marche arrière Abaisser Ia touche 123. La machine coud en arrière aussi longtemps que a touche est maintenue en bas. La - Pfaff hobbymatic 917 | Owner's Manual - Page 19
. b) Make sure you unplug the power cord whenever you have to leave the machine or want to clean it, oil it or change mechanical and accessory parts. C) Be sure to use only a 15-watt light bulb in the sewing lamp. Safety rules for United Kingdom see page 36. 4 Mesures de sécurité a) Toujours faire - Pfaff hobbymatic 917 | Owner's Manual - Page 20
mm G Geradstich M Elasticstich In der Programmtabelle auf den Seiten 78-79 sind die Stiche und Stichkombina tionen mit Hinweisen für ihre Verwen dung angegeben. Die Buchstaben der Tasten ihrer . The letters of the buttons on your machine determine the programs and combinations that can be sewn. 1 - Pfaff hobbymatic 917 | Owner's Manual - Page 21
senza punti flexi) Le nombre des touches et des program I diversi modelli hanno differente numerc mes vane selon le modéle do machine. di tasti e programmi. Touches boutonnières: A, B, C La touche boutonniere B sert en méme temps a annuler les touches activées et a déporter l'aiguille a gauche - Pfaff hobbymatic 917 | Owner's Manual - Page 22
Verbindungsstich K Overlockstich Muschelkantenstich L Federstich Zierelasticstich M Wabenstich Elasticstich In der Programmtabelle auf den Seiten 78-79 sind die Stiche und Stichkombina tionen mit Hinweisen für ihre Verwen dung angegeben. Die Buchstaben der Tasten ihrer Maschine bestimmen die - Pfaff hobbymatic 917 | Owner's Manual - Page 23
combinations are listed in the stitch program chart on pages 80-81. This chart also contains possible applications. The letters of the buttons on your machine determine the programs and combinations that can be sewn. - Pfaff hobbymatic 917 | Owner's Manual - Page 24
4 Touches de commande (modèles avec points elastiques) Le nombre des touches et des program mes vane sebon be modèle de machine. Touches boutonnières: A, B, C La touche boutonniere B sort en memo temps a annulor les a déporter l'aiguille touches activées et a gauche (page 25). D Triple point - Pfaff hobbymatic 917 | Owner's Manual - Page 25
\\\ \\ \\\ \\ \\\\ \\' 11 4 Nutzstiche einstellen (weiBe Symbole) Taste tippen und die gewunschte Stich lange zwischen 1 und 6 einstellen. Alle Zickzack- und Nutzstiche werden durch zusätzliches Tippen der Taste G in der Breite halbiert. 4 Selecting utility stitches (white symbols) Push - Pfaff hobbymatic 917 | Owner's Manual - Page 26
Stretchstlche einstellen (rote Symbole) Taste tippen und Stichlangen-Einsteller bis zum Anschlag auf rotes Symbol stel ten. Alto Stretchstiche werden durch zusâtzli ches Tippen der Taste G in der Breite halbiert. 4 N Selecting stretch stitches (red symbols> Push the button required and turn the - Pfaff hobbymatic 917 | Owner's Manual - Page 27
finger-tip controls are pressed simultane ously. The stitch combinations, together with some useful sewing tips, can be found in the programme table as well as at the end of this Instruction Book. Combinalsons de points elastlques et utilitaires Pour combiner plusieurs types de point, appuyer - Pfaff hobbymatic 917 | Owner's Manual - Page 28
4 [1 H I 4. N Stichiage einstellen bet. Geradsttch: Stichlage links: Taste B tippen Stichlage Mitte: Taste G tippen Stichlage rechts: Taste H und I tippen 4 Selecting the needle position for straight stitching: Left needle position: push button B Central needle position: push button G Right - Pfaff hobbymatic 917 | Owner's Manual - Page 29
fancy stitch is provided with a letter. Select the fancy stitch from the table. Set the corresponding letter at mark '0" by turning thumb wheel N. For sewing utility stitches, thumb wheel N for fancy stitches must be disengaged. To do so, set the white dot at mark"0". 4 Disque de reglage des points - Pfaff hobbymatic 917 | Owner's Manual - Page 30
Zierstiche und Kombinationen Musterkombinationen lassen sich durch Drücken der Tasten in Verbindung mit den Zierstichen herstellen. Die Tabelle zeigt den Stich und darunter, welche Tasten zu drücken sind. Beim Hinweis ,,stretch" Stichlängen-Einsteller auf stretch drehen. 4 Fancy stitches and - Pfaff hobbymatic 917 | Owner's Manual - Page 31
125. Allentare vite N. Togliere l'ago. Inserire ago nuovo (parte piatta del fusto verso dietro) completamente in sU. Fissare a cover 119. Push the dropteed control toward 0 (feed dog dropped) or toward P (sewing position). Abaissement de a griffe Ouvrir Ie cache 119 et déplacer le cur seur abaisse- - Pfaff hobbymatic 917 | Owner's Manual - Page 32
ör betestigen. S ist die NähfuBhalterschraube. Screws Q and R are for securing acces sories. S is the sewing foot retaining screw. Q et R servent a fixer les accessoires. S est Ia vis de fixation du support de semelle. o e R servono per fissare gIl accessori. S è Ia vito di fissaggio del supporto - Pfaff hobbymatic 917 | Owner's Manual - Page 33
(0). Detachable work support Lift and remove the work support (N). To fit the work support to the machine push is close to the machine as indi cated ör. Accessory box Open the cover of work support 108. Under this lid there is room for your sewing accessories. Boite de rangement Ouvrir le couvercle - Pfaff hobbymatic 917 | Owner's Manual - Page 34
ähfu6 4 FRei8verschlu6fu8 2 Klarsichtfu8 5 KnopflochfuB 3 Blindstichfu6 6 Lineal 7 Filzscheibe Sewing feet (standard accessories) 1 Ordinary sewing 4 Zipper foot foot 5 Buttonhole foot 2 Clear-view foot 6 Edge guide 3 Blindstitch foot 7 Felt washer Pieds presseurs (accessoires standards - Pfaff hobbymatic 917 | Owner's Manual - Page 35
Topstitching Nàhful3: Normal-Nähfu8 oder Klarsichtful3 Sewing foot: Ordinary sewing foot or und Fuhrungslineal clear-view foot and edge Stich: Taste G guide Das Fuhrungslineal N kann bei fast allen Stitch: Button G Nähfül3en zum Einsatz kommen. Edge guide N can be used with nearly all - Pfaff hobbymatic 917 | Owner's Manual - Page 36
surpiqires paralléles et le surpiquage des bords. Ce faisant, le bord du tissu (fig. Q) ou bien Ia piqüre précédente suit le guide-droit (fig. R). La couture sera toujours nette et réguliere. 4 Lavori di impunture Piedino: piedino normale 0 piedino trasparente e lineale di guida Punto: Tasto G II - Pfaff hobbymatic 917 | Owner's Manual - Page 37
Spannung: Oberfaden etwas leichter Garn: Nahgarn Stich: Taste H Stichlänge: 3-4 Nadel: sewing foot. The crease line of the outer fabric runs along edge guide 0 of the blindstitch sewing foot. Turn screw N to adjust edge guide 0 so far to the left that the needle picks up only one thread - Pfaff hobbymatic 917 | Owner's Manual - Page 38
9 2 2 2 9 Point invisible Pied presseur: Pied a points invisibles Tension: Fib: Fib d'aiguilbe moms tendu Fib a coudre Point: Touche H Longueur do point: 3 a4 Aiguible: Grosseur 70 ou 80 Réglage de Ia jetée de l'aiguille Poser 'ourbet prepare sous be pied a points invisibles. La - Pfaff hobbymatic 917 | Owner's Manual - Page 39
/ Some safety rules valid for United Kingdom only The wires in this mains lead are coloured according to the following code: Blue: Neutral Brown: Live As the colours of the wires in the mains lead of this appliance may not correspond with the colour coding of the terminals in your plug, proceed as - Pfaff hobbymatic 917 | Owner's Manual - Page 40
. 4 Buttonhole setting Push button C. Set the needle thread tension at range 3 for buttonhole sewing. Attach the buttonhole foot. Set the stitch density at range N. Insert a gimp thread in the sewing foot as shown in the illu stration: Place the thread over the back ridge 0, and pull it taut so - Pfaff hobbymatic 917 | Owner's Manual - Page 41
. Es empfiehlt sich, vor dem Nähen der Knopflöcher in das Kleidungsstück, em Probeknopfloch zu nähen. Sewing buttonholes Pull the bottom of the buttonhole foot forward as far as it will go. 1 Sew first buttonhole seam. Raise the needle. 2 Push button B in until 4 to 6 bar- tacking stitches are sewn - Pfaff hobbymatic 917 | Owner's Manual - Page 42
Zeichnungen sind ohne Nähful3. Drawings do not include sewing foot. Les illustrations ne montrent pas Ia semelle du p!ed presseur. I disegni sono eseguiti senza piedino. Execution de boutonnières Tirer a semelle mobile vers l'avant jusqu'à - Pfaff hobbymatic 917 | Owner's Manual - Page 43
hen Nàhfu8 ohne Nähfu8 oder mit KlarsichtfuB Stich: Taste E Transporteur: versenken Gain: feines sewing foot place a sewing machine needle shank or a match on the middle of the button (Fig. 0). Sew a few zigzag stitches and leave a thread end, about 15 cm long. Pull needle and bobbin threads - Pfaff hobbymatic 917 | Owner's Manual - Page 44
le pied-presseur. Glisser precautionneusement le tissu et le bouton sous le support du pied presseur. Abaisser celul-ci et faire piquer l'aiguille dans foro sinistro del bottone. Prima di abbassare it piedino si mette Ia parte grossa di un ago da macchina oppure un fiammifero sub centro del - Pfaff hobbymatic 917 | Owner's Manual - Page 45
anheben und den Reil3verschlu6 dffnen (Abb. Q). NähfuB senken, Naht zu Ende nähen. 4 Sewing in zippers Sewing foot: zipper sewing foot Stitch length: 2 to 3 Stitch: Button G Thread: sewing thread This is how the zipper foot is engaged Insert the toot with the back pin in the back groove - Pfaff hobbymatic 917 | Owner's Manual - Page 46
(fig. P). Abbassare ii piedino, cucire fino al termine della cerniera ed eseguire infine una cucitura trasversale di fissaggio. Cucire Ia seconda parte della cerniera parallelamente in uguale distanza. Poco prima del termine lasciare I'ago nella stoffa. Alzare ii piedino e aprire Ia cerniera (fig - Pfaff hobbymatic 917 | Owner's Manual - Page 47
sieho Seite 42. For machine setting see page 42. So wird der Reil3verschlul3 vorbereitet How the zipper is prepared and inserted now run into the right guiding groove in the foot (Fig. S). Nadel entfernen und, wie Abb. R zeigt, Finish sewing the zip. Now sew down das Reil3verschlul3band auf der - Pfaff hobbymatic 917 | Owner's Manual - Page 48
/1 NL \ Fermeture a glissière invisible Reglage de Ia machine voir pages 42, 43. a Voici comment 1 faudra proc . Voltare il bordo sinistro da cucire verso l'esterno (fig. N). Porre sopra Ia parte siniStra aperta della cerniera come indicato in fig. 0. I dentini della cerniera sporgono leggermente - Pfaff hobbymatic 917 | Owner's Manual - Page 49
down at the same time as you sew the zip. The zip teeth run along the right guiding edge of the foot (Fig. N). Shortly before the end of the seam, leave the needle down in the fabric, raise the zipper foot, open the zip, lower the zipper foot again and finish sewing the seam. Close the zip. Pin - Pfaff hobbymatic 917 | Owner's Manual - Page 50
dame Reglage de Ia machine voir pages 42, 43 glissiere. Mettre en place et aiigner le guide-droit sur Ia lar geur de Ia piqUre de sorte que le guide droit longe ie bord du tissu (fig con degli spilli in direzione della cucitura. Imbastire Ia parte sinistra della cerniera (fig. 0). Aprire Ia cerniera. - Pfaff hobbymatic 917 | Owner's Manual - Page 51
holen. Beide Fäden bei Nâhbeginn festhaiten. Zuerst einige Stiche rn Stoff nähen. Spannen Sie die Fäden dicht Sewing foot: Darning foot (special accessory) Stitch type: Button G Tension: Ease needle thread tension Thread: Fine machine embroidery thread Needle: Size 70 Drop the machine - Pfaff hobbymatic 917 | Owner's Manual - Page 52
inferiore. Trattenere ambedue I flu allinizio della cucitura. Cucire dapprima alcuni punti nobla stotfa. Tendore ora i [iii uno accanto all'altro e rammendare a parte strappata. AIIa tine di ogni cucitura fare un tomato completo come si vede nel diSegno (fig. S). Quando a stoffa e coperta di tanto - Pfaff hobbymatic 917 | Owner's Manual - Page 53
StopffuB (Sonderzubehär) Stich: Taste G Oberfadenspannung foot and into the thread guide P. Place the wool thread under the darninç foot. Start at the top left and place the wool thread back and forth across the damaged area (Fig. N). Then cut the wool thread and sew over the rows of wool thread - Pfaff hobbymatic 917 | Owner's Manual - Page 54
P del file. It fib si trova sotto it piedino per rammendare. Lei deve inizia re in alto a sinistra e deve tendere it fib di lana attraverso a parte che Si intende rammendare (fig. N). tnfine it file di lana viene tagliato ed i fill di lana tesi prima sulta stoffa vengono era cucite con un - Pfaff hobbymatic 917 | Owner's Manual - Page 55
edge of the needle plate. Push the toot downwards the needle plate is loosened. Remove needle plate Clean both machine feed and the vicinil of the sewing hook with a soft brush. D not oil the machine. All you have to do is put a drop of oil into the hook race way now and then - Pfaff hobbymatic 917 | Owner's Manual - Page 56
0 glei ten. Die Gluhlampe hochdrücken und nach P drehen. 4 Changing the bulb • Pull Out the mains plug. Place the edge guide, slightly diagonally, into opening N in the head of the machine. Press down the housing of the lamp and hold it fast. Push the bulb upwards, then in direction 0 and pull it - Pfaff hobbymatic 917 | Owner's Manual - Page 57
Kugelspitze Grobmaschige Strickstoffe, Wirkstoffe, Lastex, Interlock, Quiana, Simplex - - mittlere Kugelspitze - -- grol3e Kugelspitze Speziell für Pfaff entwickelte Stretchnadel. Besonders gut geeignet für emptindliche Stretch- und Wirkstoffe Grobmaschige Miederwaren, Lycra, Simplex, Lastex - Pfaff hobbymatic 917 | Owner's Manual - Page 58
Nadel-Tabelle ______- F -- Bezeichnung I 130/705H-ZWI I Stärke: 80 130/705H-ZWI Stärke: 80 Stärke: 90 Stärke: 100 Stichlange 2,5mm 2,5mm 2,5mm 2,5mm 3,0mm - - Stichbreite - - - - - Nadelentfernung 1,6mm 2,0mm 2,5mm 3,0mm 4,0 mm Geeignet für -__ normaleBiesen normale Biesen breite - Pfaff hobbymatic 917 | Owner's Manual - Page 59
-- Medium ball point Heavy ball point Stretch-fabric needle developed especially for Pfaff. for delicate stretch Particularly and knitted suitable fabncs. Wide-meshed corsetry, Lycra Seams topstitched with buttonhole silk or No. 30/3 synthetic thread. 130/705 H-WING 100 _- C - Hemstitching - Pfaff hobbymatic 917 | Owner's Manual - Page 60
\leedle chart _______ System & No. r Stitch length 130/705H-ZWI 80 130/705 H-ZWI 80 90 100 2.5 mm 2.5 mm - 2.5 mm 2.5 mm 3.0mm Stitch width - - Needle spacing 1.6mm 2.0mm - . - - 2.5 mm 3.0 mm 4.0mm - Suitable for Medium-wide cording Wide cording Extra wide cording Extra-widecording{ - Pfaff hobbymatic 917 | Owner's Manual - Page 61
ronde pointue Tissus tricotés grancle maiNe, tissus maille, Lastex, Interlock, Quiana, Simplex Aiguille Stretch, spécialement développee pour machines Pfaff. Convient tout particuli rement pour tissus stretch et maille délicats Lycra grande maille (gaines, combines, etc. Lycra, Simplex, Lastex - Pfaff hobbymatic 917 | Owner's Manual - Page 62
äbleau des aiguilles Designation 130/705H-ZW Grosseur: 80 Longueur de point 2,5 mm 2,5 mm Largeur de point - - Espacement des aiguilles 16mm 2,0 mm lJtdisations nervures normales 130/705 H-ZW1 Grosseur: 80 Grosseur: 90 Grosseur: 100 2,5mm 2.5 mm 3.0mm i 2,5 mm 3,0 mm 40mm nervures larges - Pfaff hobbymatic 917 | Owner's Manual - Page 63
di lana, velluto, cuciture omamentali, ricami stoffe a maglia larga, tessuti in maglia in genere, Lastex, Interlock, Quiana, I Simplex ago speciale Pfaff per punti flexi. Adatto particolarmente per stoffe delicate elastiche e in maglia tessuti per busti a maglia larga, Lycra, Simplex. Lastex punta - Pfaff hobbymatic 917 | Owner's Manual - Page 64
ibella degli aghi Denominazione unghezzaIarghezza punto punto 130/705 HZWl 2,5 mm Grossezza: 80 2,5 mm 130/750H-ZWI Grossezza: 80 Grossezza 90 Grossezza: 100 2,5 mm 2.5 mm 3,0mm distanza aghi 1,6 mm 2,0 mm Indicato per nervature normali nervature normali 2.5mm 3.0mm 4,0mm nervature Iarghe - Pfaff hobbymatic 917 | Owner's Manual - Page 65
4 Nahstorungen und ihre Beseitigung Ursache: Beseitigung: 1. Die Maschine Iäf3t Stiche aus Die Nadel 1st nicht richtig eirigesetzt. Es ist eine falsche Nadel eingesetzt. Die Nadel ist verbogen oder stumpf. Die Maschine st nicht richtig eingefadelt. - Pfaff hobbymatic 917 | Owner's Manual - Page 66
Ursache: Beseitigung: 5. Die Maschine transportiert nicht oder unregelmaBig Zwischen den TransporteurZahnreihen hat sich Nähstaub festgeprel3t. Stichplatte abnehmen. Nähstaub mit Pinsel entfernen. Transporteur st versenkt. Versenkschieber steht rechts. Versenkschieber nach inks stelten. 6. - Pfaff hobbymatic 917 | Owner's Manual - Page 67
. Insert thicker needle. See par. 1 above. Regulate thread tension. Use onty. good-quality thread. Insert new needle and push it up as far as it will go. Insert new needle. Refer to needle table. Let machine feed the work alone. Only guide the material lightly. When inserting the bobbin case, push - Pfaff hobbymatic 917 | Owner's Manual - Page 68
ends and put a drop of oil into hook raceway. 7. Fundamental rules Before exchanging either sewing foot or needle, Never run a threaded machine unless there is a foot. If you have to leave the machine, even for the master switch. This is particularly important switch off master switch 125. piece - Pfaff hobbymatic 917 | Owner's Manual - Page 69
n'est pas introduite correctement. a Introduire Ia nouvelle aiguille fond. Remplacer l'aiguille. Tenir compte du tableau des aiguilles. Laisser a machine entralner seule. Guider legerement I'ouvrage. Appuyer sur a boite a canette a sa mise en place. jusquà l'emboItage perceptible. 4. Couture - Pfaff hobbymatic 917 | Owner's Manual - Page 70
marche arrière Enlever a plaque a aiguille, ôter les bourres au pinceau. Placer le bouton abaisse-grifte a gauche. en position droite). 6. Marche dure de Ia machine Des bribes de fit se sont prises dans Ia coursière du crochet. Enlever les bribes de fit et mettre une goutte d'huite dans a coursi - Pfaff hobbymatic 917 | Owner's Manual - Page 71
ago sbagliato. L'ago è storto o spuntato. e La macchina non infilata bene. L'ago è troppo fine per ii fib. Inserire l'ago fino allarresto. La parte piatta del fusto verso dietro. Inserire un ago sistema 130/705 H. Cambiare 'ago. Controllare I'infilatura. Utilizar una aguja mas grused. 2. II f lb - Pfaff hobbymatic 917 | Owner's Manual - Page 72
Inconveniente Come ovviaro 5. La macchina non trasporta o trasporta solo irregolarmente Tra I dentini del trasporto si è pressata delta polvere di cucito. Togliere a placa dell'ago e pulire I dentini con un pennello. II trasporto è abbassato. ii dispositivo per abbassare ii trasporto Si trova a - Pfaff hobbymatic 917 | Owner's Manual - Page 73
Sonderzubehör Das Sonderzubehör 1st für speziefle Näharbeiten. Es 1st be) ihrern Handler gegen Berechnung erhältlich. Für Nähtüe mt Schaft Zum Lösen der Befestigungsschraube des Nähful3schalters elne Münze verwenden. / ZubenCr Besteli-Nr. N dharheit A9p1 iation sfu It 93035920-91 zum - Pfaff hobbymatic 917 | Owner's Manual - Page 74
Inhaltsverzeichnis Abstepparbeiten Anlasser Blindstich Einstellracl für Zierstiche Elektrischer Anschki6 Fadenabschneider Glühlampe auswechseln Hosenreil3verschluB (Damen) Knopfannáhen Knopflochnahen Nadel auswechseln Nadeltabelle Nahtreil3verschlul3 Nàhfül3e Nähfü8e auswechseln NähstOrungen und - Pfaff hobbymatic 917 | Owner's Manual - Page 75
at an extra charge. Use a coin to loosen the screw of the sewing foot holder. ssory Part No. Sewing Operation Appliqué toot 93-035920-91 For appliqué work Binder (remove sewing toot holder) Cording foot. 5 grooves (twin needle with 18-2.5 mm needle gauge) Cording toot, 7 grooves (twin_needle - Pfaff hobbymatic 917 | Owner's Manual - Page 76
sewing foot Checking the bobbin thread tension Checking the needle thread Sewing buttonholes Sewing feet Sewing in zippers Sewing on buttons Thread cutter Thumb wheel for fancy stitches Topstitching Upper threading Utility- and stretch-stitch combinations Work support/accessory box Zippers - Pfaff hobbymatic 917 | Owner's Manual - Page 77
pour desserrer a vis de fixation du support du pied presseur. /"essoires Pied pour applications Bordeur (enlever support du pied) Pied a nervures, 5 6,5 mm Pied fronceur Pied guide-cordonnet Pied overlock Ourleur (bord route) 2 mm Ourleur 3 mm Pied a repriser Pied guide-bord pour tricot Pi: ed - Pfaff hobbymatic 917 | Owner's Manual - Page 78
Table des matières Abassement de a griffe Bobinage Boite de rangement des accessoires Branchement électrique Changement de 'aiguille Changement de l'ampoute Changement du pied presseur Combinaisons de points elastiques at utilitaires ContrOle de a tension du fil d'aiguiile ContrOle de a tension du - Pfaff hobbymatic 917 | Owner's Manual - Page 79
Accessori fuori corredo Gli accessori fuori corredo servono per lavori di cucito speciali. Si possono acquistare nei negozi Pfaff. Per piedini con gambo Per allentare Ia vite del porta-piedino usare una moneta. essorio No. dordine avoro di Cucito Piedino per applicazioni Pedino per - Pfaff hobbymatic 917 | Owner's Manual - Page 80
Indice Attaccatura bottoni . Avvolgere Ia spolina Cerniera lampo americana Cerniere lampo Cerniere lampo per pantaloni da signora Collegamento elettrico Combinazioni di punti utili e di punti flexi (stretch) . Come abbassare ii trasporto Controllo della tensione inferiore Controllo della tensione - Pfaff hobbymatic 917 | Owner's Manual - Page 81
Programmtabelle Die Tabelle zeigt die Programmnummer, den dazugeharenden Stich und darunter, welche Tasten zu drücken sind. Bei alien Programmen mit dem Hinweis stretch" ist der Stichlängen-Einsteiler bis zum Anschiag auf ,,stretch" - Pfaff hobbymatic 917 | Owner's Manual - Page 82
en ist die Stichlänge nach Wunsch zu wählen. In der Texttabelle sind Bezeichnung md Anwendung der einzelnen Programme angegeben. 07 08 09 10 /\/ ..-iI \/\ z -.Ji /\/ .-.iI I \/\ -.JI /\/ - ..-II \/\ I 11 12 13 14 15 16 17 tØ %' Ii \/\ I M ..- > \\ I r- L. -ii .) M - L-I II - Pfaff hobbymatic 917 | Owner's Manual - Page 83
stitch 04 Elastic triple straight stitch 05 - Elastic triple zgzag stich 06 Elastic stitch 07 Honeycomb stitch 08 Blindstitch Application Buttonholes v;thout well as sewing and mending corsetry. Inserting patches and darning rips on elastic fabrics. Sewing on elastic threads or covering - Pfaff hobbymatic 917 | Owner's Manual - Page 84
and edge finishing seams on knitted fabrics. Ornamental seam on light clothing. Inserting patches and darning rips on elastic materials or sewing ornamental seams on elastic fabrics. Decorative cover seams, e. g. on aprons. 15 Lampshade stitch, wide Classical ornamental seam on all plain fabrics - Pfaff hobbymatic 917 | Owner's Manual - Page 85
Tableau des programmes Le tableau indique le numéro du programme, le schema du point correspondant et es différents reglages a effectuer sur a machine. Pour bus es programmes pour vus de Ia mention stretch, le bouton réglant a Iongueur du point est a tourner a 02 cD .03 I II I GID I C / /\: / \ - Pfaff hobbymatic 917 | Owner's Manual - Page 86
fond sur Ia position stretch. Pour es autres programmes a longucur du point peut être choisie a volonté. Dans le tableau descriplif figurent es designations et es applications des différents points O7O8O9HO1112u13H4 15 /\/ \/\ zc /\/ \/\ \/\ .-il '-Jt -.il I .-il -ll Ii \/\ .? f i Ii \/\ - Pfaff hobbymatic 917 | Owner's Manual - Page 87
La La in tuttaatubbeellilpaaroidngedriiacmparmoiiigprcraoomngrmainmidmicaaz, ioii nreela"tfilvexoi"puonctcoorer,e sotto, quail regolare ii tasti occorre premere. regolatore del punto 1mb ali'arresto su "stretch." 02 03 04 05 06 II II , CI D I CD j (E) "\ / - .-... - ..-- - - Pfaff hobbymatic 917 | Owner's Manual - Page 88
gli actri punti Si PuÔ regotare a unghezza dcl puill 1 v luii tto denominazione e applicazione der singoli progrdmrTn 7 08 09 10 11 '-...lI ii /\/ \/\ : iI ii -'-Ii iI Ii 12 I 13 14 15 :16 17 A L-i \/\ ri L \/\ A '. _- L---I fli _-// ,' A i l-l \/\ %' ---- H H K K 1 L K 'L
-
 1
1 -
 2
2 -
 3
3 -
 4
4 -
 5
5 -
 6
6 -
 7
7 -
8
-
9
-
10
-
11
-
12
-
13
-
14
-
15
-
16
-
17
-
18
-
19
-
20
-
21
-
22
-
23
-
24
-
25
-
26
-
27
-
28
-
29
-
30
-
31
-
32
-
33
-
34
-
35
-
36
-
37
-
38
-
39
-
40
-
41
-
42
-
43
-
44
-
45
-
46
-
47
-
48
-
49
-
50
-
51
-
52
-
53
-
54
-
55
-
56
-
57
-
58
-
59
-
60
-
61
-
62
-
63
-
64
-
65
-
66
-
67
-
68
-
69
-
70
-
71
-
72
-
73
-
74
-
75
-
76
-
77
-
78
-
79
-
80
-
81
-
82
-
83
-
84
-
85
-
86
-
87
-
88
 |
 |
Bedlenungsanlejtun
Instruction
Boofr
Mode
d’empioj
Libreo
istruzionj