Ricoh Aficio MP 6000 General Settings Guide - Page 17
Connecting to the USB Interface, Connect the USB 2.0 interface cable to the USB 2.0 port.
 |
View all Ricoh Aficio MP 6000 manuals
Add to My Manuals
Save this manual to your list of manuals |
Page 17 highlights
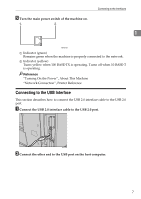
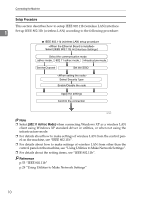
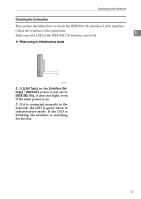
E Turn the main power switch of the machine on. Connecting to the Interfaces 1 AMM008S A Indicator (green) Remains green when the machine is properly connected to the network. B Indicator (yellow) Turns yellow when 100 BASE-TX is operating. Turns off when 10 BASE-T is operating. Reference "Turning On the Power", About This Machine "Network Connection", Printer Reference Connecting to the USB Interface This section describes how to connect the USB 2.0 interface cable to the USB 2.0 port. A Connect the USB 2.0 interface cable to the USB 2.0 port. BEY004S B Connect the other end to the USB port on the host computer. 7
-
 1
1 -
2
-
3
-
4
-
5
-
6
-
7
-
8
-
9
-
10
-
11
-
 12
12 -
 13
13 -
 14
14 -
 15
15 -
 16
16 -
 17
17 -
 18
18 -
 19
19 -
 20
20 -
 21
21 -
 22
22 -
23
-
24
-
25
-
26
-
27
-
28
-
29
-
30
-
31
-
32
-
33
-
34
-
35
-
36
-
37
-
38
-
39
-
40
-
41
-
42
-
43
-
44
-
45
-
46
-
47
-
48
-
49
-
50
-
51
-
52
-
53
-
54
-
55
-
56
-
57
-
58
-
59
-
60
-
61
-
62
-
63
-
64
-
65
-
66
-
67
-
68
-
69
-
70
-
71
-
72
-
73
-
74
-
75
-
76
-
77
-
78
-
79
-
80
-
81
-
82
-
83
-
84
-
85
-
86
-
87
-
88
-
89
-
90
-
91
-
92
-
93
-
94
-
95
-
96
-
97
-
98
-
99
-
100
-
101
-
102
-
103
-
104
-
105
-
106
-
107
-
108
-
109
-
110
-
111
-
112
-
113
-
114
-
115
-
116
-
117
-
118
-
119
-
120
-
121
-
122
-
123
-
124
-
125
-
126
-
127
-
128
-
129
-
130
-
131
-
132
-
133
-
134
-
135
-
136
-
137
-
138
-
139
-
140
-
141
-
142
-
143
-
144
-
145
-
146
-
147
-
148
-
149
-
150
-
151
-
152
-
153
-
154
-
155
-
156
-
157
-
158
-
159
-
160
-
161
-
162
-
163
-
164
-
165
-
166
-
167
-
168
-
169
-
170
-
171
-
172
-
173
-
174
-
175
-
176
-
177
-
178
-
179
-
180
-
181
-
182
-
183
-
184
-
185
-
186
-
187
-
188
-
189
-
190
-
191
-
192
-
193
-
194
-
195
-
196
-
197
-
198
-
199
-
200
-
201
-
202
-
203
-
204
-
205
-
206
-
207
-
208
-
209
-
210
-
211
-
212
-
213
-
214
-
215
-
216
-
217
-
218
-
219
-
220
-
221
-
222
-
223
-
224
-
225
-
226
-
227
-
228
-
229
-
230
-
231
-
232
-
233
-
234
-
235
-
236
-
237
-
238
-
239
-
240
-
241
-
242
-
243
-
244
-
245
-
246
-
247
-
248
-
249
-
250
-
251
-
252
-
253
-
254
-
255
-
256
-
257
-
258
-
259
-
260
-
261
-
262
-
263
-
264
-
265
-
266
-
267
-
268
-
269
-
270
-
271
-
272
-
273
-
274
-
275
-
276
-
277
-
278
-
279
-
280
-
281
-
282
-
283
-
284
-
285
-
286
-
287
-
288
-
289
-
290
-
291
-
292
-
293
-
294
-
295
-
296
-
297
-
298
-
299
-
300
-
301
-
302
-
303
-
304
-
305
-
306
-
307
-
308
-
309
-
310
 |
 |

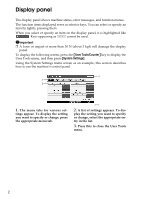
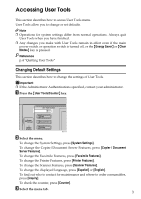
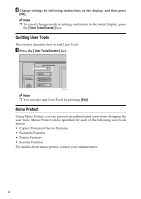
Connecting to the Interfaces
7
1
E
Turn the main power switch of the machine on.
A
Indicator (green)
Remains green when the machine is properly connected to the network.
B
Indicator (yellow)
Turns yellow when 100 BASE-TX is operating. Turns off when 10 BASE-T
is operating.
Reference
“Turning On the Power”, About This Machine
“Network Connection”, Printer Reference
Connecting to the USB Interface
This section describes how to connect the USB 2.0 interface cable to the USB 2.0
port.
A
Connect the USB 2.0 interface cable to the USB 2.0 port.
B
Connect the other end to the USB port on the host computer.
AMM008S
BEY004S