Samsung SGH-I747 User Manual Ver.lem_f5 (English(north America)) - Page 99
Camcorder Options, Camera / Camcorder Mode, Live Shooting, Self portrait, Recording mode
 |
View all Samsung SGH-I747 manuals
Add to My Manuals
Save this manual to your list of manuals |
Page 99 highlights
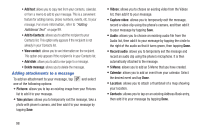
3. Using the phone's main display screen as a viewfinder, adjust the image by aiming the camcorder at the subject. 4. Before you take a video, use the Up and Down Volume keys to zoom in or out. You can magnify the video up to x4 (400 percent). - or - Pinch the screen to zoom out or pinch outwards to zoom in. 5. Tap the Video key ( ) to begin shooting video. The red light will blink while recording. 6. You can tap the screen to move the focus to the area you touch. 7. Tap to turn on auto focus. This will automatically focus on the middle of the screen. 8. To capture an image from the video while recording, tap . This feature is not available when the antishake feature is activated. 9. Tap the Video key ( ) again to stop the recording and save the video file to your Camera folder. 10. Once the file has been saved, tap the image viewer, then tap to play your video for review. 11. Press to return to the viewer. Camcorder Options Options are represented by icons across both sides of the screen. Camera / Camcorder Mode: allows you to take a photo in various modes. Once you change the mode, the corresponding indicator appears at the top left of the display. Slide the button up for Camera, or down for Camcorder. Live Shooting: takes a photo during a video recording session in Camcorder mode. You can view the photo in your image viewer or Gallery. Self portrait: allows you to activate the front facing camera so you can take videos of yourself or video chat. Recording mode: allows you to set the recording mode to: Normal, which is limited only by available space on the destination location and to Limit for MMS, which is limited by MMS size restrictions. Multimedia 93
-
 1
1 -
2
-
3
-
4
-
5
-
6
-
7
-
8
-
9
-
10
-
11
-
12
-
13
-
14
-
15
-
16
-
17
-
18
-
19
-
20
-
21
-
22
-
23
-
24
-
25
-
26
-
27
-
28
-
29
-
30
-
31
-
32
-
33
-
34
-
35
-
36
-
37
-
38
-
39
-
40
-
41
-
42
-
43
-
44
-
45
-
46
-
47
-
48
-
49
-
50
-
51
-
52
-
53
-
54
-
55
-
56
-
57
-
58
-
59
-
60
-
61
-
62
-
63
-
64
-
65
-
66
-
67
-
68
-
69
-
70
-
71
-
72
-
73
-
74
-
75
-
76
-
77
-
78
-
79
-
80
-
81
-
82
-
83
-
84
-
85
-
86
-
87
-
88
-
89
-
90
-
91
-
92
-
93
-
 94
94 -
 95
95 -
 96
96 -
 97
97 -
 98
98 -
 99
99 -
 100
100 -
 101
101 -
 102
102 -
 103
103 -
 104
104 -
105
-
106
-
107
-
108
-
109
-
110
-
111
-
112
-
113
-
114
-
115
-
116
-
117
-
118
-
119
-
120
-
121
-
122
-
123
-
124
-
125
-
126
-
127
-
128
-
129
-
130
-
131
-
132
-
133
-
134
-
135
-
136
-
137
-
138
-
139
-
140
-
141
-
142
-
143
-
144
-
145
-
146
-
147
-
148
-
149
-
150
-
151
-
152
-
153
-
154
-
155
-
156
-
157
-
158
-
159
-
160
-
161
-
162
-
163
-
164
-
165
-
166
-
167
-
168
-
169
-
170
-
171
-
172
-
173
-
174
-
175
-
176
-
177
-
178
-
179
-
180
-
181
-
182
-
183
-
184
-
185
-
186
-
187
-
188
-
189
-
190
-
191
-
192
-
193
-
194
-
195
-
196
-
197
-
198
-
199
-
200
-
201
-
202
-
203
-
204
-
205
-
206
-
207
-
208
-
209
-
210
-
211
-
212
-
213
-
214
-
215
-
216
-
217
-
218
-
219
-
220
-
221
-
222
-
223
-
224
-
225
-
226
-
227
-
228
-
229
-
230
-
231
-
232
 |
 |
