Sony GDM-5510 Operation Guide - Page 7
Customizing Your Monitor
 |
View all Sony GDM-5510 manuals
Add to My Manuals
Save this manual to your list of manuals |
Page 7 highlights
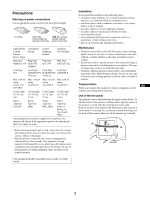
Customizing Your Monitor You can make numerous adjustments to your monitor using the on-screen menu. Navigating the menu Press the MENU button to display the menu on the screen. See page 8 for more information on using the MENU and control buttons. MENU CONTRAST / BR I GHT CONTRAST 50 1024x768 / 85Hz Use the control button to select one of the following menus. CONTRAST/BRIGHT (page 8) Adjusts the contrast and brightness. You can also call up this menu directly by moving the control button up or down while there is no menu on the screen. CONTRAST / BR I GHT CONTRAST 50 EX I T : MENU SIZE/CENTER (page 9) Adjusts the size or centering. S I ZE / CENTER GEOMETRY (page 10) Adjusts the rotation and shape of the picture. 45 EX I T : MENU GEOMETRY CONVERGENCE (page 10) Adjusts the picture's horizontal and vertical convergence. 45 EX I T : MENU CONVERGENCE T B 45 EX I T : MENU SCREEN (page 11) Adjusts the picture's quality. The options include: • degaussing the screen (DEGAUSS) • adjusting the moire cancellation (CANCEL MOIRE) • adjusting the landing (LANDING) COLOR (page 12) Adjusts the picture's color temperature to match the monitor's colors to a printed picture's colors. OPTION (page 14) Adjusts the monitor's options. The options include: • locking the controls • changing the on-screen menu language • changing the on-screen menu position • changing the picture's color temperature setting mode 0 RESET (page 14) Resets the adjustments. SCREEN DEGAUSS OK CANCEL EX I T : MENU COLOR : EASY 5000K EX I T : MENU OPT I ON CONTROL LOCK ON OFF EX I T : MENU EN RESET 1 2 CURRENT MODE OK CANCEL EX I T : MENU x Displaying the current input signal When you press the MENU button to display the menu, the horizontal/vertical frequencies of the current input signal are displayed in the menu. If the signal matches one of this monitor's factory preset modes, the resolution is also displayed. CONTRAST / BR I GHT CONTRAST 50 1024x768 / 85Hz the horizontal frequencies/ resolution of the current input signal the vertical frequencies of the current input signal (continued) 7
-
 1
1 -
 2
2 -
 3
3 -
 4
4 -
 5
5 -
 6
6 -
 7
7 -
 8
8 -
 9
9 -
 10
10 -
 11
11 -
 12
12 -
13
-
14
-
15
-
16
-
17
-
18
-
19
-
20
-
21
-
22
-
23
-
24
-
25
-
26
-
27
-
28
-
29
-
30
-
31
-
32
-
33
-
34
-
35
-
36
-
37
-
38
-
39
-
40
-
41
-
42
-
43
-
44
-
45
-
46
-
47
-
48
-
49
-
50
-
51
-
52
-
53
-
54
-
55
-
56
-
57
-
58
-
59
-
60
-
61
-
62
-
63
-
64
-
65
-
66
-
67
-
68
-
69
-
70
-
71
-
72
-
73
-
74
-
75
-
76
-
77
-
78
-
79
-
80
-
81
-
82
-
83
-
84
-
85
-
86
-
87
-
88
-
89
-
90
-
91
-
92
-
93
-
94
-
95
-
96
-
97
-
98
-
99
-
100
-
101
-
102
-
103
-
104
-
105
-
106
-
107
-
108
-
109
-
110
-
111
-
112
-
113
-
114
-
115
-
116
-
117
-
118
-
119
-
120
-
121
-
122
-
123
-
124
-
125
-
126
-
127
-
128
-
129
-
130
-
131
-
132
-
133
-
134
-
135
-
136
-
137
-
138
-
139
-
140
-
141
-
142
-
143
-
144
-
145
-
146
-
147
-
148
-
149
-
150
-
151
-
152
-
153
-
154
-
155
-
156
-
157
-
158
-
159
-
160
-
161
-
162
-
163
-
164
-
165
-
166
-
167
-
168
-
169
-
170
-
171
-
172
-
173
-
174
-
175
-
176
-
177
-
178
-
179
-
180
-
181
-
182
-
183
-
184
-
185
-
186
 |
 |
