Sony RDR-HX900 Operating Instructions
Sony RDR-HX900 Manual
 |
UPC - 027242644328
View all Sony RDR-HX900 manuals
Add to My Manuals
Save this manual to your list of manuals |
Sony RDR-HX900 manual content summary:
- Sony RDR-HX900 | Operating Instructions - Page 1
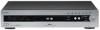
2-187-189-11(2) DVD Recorder Operating Instructions RDR-HX900 © 2004 Sony Corporation - Sony RDR-HX900 | Operating Instructions - Page 2
of the unit. Record the serial number in the space provided below. Refer to them whenever you call upon your Sony dealer regarding this product. Model No. RDR-HX900 Serial No CAUTION You are cautioned that any change or modifications not expressly approved in this manual could void your authority - Sony RDR-HX900 | Operating Instructions - Page 3
to this. If you have any questions or problems concerning your recorder, please consult your nearest Sony dealer. IMPORTANT SAFETY INSTRUCTIONS 1 Read these instructions. 2 Keep these instructions. 3 Heed all warnings. 4 Follow all instructions. 5 Do not use this apparatus near water. 6 Clean - Sony RDR-HX900 | Operating Instructions - Page 4
On Screen System 33 Using the Title List 37 Using the "Disc Info" Screen (disc settings 39 Checking the Play Information and Playing Time 41 How to Enter Characters 43 Recording 45 Before Recording 45 Timer Recording (TV GUIDE/Manual/VCR Plus 46 Checking/Changing/Canceling Timer Settings 49 - Sony RDR-HX900 | Operating Instructions - Page 5
, the internal hard disk drive is written as "HDD," and "disc" is used as a general reference for the HDD, DVDs, or CDs unless otherwise specified by the text or illustrations. • Instructions in this manual describe the controls on the remote. You can also use the controls on the recorder if they - Sony RDR-HX900 | Operating Instructions - Page 6
set top box controller to have the recorder change the channel of your cable box or satellite receiver during a timer recording (page 14). CH 103! 103 Easily search for programs with the TV Guide On Screen system - TV Guide , The TV Guide On Screen system displays a free television program - Sony RDR-HX900 | Operating Instructions - Page 7
the beginning now. Watch one title while recording another - Simultaneous Rec and Play , If you are using a DVD-RW (VR mode) or the HDD, you can watch a previously recorded program while recording another program on the same disc (page 60). Recording I think I'll watch yesterday's golf game now - Sony RDR-HX900 | Operating Instructions - Page 8
Quick Guide to Disc Types Recordable and playable discs Type Disc Logo Hard disk drive (internal) DVD+RW DVDRW VR mode Video mode DVD+R DVD-R Icon used in this manual Formatting (new discs) Compatibility with other DVD players (finalizing) (Formatting HDD unnecessary) - +RW - Sony RDR-HX900 | Operating Instructions - Page 9
Rewrite (page 45) Auto Chapter (page 91) Manual Chapter (page 68) Record Change Delete 16:9 sizes title name title (page *2 Yes Yes *3 No No Discs that cannot be recorded on • 4x-speed compatible DVD-RWs (Ver. 1.2/4x) • DVD-RWs (Ver. 1.0) • DVD+RWs that are not 2.4x-speed compatible • - Sony RDR-HX900 | Operating Instructions - Page 10
format • Data part of CD-Extras • DVD-ROMs • DVD Audio discs • DVD-RAMs • HD layer on Super Audio CDs • DVD VIDEOs with a different region code (page 11) • A disc recorded in a color system other than NTSC, such as PAL or SECAM z Hint This DVD recorder can play 8 cm CDs and 8 cm DVDs as well. 10 - Sony RDR-HX900 | Operating Instructions - Page 11
even though playing the DVD VIDEO is prohibited by area restrictions. 00V 00Hz 00W NO. X RDR-XXXX 0-000-000-00 Region code Notes • You cannot mix VR mode and Video mode on the same DVD-RW. To change the disc's format, reformat the disc (page 40). Note that the disc's contents will be erased - Sony RDR-HX900 | Operating Instructions - Page 12
the TV Guide On Screen data. • If you are using the TV Guide On Screen system and the recorder is receiving TV Guide On Screen data, you may not be able to use the remote control to change channels on the cable box when the recorder is off. Wait until the recorder has finished receiving TV Guide On - Sony RDR-HX900 | Operating Instructions - Page 13
to match the channel on the recorder (L1 or L3) to the input jack connected to the cable box or satellite receiver (LINE IN 1 or 3). Note that satellite receiver programs do not appear in the TV Guide On Screen system. Place the set top box controller near the remote sensor on the Wall cable box - Sony RDR-HX900 | Operating Instructions - Page 14
the channel on the recorder (2ch, 3ch, or 4ch) to the antenna output channel on the cable box (2ch, 3ch, or 4ch). Wall Cable box ANT IN TO TV Set top box controller (supplied) Place the set top box controller near the remote sensor on the cable box/satellite receiver. Antenna cable (supplied - Sony RDR-HX900 | Operating Instructions - Page 15
COMPONENT VIDEO IN LINE IN S VIDEO R AUDIO L VIDEO OUT 1 G-LINK 3 CONTROL S IN DIGITAL OUT Y PCM/DTS/DOLBY DIGITAL LINE OUT COAXIAL 1 R AUDIO L VIDEO PB 2 PR OPTICAL S VIDEO COMPONENT VIDEO OUT Y PB PR DVD recorder ~ AC IN TV to VHF/UHF OUT to antenna input Antenna cable (supplied - Sony RDR-HX900 | Operating Instructions - Page 16
OUT Y PB PR DVD recorder ~ AC IN (red) (blue) (green) to COMPONENT VIDEO OUT to CONTROL S IN CONTROL S TV or other equipment with a CONTROL S jack Component video cord (not supplied) C COMPONENT VIDEO IN Y (green) PB (blue) PR (red) TV, projector, or AV amplifier (receiver) : Signal flow - Sony RDR-HX900 | Operating Instructions - Page 17
C above, connect the CONTROL S IN jack to your TV's CONTROL S (OUT) jack using a control S cord (not supplied). See the instructions supplied with the TV to be connected. Note that your TV's input will not automatically switch to this recorder when you play a disc. C Connecting to component video - Sony RDR-HX900 | Operating Instructions - Page 18
of 480 progressive scan picture problems, it is recommended that the user switch the connection to the 'standard definition' output. If there are questions regarding our TV set compatibility with this model 480p DVD recorder, please contact our customer service center. • TV Guide On Screen does not - Sony RDR-HX900 | Operating Instructions - Page 19
). This will enable you to listen to sound. (red) (white) Audio/video cord (supplied) (yellow) (white) (yellow)* (red) INPUT A VIDEO L AUDIO R LINE OUT 1 R AUDIO L VIDEO S VIDEO 2 TV, projector, or AV amplifier (receiver) to LINE OUT (R-AUDIO-L) 1 or 2 VHF/UHF IN SET TOP BOX CONTROL - Sony RDR-HX900 | Operating Instructions - Page 20
Dolby Digital (5.1ch), DTS (5.1ch) Stereo amplifier (receiver): Standard, Night Note Do not connect your TV's audio output jacks to the LINE IN (AUDIO L/R) jacks at the same time. This will cause unwanted noise to come from your TV's speakers. *1 Manufactured under license from Dolby Laboratories - Sony RDR-HX900 | Operating Instructions - Page 21
outlet Notes • If the supplied remote interferes your other Sony DVD recorder or player, change the command mode number for this recorder (page 23). • Use the . - If you do not intend to use the remote for an extended period of time, remove the batteries. - If battery leakage occurs, wipe out - Sony RDR-HX900 | Operating Instructions - Page 22
connected unit, you may not be able to control your TV or AV amplifier (receiver) with some or all of the buttons below. • If you enter a new code number, the code number previously entered will be erased. • When you replace the batteries of the remote, the code number may be reset to the default - Sony RDR-HX900 | Operating Instructions - Page 23
to control the TV's volume even when the TV/DVD switch is set to DVD, repeat the steps above and enter the code number 90 (default). If you have a Sony DVD player or more than one Sony DVD recorder If the supplied remote interferes with your other Sony DVD recorder or player, set the command mode - Sony RDR-HX900 | Operating Instructions - Page 24
OSD Language Setup m Clock Setup m Cable Box/Sat. Control Setup m Tuner and Channel Setup m TV Type Setup m Audio Connection Setup m Finished! You must leave the recorder turned off for at least 24 hours to receive the TV Guide On Screen data. If your recorder is connected to a cable box, be sure to - Sony RDR-HX900 | Operating Instructions - Page 25
and Settings O RETURN - Sony RDR-HX900 | Operating Instructions - Page 26
and - Sony RDR-HX900 | Operating Instructions - Page 27
cable box/satellite receiver control, check that the control works correctly (see below). EASY SETUP Easy Setup is finished. Finish EASY SETUP Audio Connection 7/7 Dolby Digital D-PCM Dolby Digital You must leave the recorder turned off for at least 24 hours to receive the TV Guide On Screen - Sony RDR-HX900 | Operating Instructions - Page 28
satellite receiver window. Tune your cable box to channel 02. Then using your DVD recorder's remote, enter 09 to tune your cable box to channel 09. Did the cable box change to channel 09? If the cable box did not tune to channel 09, follow the instructions below for getting your recorder to control - Sony RDR-HX900 | Operating Instructions - Page 29
the front panel if the equipment has a DV/Digital8 output jack (i.LINK jack) (page 77). See also the instruction manual supplied with the connected equipment. To record on this recorder, see "Recording From a VCR or Similar Device" (page 53). Connecting to the LINE IN 1 or 3 jacks If the equipment - Sony RDR-HX900 | Operating Instructions - Page 30
Do not connect a hi-definition tuner or similar device using the component video cords. This recorder only accepts standard definition interlace signals. supplied) Audio/video cord (not supplied) to LINE 2 IN DVD recorder : Signal flow z Hint When the connected equipment outputs only monaural - Sony RDR-HX900 | Operating Instructions - Page 31
VCR, you may not receive a clear image on your TV screen. DVD recorder VCR TV Be sure to connect your VCR to the DVD recorder and your TV in the order shown below. To watch videotapes, watch the tapes through a second Line input on your TV. LINE IN 1 VCR DVD recorder TV LINE IN 2 • Do not - Sony RDR-HX900 | Operating Instructions - Page 32
from the HDD to a DVD and vice versa. Select the dubbing direction before dubbing. F SETUP (page 83): Turns on the Setup Display, which allows you to set up the recorder to suit your preferences. Note The TV GUIDE option will not contain any listings until the recorder receives the TV Guide On - Sony RDR-HX900 | Operating Instructions - Page 33
TOOLS while a DVD-RW (VR mode) is playing. Close Stop Disc Info. Erase Title Protect Title TOOLS Options for the disc or picture To return to the previous display Press O RETURN. Using the TV Guide On Screen System The TV Guide On Screen system automatically displays a free television program - Sony RDR-HX900 | Operating Instructions - Page 34
. • Your cable box's channel may suddenly change even if the recorder is turned off. This is because the set top box control has changed the channel to receive the TV Guide On Screen data. 34 Navigating the TV Guide On Screen system Number buttons Blue button [TV GUIDE] 123 14 25 36 47 58 69 7 80 - Sony RDR-HX900 | Operating Instructions - Page 35
remote when the broadcasting time for that program arrives. If more than one program is registered as a "Favorite" in the same time slot, press the blue button repeatedly to switch between the programs. To set a program for timer recording See "Recording using the TV Guide On Screen system (TV GUIDE - Sony RDR-HX900 | Operating Instructions - Page 36
on the power, the TV Guide On Screen system automatically appears on your TV screen. To turn off this function, select "SETUP" from the Main Menu Bar, and then select "Review options." Then select "Off" and press ENTER. You cannot unlock the Picture in Guide during recording. • If you are watching - Sony RDR-HX900 | Operating Instructions - Page 37
Guide to Displays Using the Title List Standard Title List (Example: DVD-RW in VR mode) HDD +RW -RWVR -RWVideo +R -R The titles of programs recorded on a disc are displayed in the Title List. Z OPEN/ CLOSE HDD TITLE LIST 123 456 789 0 CURSOR MODE DVD TOOLS - Sony RDR-HX900 | Operating Instructions - Page 38
title number. To change a title thumbnail picture (Thumbnail) (HDD/DVD-RW (VR mode) only) You can select a favorite scene for the thumbnail picture shown in the Title List menu. 1 Press TITLE LIST while a disc is in the recorder, and press ZOOM+. 2 Select a title whose thumbnail picture you - Sony RDR-HX900 | Operating Instructions - Page 39
display differ depending on the disc type or recording format. A "Disc Name" (DVD only) B "Media": Disc type C "Format": Recording format type (HDD/ DVD-RW only) D "Title no.": Total number of titles E "Protected": Indicates whether protection is set (DVD-RW in VR mode only) F "Date": Dates of when - Sony RDR-HX900 | Operating Instructions - Page 40
for playback on other equipment) +RW -RWVR -RWVideo +R -R Finalizing is necessary when you play discs recorded with this recorder on other DVD equipment. When you finalize a DVD+RW, DVD-RW (Video mode), DVD+R, or DVD-R, a DVD menu will be automatically created, which can be displayed on other - Sony RDR-HX900 | Operating Instructions - Page 41
Playing Time HDD +RW -RWVR -RWVideo +R -R DVD VCD CD DATA CD You can check the playing time and remaining time of the current title, chapter, or track. Also, you can check the disc name recorded on the DVD/CD. To unfinalize a DVD-RW (VR mode) If you cannot record or edit on a DVD-RW (VR mode - Sony RDR-HX900 | Operating Instructions - Page 42
differ depending on the disc type or playing status. ◆Front panel display Example: When playing a DVD Playing time and number of the current title A Disc type*2/format (page 8) B Title type (Original or Playlist) (page 64) C Play mode D Recording mode (page 45) E Playing status bar*3 F Title number - Sony RDR-HX900 | Operating Instructions - Page 43
of the current track m Playing time of the disc m Remaining time of the disc m CD text (when available) Notes • The recorder can only display the first level of a CD's text, such as the disc name. • The letters or symbols that cannot be displayed are replaced with "*." • Playing time of MP3 audio - Sony RDR-HX900 | Operating Instructions - Page 44
To enter a letter with an accent mark, select an accent followed by the letter. Example: Select " ` " and then "a" to enter "à." To insert a space, select "Space." 3 Repeat steps 1 and 2 to enter the remaining characters. Input row Input Title Name Kids 1. , -1 2A B C 2 3DE F 3 4GH I 4 5J K L 5 - Sony RDR-HX900 | Operating Instructions - Page 45
Recording Recording Before Recording Before you start recording... • This recorder can record on various discs. Select the disc type according to your needs (page 8). • Check that the disc has enough available space for the recording (page 39). For HDD, DVD+RWs, and DVD-RWs, you can free up disc - Sony RDR-HX900 | Operating Instructions - Page 46
Free Recordable discs HDD +RW -RWVideo +R -RWVR -R Copy-Once Copy-Never HDD -RWVR (Ver.1.1 with CPRM*) None (a blank screen is recorded) * The recorded disc can be played only on CPRM compatible equipment. Note Copy-Once programs can not be dubbed (page 73). Timer Recording (TV GUIDE/ Manual - Sony RDR-HX900 | Operating Instructions - Page 47
see that there is enough available space for the recording (DVD+RW/DVD-RW only) (page 67). Note that recordings made with the TV Guide On Screen system require one extra minute of recording time. • The Rec Mode Adjust function only works with a timer recording. It does not function with Quick Timer - Sony RDR-HX900 | Operating Instructions - Page 48
the recording mode. "Destination": Press the blue button to switch between HDD and DVD. "PlusCode": Press the number buttons. To correct the number, press M/m and enter the number again. 3 Press ENTER. To make another timer setting, select "RECORD" and repeat from step 3. 4 Press [TV GUIDE]. The - Sony RDR-HX900 | Operating Instructions - Page 49
start the recording by up to 99 minutes in advance. "End late by": Press the number buttons to extend the recording by up to 99 minutes. "Quality": Press the blue button to change the recording mode. "Destination": Press the blue button to switch between HDD and DVD. 4 Press [TV GUIDE]. ,continued - Sony RDR-HX900 | Operating Instructions - Page 50
be cut. 7:00 A 9:00 10:00 B Recording Without the Timer HDD +RW -RWVR -RWVideo +R -R HDD 123 456 789 0 DVD TV/VIDEO CH +/- z REC REC MODE X REC PAUSE x REC STOP 1 Press HDD or DVD to select a media. When you selected DVD, insert a recordable DVD. 2 Press CH +/- to select the channel or - Sony RDR-HX900 | Operating Instructions - Page 51
that it may take a few seconds for recording to stop. To pause recording Press X REC PAUSE located beneath the remote control cover. To restart recording, press the button again. To watch another TV program while recording Set your TV to the TV input using the TV/VIDEO button. z Hint If you do not - Sony RDR-HX900 | Operating Instructions - Page 52
is set to HQ, HSP, or SP. For all other recording modes, the screen size is fixed at "4:3." For DVD-RWs (VR mode), the actual picture size is recorded regardless of the setting. For example, if a 16:9 size picture is received, the disc records the picture as 16:9 even if "Rec Screen Size" is set - Sony RDR-HX900 | Operating Instructions - Page 53
this when recording to discs other than the HDD or DVD-RWs (VR mode). 5 Press X REC PAUSE to set this recorder to record pause. 6 Insert the source tape into the connected equipment and set to playback pause. 7 At the same time, press X REC PAUSE on this recorder and the pause or play button on - Sony RDR-HX900 | Operating Instructions - Page 54
Menu When you play a DVD VIDEO, or a finalized DVD+RW, DVD-RW (Video mode), DVD+R, or DVD-R, you can display the disc's menu by pressing TOP MENU or MENU. To play VIDEO CDs with PBC functions PBC (Playback Control) allows you to play VIDEO CDs interactively using the menu on your TV screen. When you - Sony RDR-HX900 | Operating Instructions - Page 55
(VIDEO CD/CD/ DATA CD only). - you make a recording (except for HDD/DVD- RWs in VR mode). To play restricted DVDs (Parental Control) If you play a restricted DVD, the message "Do you want temporarily change parental control to *?" appears on your TV screen. 1 Select "OK" and press ENTER. The display - Sony RDR-HX900 | Operating Instructions - Page 56
PROGRESSIVE m/M X PAUSE SUR Buttons Z OPEN/CLOSE AUDIO SUBTITLE ANGLE Operations Discs Stops play and opens the disc tray. All discs Selects one of the audio tracks recorded on the disc when pressed repeatedly. DVD Selects the language. HDD -RWVR Selects the main or sub sound. VCD CD DATA CD - Sony RDR-HX900 | Operating Instructions - Page 57
DVD * TVS was developed by Sony to produce home surround sound with just a stereo TV discs * FR3 and FF3 are only available for the HDD and DVDs. Plays in slow motion when pressed for more than one second in pause mode. Plays one frame at a time when pressed briefly in pause mode. HDD -RWVideo DVD - Sony RDR-HX900 | Operating Instructions - Page 58
modes, turn off the surround settings of the connected TV or amplifier (receiver). • Make sure that your listening position is between and at an equal distance from your speakers, and that the speakers are located in similar surroundings. • The TVS function cannot be used with discs recorded - Sony RDR-HX900 | Operating Instructions - Page 59
blurred, set "BNR" to "Off." • Depending on the disc or the scene being played, the above BNR, Y NR, or C NR effects may be hard to discern. And, these functions may not work with some screen sizes. • When playing a disc recorded in SLP recording mode, the BNR setting may have little effect. • When - Sony RDR-HX900 | Operating Instructions - Page 60
recording to the HDD: Play another title on the HDD. Play a previously recorded program on a DVD by pressing DVD. • While recording to a DVD: Play a previously recorded program on the HDD by pressing HDD. • While recording to a DVD-RW (VR mode)*1: Play another title on the same DVD-RW (VR mode) disc - Sony RDR-HX900 | Operating Instructions - Page 61
. Note The DVD's playback picture on your TV screen freezes for a few seconds when you fast forward/fast reverse or instant replay/advance during Simultaneous Rec and Play. Searching for a Title/ Chapter/Track, etc. HDD +RW -RWVR -RWVideo +R -R DVD VCD CD DATA CD You can search a disc by title - Sony RDR-HX900 | Operating Instructions - Page 62
also play discs recorded in Multi Session. See the instructions supplied with the CD-R/CDRW drives and the recording software (not supplied) for details on the recording format. Note on Multi Session discs If MP3 audio tracks are recorded in the first session, the recorder will also play MP3 audio - Sony RDR-HX900 | Operating Instructions - Page 63
). • If you add numbers (01, 02, 03, etc.) to the front of the track names when you store the tracks in a disc, the tracks will be played in that order. • Since a disc with many trees takes longer to start playback, it is recommended that you create albums with no more than two trees. 63 - Sony RDR-HX900 | Operating Instructions - Page 64
the edited contents if you remove the disc or a timer recording starts while editing. Edit options for the HDD and DVD+RWs/DVD-RWs (Video mode)/ DVD+Rs/DVD-Rs HDD +RW -RWVideo +R -R You can perform simple edits. Since Video mode titles are actual recordings on the disc, you cannot undo any edits - Sony RDR-HX900 | Operating Instructions - Page 65
editing is irreversible. To edit a DVD-RW (VR mode) without changing the original recordings, create a Playlist title (page 68). Note When editing a DVD+R, DVD-R, or DVD-RW (Video mode), finish all editing before finalizing the disc. You cannot edit a finalized disc. Notes • The Playlist title - Sony RDR-HX900 | Operating Instructions - Page 66
66), or erase all of the titles on the disc at once (page 40). • You can label or re-label DVDs (page 40). Note You cannot protect Playlist titles. To continue, select "Yes," and repeat from step 2. To finish, select "No." HDD +RW -RWVR You can select a section (scene) in a title and erase it - Sony RDR-HX900 | Operating Instructions - Page 67
disc space (Disc Map) +RW -RWVideo When recording on a DVD+RW or DVD-RW (Video mode), the recorder searches for the largest open space and records there. Before you start, check the disc status by using Disc "OK," and press ENTER. The selected titles are erased, freeing up disc space. ,continued 67 - Sony RDR-HX900 | Operating Instructions - Page 68
Creating chapters manually HDD -RWVR You can manually insert a chapter mark at any point you like during playback or recording. Press CHAPTER details, see "Edit options for DVD-RWs (VR mode)" (page 64). Note Once you create a Playlist title from original titles, you will be unable to erase or edit - Sony RDR-HX900 | Operating Instructions - Page 69
The display for setting the start point (IN) appears. The title starts to play in the background. Capture (Set IN point) 2 5ch 8:00PM - 9:00PM The display for setting the end point (OUT) appears, and the title continues to play in the background. Capture (Set OUT point) 2 5ch 8:00PM - 9:00PM IN - Sony RDR-HX900 | Operating Instructions - Page 70
. Then, select "Playlist" and press ENTER. When the Title List (Playlist) menu appears, select a title and press H PLAY. z Hint When a Playlist title is created, the IN and OUT points will become chapter marks, and each scene will become a chapter. Note The picture may pause when the edited scene is - Sony RDR-HX900 | Operating Instructions - Page 71
Combining multiple Playlist titles (Combine Titles) -RWVR 1 Press TITLE LIST to turn on the Title List (Playlist) menu. If the Title List (Original) menu appears, press TOOLS and select "Playlist." 2 Press TOOLS to select "Combine Titles," and press ENTER. The display for selecting titles appears. - Sony RDR-HX900 | Operating Instructions - Page 72
depending on the disc status. Follow the instructions that appear on the screen. • When a message appears and indicates that the control information is full, erase unnecessary titles (page 65). • You cannot dub from DVD VIDEOs or a DVD recorded on other DVD equipment to the HDD. • Thumbnails that - Sony RDR-HX900 | Operating Instructions - Page 73
a non-rewritable DVD such as a DVD-R. Copy protection signals Original recording Dubbing , Copy-Free HDD +RW -RWVR -RWVideo +R -R +RW -RWVR -RWVideo +R -R HDD Copy-Once HDD -RWVR * recorded in gray. Copy-Never recorded in gray. * Version 1.1 CPRM-compatible DVD-RW (VR mode) only (page - Sony RDR-HX900 | Operating Instructions - Page 74
the title to be dubbed. 74 z Hints • If disc space is still insufficient for the selected dubbing mode, erase unnecessary parts of the title, or free up disc space by erasing titles on the disc (page 65). • You can turn off the recorder without affecting the dubbing. Press "/1 during dubbing. • You - Sony RDR-HX900 | Operating Instructions - Page 75
World Cup Final 6/20 Rec Mode: SP Dub Mode: Fast 1.2GB A Total size of the selected titles. B Direction of dubbing. C Available space on the disc to be dubbed (approximate). D Information about the title to be dubbed (title name, original recording mode, dubbing mode, and data size after dubbing - Sony RDR-HX900 | Operating Instructions - Page 76
and press ENTER. To automatically adjust the dubbing mode (Auto Dub Mode) The recorder adjusts the dubbing mode so all of the titles fit in. The same dubbing mode is set for all of the titles. If disc space is insufficient for the selected dubbing mode, the following display appears after step 8 of - Sony RDR-HX900 | Operating Instructions - Page 77
, which limit recording. • If you want to play the disc on other DVD equipment, finalize the disc (page 40). Hookups DVD recorder To DV IN i.LINK cable (not supplied) DV output Digital video camera : Signal flow Z OPEN/ CLOSE HDD 123 456 789 0 DVD TOOLS M/m, ENTER REC MODE INPUT SELECT - Sony RDR-HX900 | Operating Instructions - Page 78
picture size of the source image changes, or if there is nothing recorded on the tape. * Does not appear when "Set Top Box Control" is set to "On." 4 Press REC MODE on the remote repeatedly to select the recording mode. The recording mode changes as follows: HQ HSP SP LP EP SLP For details about - Sony RDR-HX900 | Operating Instructions - Page 79
seconds for the recorder to stop recording. z Hints • If you set "Finalize Disc" to "Auto" in Features Setup (page 93), the recorded disc (except DVD-RW(VR mode)) will automatically be finalized after recording is finished. • You can play back a previously recorded title on the HDD while One Touch - Sony RDR-HX900 | Operating Instructions - Page 80
title, and the title is divided into chapters. For a DVDRW (VR mode) and the HDD, every shooting on the tape and each selected scene becomes a chapter on the disc (Auto Scene Chaptering function). For other discs, the recorder divides the title in either 6 or 15-minute intervals, according to the - Sony RDR-HX900 | Operating Instructions - Page 81
asks if you want to start recording. To change the disc media, select "Media" and press M/m. To change the dubbing mode, select "Dub Mode" and press M/m. DV / D8 Dubbing 2.6GB Change the dubbing mode if necessary. Select "Start" to start dubbing. Media DVD Dub Mode SP 0.8GB Start Cancel Data - Sony RDR-HX900 | Operating Instructions - Page 82
from step 9. To have the recorder adjust the dubbing mode, select "Auto Dub Mode." • If there is not enough disc space even after changing the dubbing mode, the display asks if you want to record halfway. To continue, select "OK." To stop during recording Open the remote's cover and press x REC STOP - Sony RDR-HX900 | Operating Instructions - Page 83
way. Note Playback settings stored in the disc take priority over the Setup Display settings, Features Options Tuner Preset Area Setup Clock Set Top Box Control Language Easy TV Type" 1 Press SYSTEM MENU while the recorder is in stop mode. The System Menu appears. SYSTEM MENU TITLE LIST TV GUIDE - Sony RDR-HX900 | Operating Instructions - Page 84
Notes • You cannot presets channels for the connected cable box or satellite receiver. • You cannot select "Tuner Preset" when you set "Set Top Box Control" to "On." Auto Preset Automatically presets the receivable channels. The recorder can receive VHF channels 2 to 13, UHF channels 14 to 69, and - Sony RDR-HX900 | Operating Instructions - Page 85
ENTER. Settings - Tuner Preset Ch1 Antenna / Cable : Auto Preset Manual Set : AFT : CAanbtelenna Cable Add On "Cable": Presets cable TV channels. "Antenna": Presets VHF and UHF channels. 4 Select an option, and press ENTER. 5 Select "Auto Preset," and press ENTER. All receivable channels are - Sony RDR-HX900 | Operating Instructions - Page 86
"Clock," and press ENTER. Settings - Clock - Present Time Set the time and date manually. Thu 1 / 1 / 2004 12 : 00 AM 3 Press M/m to set the month Top Box Control" to "On" or "Off," all of the timer recording settings will be canceled. ◆Brand Code See "Cable Box/Satellite Receiver Brand Code - Sony RDR-HX900 | Operating Instructions - Page 87
receiver only accepts a two digit channel number. ◆Mode for SET button Select "Mode 1" or "Mode 2" if your cable box or satellite receiver according to the type of TV, tuner, or decoder connected to the DVD recorder. 1 Press SYSTEM MENU while the recorder is in stop mode. 2 Select "SETUP," and - Sony RDR-HX900 | Operating Instructions - Page 88
disc, "4:3 Letter Box" may be selected automatically instead of "4:3 Pan Scan" or vice versa. Pause Mode (DVDs only) Selects the picture quality in pause mode up on the front panel and the recorder outputs progressive signals. On Raises the based software is derived from TV, such as dramas and sit - Sony RDR-HX900 | Operating Instructions - Page 89
conditions. 1 Press SYSTEM MENU while the recorder is in stop mode. 2 Select "SETUP," and press ENTER Tuner Audio Selects the sound to be recorded. Main SAP Records only the main sound. Records only the SAP (Second Audio Program) sound. Note If no SAP sound is received, the main sound is recorded - Sony RDR-HX900 | Operating Instructions - Page 90
playing a DVD that conforms to "Audio DRC." This affects the output from the following jacks: - LINE OUT (AUDIO L/R) 1/2 jacks - DIGITAL OUT (OPTICAL or COAXIAL) jack only when "Dolby Digital" is set to "D-PCM." Standard TV Mode a component such as an amplifier (receiver) with a digital input jack. - Sony RDR-HX900 | Operating Instructions - Page 91
Recording and Parental Control Settings (Features) The Features Setup allows you to adjust recording and parental control settings. 1 Press SYSTEM MENU while the recorder is in stop mode tapes to HDD and DVD-RWs (VR mode). Chapter marks are automatically entered where the recordings start on the - Sony RDR-HX900 | Operating Instructions - Page 92
Setup" in Options Setup (page 94). • When you play discs which do not have the Parental Control function, playback cannot be limited on this recorder. • Depending on the disc, you may be asked to change the Parental Control level while playing the disc. In this case, enter your password, then change - Sony RDR-HX900 | Operating Instructions - Page 93
(for all recordable discs except DVD-RW in VR mode) Selects whether or not to finalize the disc automatically following One Touch Dubbing (page 79). Auto Manual Automatically finalizes the disc following One Touch Dubbing. Allows you to finalize the disc manually. HQ Setting (HDD only) Selects - Sony RDR-HX900 | Operating Instructions - Page 94
is pressed. Command Mode Changes the Command Mode of the recorder if other DVD equipment is assigned the same Command Mode. Be sure to match the Command Mode switch on the remote to the setting made here. For details, see "If you have a Sony DVD player or more than one Sony DVD recorder" on page 23 - Sony RDR-HX900 | Operating Instructions - Page 95
) Select this to run the Easy Setup program. 1 Press SYSTEM MENU while the recorder is in stop mode. 2 Select "SETUP," and press ENTER. 3 Select "Easy Setup," and press ENTER. SETUP Settings Video Audio Features Options Easy Setup Easy Setup 4 Press ENTER. 5 Select "Start," - Sony RDR-HX900 | Operating Instructions - Page 96
If you experience any of the following difficulties while using the recorder, use this troubleshooting guide to help remedy the problem before requesting repairs. Should any problem persist, consult your nearest Sony dealer. Power The power does not turn on. , Check that the AC power cord - Sony RDR-HX900 | Operating Instructions - Page 97
of TV Guide On Screen (page 36). Program listings for some channels is missing. , It may take several days for the recorded to receive all of the TV Guide to the amplifier is incorrect. , The recorder is in reverse play, fast-forward, slow motion, or pause mode. , If the audio signal does not - Sony RDR-HX900 | Operating Instructions - Page 98
may not be able to do some of the operations above. See the instruction manual supplied with the disc. The language for the sound track cannot be changed. , Multilingual tracks are not recorded on the DVD being played. , The DVD VIDEO prohibits the changing of the language for the sound track. , Try - Sony RDR-HX900 | Operating Instructions - Page 99
, The timer setting overlapped another setting that was set later. , There is no DVD inside the recorder. , There is not enough HDD or DVD disc space for the recording. , The set top box was turned off. , The set top box controller was incorrectly connected (page 13). , The settings in "Set Top Box - Sony RDR-HX900 | Operating Instructions - Page 100
, Set the TV/DVD switch to DVD (page 22). Other Sony equipment responds to the remote. , The same command mode is set for both the equipment and recorder. Set a different command mode for the recorder (page 23). Others The recorder does not operate properly. , Restart the recorder. Press down "/1 on - Sony RDR-HX900 | Operating Instructions - Page 101
a problem with the HDD. , Contact your nearest Sony dealer or local authorized Sony service facility. The DVD is dirty. , Clean the disc with a soft cloth. C 31 The DVD/CD is not inserted correctly. , Re-insert the disc correctly. E XX (xx is a number) To prevent a malfunction, the recorder has - Sony RDR-HX900 | Operating Instructions - Page 102
After playing, store the disc in its case. • Clean the disc with a cleaning cloth. Wipe the disc from cycle (digital)/Power back-up duration: 1 hour Video recording format: MPEG Video Audio recording format/applicable bit rate: Dolby Digital, 2 ch/256 kbps When you play CONTROL S IN: Mini jack 102 - Sony RDR-HX900 | Operating Instructions - Page 103
. projecting parts Hard disk drive capacity: 160 GB Mass (approx.): 5.9 kg (13.01 lb) Operating temperature: 5 ºC to 35 ºC (41 ºF to 95 ºF) Operating humidity: 25 % to 80 % Supplied accessories: Audio/video cord (1) Power cord (1) Antenna cable (1) Set top box controller (1) Remote commander (remote - Sony RDR-HX900 | Operating Instructions - Page 104
for megabits per second, or the amount of data that can be sent or received in one second. For example, a baud rate of 100 Mbps means that precautions when connecting this recorder, also see the instruction manuals for the equipment to be connected. Required i.LINK cable Use the Sony i.LINK 4-pin-to - Sony RDR-HX900 | Operating Instructions - Page 105
Guide to Parts and Controls For more information, see the pages in parentheses. Front panel Buttons on the recorder have the same function as the buttons on the remote if they have the same or similar names. A @/1 (on/standby) button (24) B Front panel display (42, 108) C Disc tray (46) D TIMER REC - Sony RDR-HX900 | Operating Instructions - Page 106
on the remote have the same function as the buttons on the recorder if they have the same or similar names. Buttons with an orange dot next to them can be used with your TV when the TV/ DVD switch is set to TV. 123 456 789 0 106 A TV/DVD switch (22) B Z OPEN/CLOSE button (46) C HDD button (37 - Sony RDR-HX900 | Operating Instructions - Page 107
) wk H PLAY button (54) The button has a tactile dot.* X PAUSE button (54) x STOP button (54) wl CHAPTER MARK/ERASE buttons (68) e; DISPLAY button (41, 52) TIME/TEXT button (42) ea COMMAND MODE switch (DVD 1,2,3) (23) * Use the tactile dot as a reference when operating the recorder. Additional - Sony RDR-HX900 | Operating Instructions - Page 108
Front panel display HDD PROGRESSIVE DVD DVD RW PLAYLIST V CD VR STEREO SAP CH A HDD/DVD indicators Displays the selected media and the playing/recording/dubbing status. B Disc type*/recording format * Displays DATA CDs as "CD." C (angle) indicator (56) D PLAYLIST indicator (38) E Audio signal - Sony RDR-HX900 | Operating Instructions - Page 109
the DVD VIDEO format. DVD-RW (page 8) A DVD-RW is a recordable and rewritable disc that is the same size as a DVD VIDEO. The DVDRW has two different modes: VR mode and Video mode. DVDs created in Video mode have the same format as a DVD VIDEO, while discs created in VR (Video Recording) mode allow - Sony RDR-HX900 | Operating Instructions - Page 110
actually recorded on a DVD-RW (VR mode). Erasing original titles frees up disc space. Playlist (page 64) Playback information created from the actual recordings on a DVD-RW (VR mode). A Playlist leaves the original titles as they are, and contains only the information needed to control playback - Sony RDR-HX900 | Operating Instructions - Page 111
Language Code List For details, see page 87. The language spellings conform to the ISO 639: 1988 (E/F) standard. Code Language 1027 Afar 1028 Abkhazian 1032 Afrikaans 1039 Amharic 1044 Arabic 1045 Assamese 1051 Aymara 1052 Azerbaijani 1053 Bashkir 1057 Byelorussian 1059 Bulgarian 1060 Bihari 1061 - Sony RDR-HX900 | Operating Instructions - Page 112
than one code number is listed, try entering them one at a time until you find the one that works with your cable box/satellite receiver. Cable box brand 3M ABC Accuphase Acorn Action Active Aim Allegro Amark American Americast Antronix Anvision Apache Arbatron Archer ASE Auna BBT BCC Belcor Bell - Sony RDR-HX900 | Operating Instructions - Page 113
Cable box brand GE Gemini General Instrument GHZ Gibraltar Global GMI GoldStar Goodmind Gradiente Hamlin Healthway Interactive Hitachi Houston Tracker Hwalin IBM IEEC Interbuy Jasco Jebsee Jerrold Kuang Yu Leon LG Linsay Macom Maestro Magnavox Millennium Memorex Mitsubishi Code number 0232, 0233, - Sony RDR-HX900 | Operating Instructions - Page 114
Seam Sears Sejin Sigma Signal Signature SkyCable Skygiant SL Marx Sony Spectradyne Spectravision Sprucer Standard Components Starcom 114 Code number TFC Thomson Timeless Tocom Torx Toshiba Trans PX Trinity Tristar TS Tusa TV COMM TV Guide TV86 Uniden Unika Code number 0015, 0040, 0770, 0865, 0797 - Sony RDR-HX900 | Operating Instructions - Page 115
0027, 0111, 0030, 0121 0883 1264 0883 0565 0078 0000, 0525, 0054, 0017, 0039, 0153, 0060, 0315, 0191, 0899 0400 Satellite receiver brand Code number AlphaStar 0772 Atlantic Telephone 1333 Bell ExpressVu 0775 Century 0856 Chaparral 0216 Crossdigital 1109 DirecTV 0749, 0566, 0392, 1749 - Sony RDR-HX900 | Operating Instructions - Page 116
Satellite receiver brand Paysat Philips Primestar Proscan QNS RadioShack RCA Samsung Sky Sony Star Choice Star Trak Thomson Tivo Toshiba UEC Uniden Video Cipher II Plus Zenith Code number 0724 1076, 0099, 1142, 0724, 0722, 0749, 1442, 1749, - Sony RDR-HX900 | Operating Instructions - Page 117
recording CONTROL S 17 Controlling TVs with the remote 22 Copy protection 46, 109 Copy-Free 46 Copy-Never 46 Copy-Once 46 CPRM 8 Creating chapters 68 Cursor mode 38 D DATA CD 10 "Digital Out" 90 Digital video camera 77 "Dimmer" 94 "Disc Info" 39 "Disc Map" 67 "Disc Name" 40 Disc settings 39, 94 Disc - Sony RDR-HX900 | Operating Instructions - Page 118
Recording 45, 91 picture adjustment 51 recordable discs 8 recording format 8 while watching another program 51 Recording mode 42, 45, 52 Recording picture quality 51 Recording picture size 51 Recording time 45, 52 RECOVERY 100 Region code 11 Remaining time 42 Remote 21, 106 Resetting 95 Resume Play - Sony RDR-HX900 | Operating Instructions - Page 119
" 61 Troubleshooting 96 "Tuner Audio" 89 Tuner Preset 26, 84 TV Guide On Screen system 33, 46 "TV Type" 87 TV Virtual Surround 57 TV/DVD 22 TV/VIDEO 51 TVS 57 U "Unfinalize" 41 Unrecordable pictures 46 Usable discs 8, 10 V VCR Plus+ 48 VIDEO CD 10 Video cord 16 Video input 17 Video mode 8 "Video - Sony RDR-HX900 | Operating Instructions - Page 120
Printed on 100% recycled paper using VOC (Volatile Organic Compound)-free vegetable oil based ink. 2-187-189-11(2) Sony Corporation Printed in Malaysia
-
 1
1 -
 2
2 -
 3
3 -
 4
4 -
 5
5 -
 6
6 -
 7
7 -
8
-
9
-
10
-
11
-
12
-
13
-
14
-
15
-
16
-
17
-
18
-
19
-
20
-
21
-
22
-
23
-
24
-
25
-
26
-
27
-
28
-
29
-
30
-
31
-
32
-
33
-
34
-
35
-
36
-
37
-
38
-
39
-
40
-
41
-
42
-
43
-
44
-
45
-
46
-
47
-
48
-
49
-
50
-
51
-
52
-
53
-
54
-
55
-
56
-
57
-
58
-
59
-
60
-
61
-
62
-
63
-
64
-
65
-
66
-
67
-
68
-
69
-
70
-
71
-
72
-
73
-
74
-
75
-
76
-
77
-
78
-
79
-
80
-
81
-
82
-
83
-
84
-
85
-
86
-
87
-
88
-
89
-
90
-
91
-
92
-
93
-
94
-
95
-
96
-
97
-
98
-
99
-
100
-
101
-
102
-
103
-
104
-
105
-
106
-
107
-
108
-
109
-
110
-
111
-
112
-
113
-
114
-
115
-
116
-
117
-
118
-
119
-
120
 |
 |
2-187-189-
11
(2)
© 2004 Sony Corporation
DVD Recorder
Operating Instructions
RDR-HX900