Sony RDR-HX900 Operating Instructions - Page 50
Recording Without the Timer, source you want to record.
 |
UPC - 027242644328
View all Sony RDR-HX900 manuals
Add to My Manuals
Save this manual to your list of manuals |
Page 50 highlights
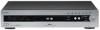
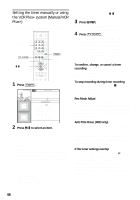
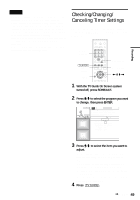
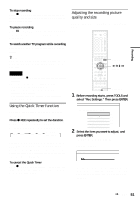
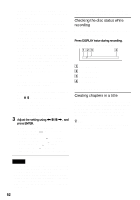
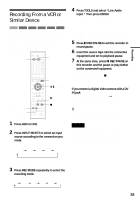
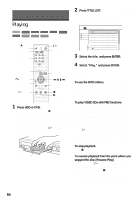
To change the recording frequency Press SCHEDULE and select the program you want to change. Then press the green button repeatedly to change the recording frequency. Programs set to be recorded "Daily" will only be recorded from Monday through Friday. To cancel the timer setting Press SCHEDULE and select the program you want to cancel. Then press the blue button. To turn off the SCHEDULE list Press EXIT. If two or more timer settings overlap The timer recording set last has priority over the other settings and is recorded. All other overlapped settings are suspended, even if the setting only partially overlaps the setting with priority. appears next to programs that are suspended. Example: You set the timer in order of A, and then B. 7:00 A will be suspended 9:00 11:00 B will be recorded Note that if you modify setting A (for instance, if you extend the recording time), then setting A becomes the last timer recording you set and will have priority over setting B. If the end and start time of two timer settings are the same The end of program A or the beginning of program B will be cut. 7:00 A 9:00 10:00 B Recording Without the Timer HDD +RW -RWVR -RWVideo +R -R HDD 123 456 789 0 DVD TV/VIDEO CH +/- z REC REC MODE X REC PAUSE x REC STOP 1 Press HDD or DVD to select a media. When you selected DVD, insert a recordable DVD. 2 Press CH +/- to select the channel or input source you want to record. 3 Press REC MODE repeatedly to select the recording mode. Each time you press the button, the display changes on the TV screen as follows: HQ HSP SP LP EP SLP For more details about the recording mode, see page 45. 4 Press z REC. Recording starts. Recording continues until you stop the recording or the disc is full. 50
-
 1
1 -
2
-
3
-
4
-
5
-
6
-
7
-
8
-
9
-
10
-
11
-
12
-
13
-
14
-
15
-
16
-
17
-
18
-
19
-
20
-
21
-
22
-
23
-
24
-
25
-
26
-
27
-
28
-
29
-
30
-
31
-
32
-
33
-
34
-
35
-
36
-
37
-
38
-
39
-
40
-
41
-
42
-
43
-
44
-
 45
45 -
 46
46 -
 47
47 -
 48
48 -
 49
49 -
 50
50 -
 51
51 -
 52
52 -
 53
53 -
 54
54 -
 55
55 -
56
-
57
-
58
-
59
-
60
-
61
-
62
-
63
-
64
-
65
-
66
-
67
-
68
-
69
-
70
-
71
-
72
-
73
-
74
-
75
-
76
-
77
-
78
-
79
-
80
-
81
-
82
-
83
-
84
-
85
-
86
-
87
-
88
-
89
-
90
-
91
-
92
-
93
-
94
-
95
-
96
-
97
-
98
-
99
-
100
-
101
-
102
-
103
-
104
-
105
-
106
-
107
-
108
-
109
-
110
-
111
-
112
-
113
-
114
-
115
-
116
-
117
-
118
-
119
-
120
 |
 |
