Sony RDR-HX900 Operating Instructions - Page 45
Recording, Before Recording
 |
UPC - 027242644328
View all Sony RDR-HX900 manuals
Add to My Manuals
Save this manual to your list of manuals |
Page 45 highlights
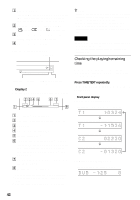
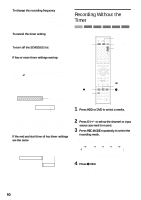
Recording Recording Before Recording Before you start recording... • This recorder can record on various discs. Select the disc type according to your needs (page 8). • Check that the disc has enough available space for the recording (page 39). For HDD, DVD+RWs, and DVD-RWs, you can free up disc space by erasing titles (page 67). • Adjust the recording picture quality and picture size if necessary (page 51). z Hint Timer recordings will be made regardless whether or not the recorder is turned on. You can turn off the recorder without affecting the recording even after recording starts. Recording mode Like the SP or LP recording mode of VCRs, this recorder has six different recording modes. Select a recording mode according to the time and picture quality you need. For example, if picture quality is your top priority, select the High Quality mode (HQ). If recording time is your priority, Super Long Play mode (SLP) can be a possible choice. Note that recording times in the following table are approximate and the actual times may differ. Note also that the maximum continuous recording time for a single title is eight hours (HDD), or six hours (DVD). Contents beyond this time will not be recorded. Press REC MODE repeatedly to switch the recording modes. I want to record with the best possible picture quality, so I'll select HQ. Recording mode HQ (High quality) HSP R SP (Standard mode) LP r EP r SLP (Long duration) Recording time (hour) HDD DVD 33 1 51 1.5 67 2 103 3 137 4 204 6 "HQ+" recording mode "HQ+" records pictures in higher quality than HQ on the HDD. Set "HQ Setting" in Features Setup to "HQ+" (page 93). Maximum recording time is 21 hours. "HQ" appears in the display. Note Situations below may cause slight inaccuracies with the recording time. - Recording a program with poor reception, or a program or video source of low picture quality - Recording on a disc that has already been edited - Recording only a still picture or just sound Recording a stereo/SAP program The recorder can receive and record stereo/SAP programs. Stereo programs When a stereo program is received, the "STEREO" indicator lights up on the front panel display. If there is noise in the stereo program, set "Auto Stereo" in Audio Setup to "Off" (page 89). The sound will be recorded in monaural but with less noise. SAP (Second Audio Program) When a SAP (Second Audio Program) is received, the "SAP" indicator lights up on the front panel display. To record only SAP sound, set "Tuner Audio" in Audio Setup to "SAP" (page 89). ,continued 45
-
 1
1 -
2
-
3
-
4
-
5
-
6
-
7
-
8
-
9
-
10
-
11
-
12
-
13
-
14
-
15
-
16
-
17
-
18
-
19
-
20
-
21
-
22
-
23
-
24
-
25
-
26
-
27
-
28
-
29
-
30
-
31
-
32
-
33
-
34
-
35
-
36
-
37
-
38
-
39
-
 40
40 -
 41
41 -
 42
42 -
 43
43 -
 44
44 -
 45
45 -
 46
46 -
 47
47 -
 48
48 -
 49
49 -
 50
50 -
51
-
52
-
53
-
54
-
55
-
56
-
57
-
58
-
59
-
60
-
61
-
62
-
63
-
64
-
65
-
66
-
67
-
68
-
69
-
70
-
71
-
72
-
73
-
74
-
75
-
76
-
77
-
78
-
79
-
80
-
81
-
82
-
83
-
84
-
85
-
86
-
87
-
88
-
89
-
90
-
91
-
92
-
93
-
94
-
95
-
96
-
97
-
98
-
99
-
100
-
101
-
102
-
103
-
104
-
105
-
106
-
107
-
108
-
109
-
110
-
111
-
112
-
113
-
114
-
115
-
116
-
117
-
118
-
119
-
120
 |
 |
