Sony STR-DN1030 Operating Instructions (Large File - 11.51 MB) - Page 107
Using the Remote Control
 |
View all Sony STR-DN1030 manuals
Add to My Manuals
Save this manual to your list of manuals |
Page 107 highlights
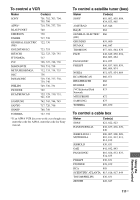
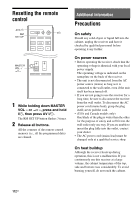
To view the information on the display panel The display panel provides various information of the receiver status such as sound field. 1 Select the input for which you want to check the information. 2 Press AMP, then press DISPLAY repeatedly. Each time you press DISPLAY, the display will change cyclically as follows. Index name of the input* t Input you selected t Sound field currently applied t Volume level t Stream information** When listening to FM and AM radio Preset station name* t Frequency t Sound field currently applied t Volume level * Index name appears only when you have assigned one to the input or preset station. Index name does not appear when only blank spaces have been entered or it is same as the input name. **Stream information may not be displayed. Note Character or marks may not be displayed for some languages. Tip You cannot switch the display while "GUI MODE" is shown on the display panel. Press GUI MODE repeatedly to select "GUI OFF". Using the Remote Control Programming the remote control You can customize the remote control to match the equipment connected to your receiver. You can even program the remote control to operate non-Sony equipment and also Sony equipment that the remote control is normally unable to operate. Before you begin, note that: - You cannot change the settings of TUNER, USB, AirPlay, HOME NETWORK, BLUETOOTH, SOURCE and SEN input buttons. - The remote control can only control equipment that accept infrared wireless control signals. RM SET UP SHIFT AV ?/1 TV Input buttons Numeric buttons ENT/MEM 1 Hold down RM SET UP, then press AV ?/1. The RM SET UP button flashes slowly. 2 Press the input button of the equipment you want to program. For example, if you want to program a VCR connected to VIDEO 1 jacks, press VIDEO 1. The RM SET UP and SHIFT buttons light up. continued 107US Using the Remote Control
-
 1
1 -
2
-
3
-
4
-
5
-
6
-
7
-
8
-
9
-
10
-
11
-
12
-
13
-
14
-
15
-
16
-
17
-
18
-
19
-
20
-
21
-
22
-
23
-
24
-
25
-
26
-
27
-
28
-
29
-
30
-
31
-
32
-
33
-
34
-
35
-
36
-
37
-
38
-
39
-
40
-
41
-
42
-
43
-
44
-
45
-
46
-
47
-
48
-
49
-
50
-
51
-
52
-
53
-
54
-
55
-
56
-
57
-
58
-
59
-
60
-
61
-
62
-
63
-
64
-
65
-
66
-
67
-
68
-
69
-
70
-
71
-
72
-
73
-
74
-
75
-
76
-
77
-
78
-
79
-
80
-
81
-
82
-
83
-
84
-
85
-
86
-
87
-
88
-
89
-
90
-
91
-
92
-
93
-
94
-
95
-
96
-
97
-
98
-
99
-
100
-
101
-
 102
102 -
 103
103 -
 104
104 -
 105
105 -
 106
106 -
 107
107 -
 108
108 -
 109
109 -
 110
110 -
 111
111 -
 112
112 -
113
-
114
-
115
-
116
-
117
-
118
-
119
-
120
-
121
-
122
-
123
-
124
-
125
-
126
-
127
-
128
-
129
-
130
-
131
-
132
 |
 |
