Sony STR-DN1030 Operating Instructions (Large File - 11.51 MB) - Page 40
Before you perform Auto, Calibration, Setting up the Auto Calibration, Select the speaker pattern - test
 |
View all Sony STR-DN1030 manuals
Add to My Manuals
Save this manual to your list of manuals |
Page 40 highlights
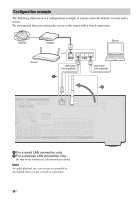
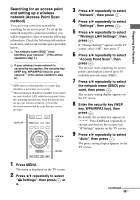
The DCAC is designed to achieve proper sound balance for your room. However, you can adjust the speaker levels manually according to your preference. For details, see "Test Tone" (page 95). Setting up the Auto Calibration Optimizer microphone Before you perform Auto Calibration Before you perform Auto Calibration, check the following items. • Set up and connect the speakers (page 22, 24). • Connect only the supplied optimizer microphone to the AUTO CAL MIC jack. Do not connect any other microphones to this jack. • Set the "SB Assign" to "BI-AMP" in the Speaker Settings menu if you use bi-amplifier connection (page 90). • Set the "SB Assign" to "Speaker B" in the Speaker Settings menu if you use speakers front B connection (page 38). • Make sure the speaker output is not set to "SPK OFF" (page 39). • Make sure that you are not using PARTY STREAMING function (page 74). • Disconnect the headphones. • Remove any obstacles in the path between the optimizer microphone and the speakers to avoid measurement errors. • Get accurate measurement by making sure the environment is free from noise and quiet. Notes • The speakers emit very loud sound during the calibration and the volume cannot be adjusted. Provide consideration to your neighborhood and to the children in presence. • If the muting function has been activated before you perform Auto Calibration, the muting function will shut off automatically. • The correct measurements may not be able to take or Auto Calibration cannot be performed when special speakers, such as dipole speakers are used. Example of using surround back speakers 1 Select the speaker pattern (page 38). If you connect front high speakers, select the speaker pattern that has front high speakers (5/x.x or 4/x.x) each time you perform Auto Calibration. Otherwise, the characteristics of the front high speakers cannot be measured. 2 Connect the supplied optimizer microphone to the AUTO CAL MIC jack. 3 Set up the optimizer microphone. Place the optimizer microphone at your seating position. Use a stool or tripod so that the optimizer microphone remains at the same height as your ears. 40US
-
 1
1 -
2
-
3
-
4
-
5
-
6
-
7
-
8
-
9
-
10
-
11
-
12
-
13
-
14
-
15
-
16
-
17
-
18
-
19
-
20
-
21
-
22
-
23
-
24
-
25
-
26
-
27
-
28
-
29
-
30
-
31
-
32
-
33
-
34
-
 35
35 -
 36
36 -
 37
37 -
 38
38 -
 39
39 -
 40
40 -
 41
41 -
 42
42 -
 43
43 -
 44
44 -
 45
45 -
46
-
47
-
48
-
49
-
50
-
51
-
52
-
53
-
54
-
55
-
56
-
57
-
58
-
59
-
60
-
61
-
62
-
63
-
64
-
65
-
66
-
67
-
68
-
69
-
70
-
71
-
72
-
73
-
74
-
75
-
76
-
77
-
78
-
79
-
80
-
81
-
82
-
83
-
84
-
85
-
86
-
87
-
88
-
89
-
90
-
91
-
92
-
93
-
94
-
95
-
96
-
97
-
98
-
99
-
100
-
101
-
102
-
103
-
104
-
105
-
106
-
107
-
108
-
109
-
110
-
111
-
112
-
113
-
114
-
115
-
116
-
117
-
118
-
119
-
120
-
121
-
122
-
123
-
124
-
125
-
126
-
127
-
128
-
129
-
130
-
131
-
132
 |
 |
