Yamaha N12 Owners Manual - Page 19
DAW Remote Control MONITOR REMOTE [REC BUS WET] switch - cubase 7
 |
UPC - 086792859866
View all Yamaha N12 manuals
Add to My Manuals
Save this manual to your list of manuals |
Page 19 highlights
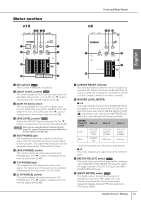
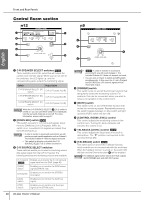
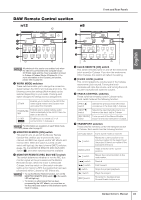
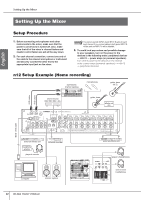
DAW Remote Control section n12 n8 1 1 4 2 3 5 2 3 6 6 7 7 Front and Rear Panels 4 5 English NOTE All switches in this section are enabled only when the n8/n12 is connected to the computer via an IEEE1394 cable and the mixer's operation is linked to Cubase 4/Cubase Studio 4/Cubase AI 4. For more information on the Cubase Link function, please refer to page 33. 1 WORK MODE switches These switches enable you to change the connection status between the n8/n12 and Cubase all at once. The following connection settings (Work modes) can be selected depending on your needs. Pressing each switch changes I/O settings and bus assignments. ST MIX Enables you to monitor on the n8/n12 the stereo signal mixed in the Cubase mixer and output from the DAW. HARDWARE MIX Enables you to output Cubase audio tracks individually to the n8/n12, then mix them on the n8/n12. 5.1 MIX Only Enables you to create a 5.1-ch surround mix in Cubase 4. NOTE For information on operations in each Work mode, please refer to page 37. 2 MONITOR REMOTE [ON] switch This switch turns on and off the Monitor Remote function that enables you to process the input channel and REC bus signals via the VST effects and monitor them. When the switch is turned on (the switch will light up), the input channel [WET] switches (page 15), the MONITOR REMOTE [REC BUS WET] switch (3), and other switches become available. 3 MONITOR REMOTE [REC BUS WET] switch This switch determines whether or not the REC bus monitor signal will be processed via the Monitor Remote function. When the mixer is linked with Cubase, turn this switch on (the switch indicator lights up) to monitor a REC bus signal that has been processed within Cubase by VST effects etc. NOTE • To use the Monitor Remote function, turn on the MONITOR REMOTE [ON] switch (2) (the switch LED will light up). • To monitor an effect signal that has been processed by the VST effects, you must turn on the Record Enable button for the destination audio track in Cubase. 4 CLICK REMOTE [ON] switch This switch remotely turns on and off the metronome (click sound) in Cubase. If you turn the metronome ON in Cubase, this switch will reflect the setting. 5 [CLICK LEVEL] control This control adjusts the volume level of the Cubase metronome (click sound). Turning the knob clockwise will raise the volume, and turning the knob counter-clockwise will lower the volume. 6 TRACK CONTROL switches These switches remotely control Cubase tracks. Each switch features the following function: [PREV ▲] switch Selects the previous track (the track one above in the track list) in Cubase. [NEXT ▼] switch Selects the next track (the track one below in the track list) in Cubase. [REC READY] Turns on and off the Record Enable switch button for the track selected in Cubase. 7 TRANSPORT switches These switches remotely control the transport section in Cubase. Each switch has the following function: [CYCLE] switch [ ] switch [ADD] switch [ ] switch [ ] switch [ ] switch [■] switch [ ] switch [REC] switch Turns Cycle mode on and off. Moves the current position to the previous marker (or the beginning of the project if there is no marker in the backward direction). Adds a marker at the current position. Moves the current position to the next marker. Rewind Fast forward Stops the project playback. Plays the project. Records the track(s) whose Record Enable button is on Owner's Manual 19
-
 1
1 -
2
-
3
-
4
-
5
-
6
-
7
-
8
-
9
-
10
-
11
-
12
-
13
-
 14
14 -
 15
15 -
 16
16 -
 17
17 -
 18
18 -
 19
19 -
 20
20 -
 21
21 -
 22
22 -
 23
23 -
 24
24 -
25
-
26
-
27
-
28
-
29
-
30
-
31
-
32
-
33
-
34
-
35
-
36
-
37
-
38
-
39
-
40
-
41
-
42
-
43
-
44
-
45
-
46
-
47
-
48
-
49
-
50
-
51
-
52
-
53
-
54
-
55
-
56
-
57
-
58
-
59
-
60
-
61
-
62
 |
 |
