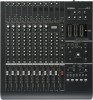
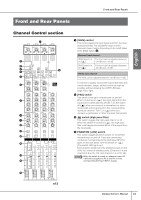
Yamaha N12 Owners Manual - Page 8
Turning On and Off the Power to the Mixer, Before Turning On the Power to the Mixer
 |
UPC - 086792859866
View all Yamaha N12 manuals
Add to My Manuals
Save this manual to your list of manuals |
Page 8 highlights
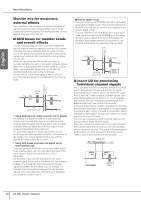
English Turning On and Off the Power to the Mixer Turning On and Off the Power to the Mixer Before Turning On the Power to the Mixer 1. Make sure that the mixer's power switch is in the STANDBY position. Warning Use only the included power adaptor (*PA-30 for the n12, PA20 for the n8 or an equivalent recommended by Yamaha). Use of a different adaptor may result in equipment damage, overheating, or fire. In such cases, the product warranty will be void immediately even within the effective warranty period. 2. Connect the power adaptor to the AC INPUT connector (1) on the rear panel of the mixer, then turn the fastening ring clockwise (2) to secure the connection. 2 Turning the Power On and Off 1. To turn the power on, press the mixer's power switch to the ON position. 2. To turn the power off, press the power switch to the STANDBY position. Caution Note that a small amount of current continues to flow while the switch is in the STANDBY position. If you do not plan to use the mixer for an extended period of time, please be sure to unplug the adaptor from the wall outlet. NOTE To prevent sudden loud sounds from being produced from your speakers, power-on your equipment starting at the audio source (instrument, mic, CD player, etc.) and working downstream. Example: Instruments, mics, CD players, and other peripheral devices → n8/n12 → Powered speakers (power amps) When turning the power off, reverse the above sequence. 1 3. Connect the power adaptor to a standard household power outlet securely. Caution • Be sure to unplug the adaptor from the outlet when you are not using the mixer, or when lightning storms are expected in your area. • Make sure that there is adequate distance between the power adaptor and the mixer. Otherwise, noise may be generated. 8 Owner's Manual
-
 1
1 -
2
-
 3
3 -
 4
4 -
 5
5 -
 6
6 -
 7
7 -
 8
8 -
 9
9 -
 10
10 -
 11
11 -
 12
12 -
 13
13 -
14
-
15
-
16
-
17
-
18
-
19
-
20
-
21
-
22
-
23
-
24
-
25
-
26
-
27
-
28
-
29
-
30
-
31
-
32
-
33
-
34
-
35
-
36
-
37
-
38
-
39
-
40
-
41
-
42
-
43
-
44
-
45
-
46
-
47
-
48
-
49
-
50
-
51
-
52
-
53
-
54
-
55
-
56
-
57
-
58
-
59
-
60
-
61
-
62
 |
 |
