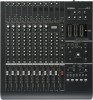
Yamaha N12 Owners Manual - Page 24
A Hands-On Guide to the n8/n12, Let’s Hear It!, Connecting sound sources and monitor devices - preamps
 |
UPC - 086792859866
View all Yamaha N12 manuals
Add to My Manuals
Save this manual to your list of manuals |
Page 24 highlights
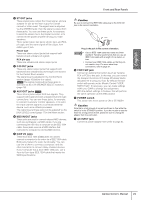
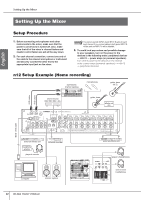
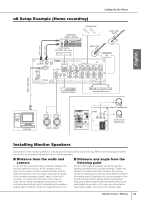
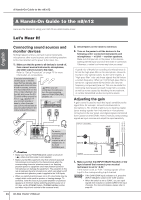
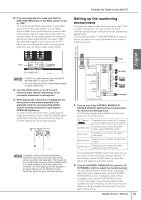
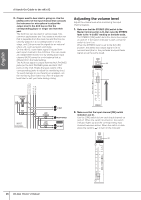
A Hands-On Guide to the n8/n12 English STEREO BUS L STEREO BUS R A Hands-On Guide to the n8/n12 Here are the basics for using your n8/n12 as a stand-alone mixer. Let's Hear It! Connecting sound sources and monitor devices Nothing happens until you connect musical instruments, microphones, other sound sources, and monitoring speakers to the mixer and turn on the power to the mixer. So... 1. Make sure that the power to all devices is turned off, then connect musical instruments, microphones, and other sound sources to the mixer. Refer to "Setup Procedure" on page 22 for more information on connections. If you are connecting an electric guitar or electric bass that has passive-type pickups and does not have a built-in preamp, connect it to input channel 8 (on the n12) or input channel 4 (on the n8), and press the [HiZ] switch of that channel to the on ( ) position. If you connect a guitar or bass to other channels, use a DI box (direct box) or amp simulator between the instrument and the mixer. When you use condenser microphones, turn the corresponding channel PHANTOM [48V] switches on. To send a DI monitoring signal exclusively to the player, connect a set of headphones to the AUX PHONES jack. Caution • Make sure that the PHANTOM [48V] switch is turned off ( ) when phantom power is not required. • Make sure that NO equipment other than phantom-powered microphones is connected to the channel inputs when the corresponding channels' phantom power is on. Applying phantom power to equipment other than phantom-powered microphones can damage the equipment. The exception to this rule is balanced dynamic microphones, which can safely be left connected while phantom power is applied to the XLR inputs. • When you switch phantom power on or off, a loud noise may be output, which could result in speaker or hearing damage. To avoid this, lower the level of your power amplifier (or powered speakers) to minimum before switching phantom power on or off. Also, set the STEREO faders, [PHONES LEVEL] control, and other output level controls to the minimum levels. 24 Owner's Manual 2. Set all faders on the mixer to minimum. 3. Turn on the power to all the devices in the following order: connected instruments and microphones → n12/n8 → monitor speakers. Make sure that you turn on the power to the devices starting with the input sources in the order of connection. Otherwise, a rather loud noise may blow you away! A good rule of thumb for recording via microphones is to turn the high-pass filter on for microphone channels, except in very special cases. As the name implies, a "high-pass filter" cuts only those signals that fall below a certain frequency. When an n12/n8 high-pass filter is turned on, signals below 80 Hz (which are very low frequency components) are cut. This can be useful for minimizing low-frequency breath noise from a vocalist, as well as noise caused by handling the microphone, or rumble transmitted via the microphone stand. Adjusting the gain A gain control is used to mach the input's sensitivity to the signal from, for example, connected instruments or microphones. The n12/n8 enables you to input two signal types: analog signals from instruments or microphones connected to the rear panel, and digital signals transferred from Cubase or other DAWs. Here is how you select analog signals as input sources and adjust the input sensitivity. INPUT CHANNEL INPUT METER INPUT A INPUT B PAD HA DAW IN GAIN PRE PAN CHANNEL FADER 1. Make sure that the [INPUT SELECT] switch of the input channel that connects your musical instrument is set to "A.IN." If the switch is set to "A.IN," analog signals will be input to the corresponding input channel. NOTE • If the DAW (DAW input) indicator is lit, press the [INPUT SELECT] switch to the "A.IN" position. • When the switch is set to "DAW," you can input signals from Cubase or another DAW to the input channels. For more information, please refer to page 43
-
 1
1 -
2
-
3
-
4
-
5
-
6
-
7
-
8
-
9
-
10
-
11
-
12
-
13
-
14
-
15
-
16
-
17
-
18
-
 19
19 -
 20
20 -
 21
21 -
 22
22 -
 23
23 -
 24
24 -
 25
25 -
 26
26 -
 27
27 -
 28
28 -
 29
29 -
30
-
31
-
32
-
33
-
34
-
35
-
36
-
37
-
38
-
39
-
40
-
41
-
42
-
43
-
44
-
45
-
46
-
47
-
48
-
49
-
50
-
51
-
52
-
53
-
54
-
55
-
56
-
57
-
58
-
59
-
60
-
61
-
62
 |
 |
