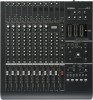
Yamaha N12 Owners Manual - Page 31
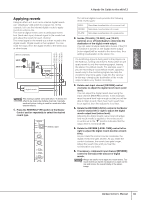
Applying reverb, Set the [TO AUX], [TO REC], and [TO ST]
 |
UPC - 086792859866
View all Yamaha N12 manuals
Add to My Manuals
Save this manual to your list of manuals |
Page 31 highlights
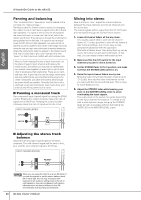
STEREO BUS L STEREO BUS R REVERB BUS L REVERB BUS R English Applying reverb Using an effect unit, such as an internal digital reverb, can "effectively" add polish to a stereo mix. In this example, let's use the internal digital reverb to apply reverb to a stereo mix. The internal digital reverb uses its dedicated reverb bus. Send each input channel signal to the reverb bus and adjust the reverb for each channel. The mixed signal in the reverb bus is then routed to the digital reverb. Digital reverb is then applied. You can route the output from the digital reverb to the stereo bus or other buses. INPUT CHANNEL INPUT A INPUT B PAN REVERB digital reverb NOTE This routing is called "send and return." It allows one effect to be shared by multiple channels. Typically, send and return routing is used for reverb and other ambient effects. 1. Press the REVERB [TYPE] switch in the Master Control section repeatedly to select the desired reverb type. Select a type. A Hands-On Guide to the n8/n12 The internal digital reverb provides the following three reverb types: HALL ROOM PLATE Simulates reverberation of a concert hall. Simulates reverberation of a room. Simulates reverberation of a plate echo. 2. Set the [TO AUX], [TO REC], and [TO ST] switches on or off individually to determine the destination of the digital reverb output. You can select multiple destination buses. If the [TO ST] switch is turned on, the digital reverb output (return signal) will be routed to the stereo bus, thus adding reverberation to the stereo mix. If a monitoring signal is being sent to the players via the AUX bus, turning only the [TO AUX] switch on will apply reverb to only the monitoring signal, leaving the stereo mix without reverb. For example, even if you are recording a vocal without reverb, applying reverb only to the monitoring signal may help the vocalist to sing more easily or get into the "groove." In this way, changing the destination of the reverb output enables very flexible recording. 3. Rotate each input channel [REVERB] control clockwise to adjust the digital reverb level (send level). You can adjust the digital reverb level using the input channel [REVERB] controls. In this example, raise this send level high enough so that you will be able to listen to and check how much reverb has been applied, then fine-adjust the level later. 4. Rotate the REVERB [LEVEL] control in the Master Control section left or right to adjust the digital reverb output level (return level). Adjusting the digital reverb output level will adjust how much reverb is applied to the entire sound. A control set to the "▼" position indicates that the output level is nominal (0 dB). 5. Rotate the REVERB [LEVEL TIME] control left or right to adjust the digital reverb duration (reverb time). As you rotate the control counter-clockwise, the digital reverb time gets shorter. As you rotate the control clockwise, the reverb time gets longer. Adjust the reverb time until you hear the reverberation you desire. 6. If necessary, rotate each input channel [REVERB] control to fine-adjust the amount of digital reverb. NOTE Always be careful not to apply too much reverb. Too much reverb can tip the mix balance or wash out the mix and reduce the overall clarity of the stereo image. Owner's Manual 31
-
 1
1 -
2
-
3
-
4
-
5
-
6
-
7
-
8
-
9
-
10
-
11
-
12
-
13
-
14
-
15
-
16
-
17
-
18
-
19
-
20
-
21
-
22
-
23
-
24
-
25
-
 26
26 -
 27
27 -
 28
28 -
 29
29 -
 30
30 -
 31
31 -
 32
32 -
 33
33 -
 34
34 -
 35
35 -
 36
36 -
37
-
38
-
39
-
40
-
41
-
42
-
43
-
44
-
45
-
46
-
47
-
48
-
49
-
50
-
51
-
52
-
53
-
54
-
55
-
56
-
57
-
58
-
59
-
60
-
61
-
62
 |
 |
