Yamaha N12 Owners Manual - Page 25
Setting up the monitoring environment
 |
UPC - 086792859866
View all Yamaha N12 manuals
Add to My Manuals
Save this manual to your list of manuals |
Page 25 highlights
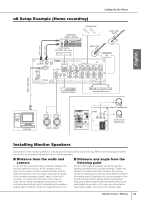
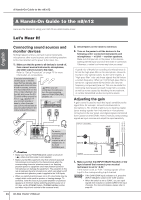
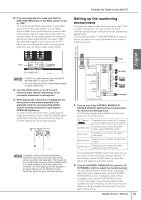
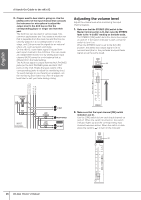
2. If you are using the n12, make sure that the [INPUT METER] switch in the Meter section is set to "PRE." You can select pre-fader signal level or post-fader signal level for the input meters. (A "pre-fader" signal is taken from a point before the channel fader. A "post-fader" signal is taken from a point after the channel fader.) As you might guess, the meters will display pre-fader signal levels if you select "PRE," and post-fader signal levels if you select "POST." When you are adjusting the input sensitivity (gain), keep your eyes on the pre-fader signal meters. A Hands-On Guide to the n8/n12 Setting up the monitoring environment Of course you need to hear what is going on, right? That is called "monitoring." You can monitor the input channel signals through connected monitor speakers or headphones. The n12 also provides C-R SPEAKER SELECT switches that let you select one output destination from multiple monitor speakers. STEREO BUS L STEREO BUS R C-R SOURCE SELECT C-R SPEAKER SELECT Only English PRE NOTE • If "POST" has been selected, press the [INPUT METER] switch to change to "PRE." • If you are using the n8, the meters always display pre fader signal levels. 3. Turn the [PAD] switch on or off for each monaural input channel, depending on the connected instrument or microphone. 4. While playing the instrument or singing into the microphone at the loudest expected level, gradually rotate the corresponding [GAIN] control clockwise without the input meter's OVER LED lighting up. In order to record the sound with a wide dynamic range and minimum noise, rotate the [GAIN] control clockwise to raise the input sensitivity as high as possible without the input signal clipping. NOTE To achieve a clear sound with the least noise, amplify the input to the desired average level as early as possible in the signal path. That means that you should amplify the input using the [GAIN] control in the head amplifier as much as possible. But, remember: too much initial gain is bad, because it will cause clipping, and will distort the sound. Amplify the signal to a level "just below clipping." ST OUT STEREO FADER STEREO AUX CONTROL ROOM LEVEL SOLO DAW C-R PHONES CONTROL ROOM C-R OUT(A) C-R OUT B Only C-R OUT C Only C-R PHONES 1. Turn on one of the CONTROL ROOM [C-R SOURCE SELECT] switches that corresponds to the desired monitoring source. The following signals are available as monitoring sources in the control room: [5.1] switch Only Enables you to monitor a 5.1 channel surround signal input from the DAW. [DAW] switch Enables you to monitor the DAW stereo output (DAW IN 1 & 2). [ST] switch Enables you to monitor the stereo bus signal. [AUX] switch Enables you to monitor the AUX bus signal. [2TR] switch Enables you to monitor the input signal from the 2TR IN jacks. The C-R SOURCE SELECT switch indicators will tell you which monitor source is currently selected. In this example, press the [ST] switch to select the stereo bus signal as a monitor source. 2. Turn the [CONTROL ROOM LEVEL] control or [C- R PHONES] control to adjust the monitoring level. You can adjust the level of each monitor individually. To adjust the monitor speaker level, use the [CONTROL ROOM LEVEL] control. To adjust the Control Room headphone level, use the [C-R PHONES] control. To avoid damages to your hearing ability and/or speakers during monitoring, set the monitoring level rather low, then re-adjust the level later to suit your taste during mixing. Owner's Manual 25
-
 1
1 -
2
-
3
-
4
-
5
-
6
-
7
-
8
-
9
-
10
-
11
-
12
-
13
-
14
-
15
-
16
-
17
-
18
-
19
-
 20
20 -
 21
21 -
 22
22 -
 23
23 -
 24
24 -
 25
25 -
 26
26 -
 27
27 -
 28
28 -
 29
29 -
 30
30 -
31
-
32
-
33
-
34
-
35
-
36
-
37
-
38
-
39
-
40
-
41
-
42
-
43
-
44
-
45
-
46
-
47
-
48
-
49
-
50
-
51
-
52
-
53
-
54
-
55
-
56
-
57
-
58
-
59
-
60
-
61
-
62
 |
 |
