Yamaha N12 Owners Manual - Page 22
Setting Up the Mixer, Setup Procedure, n12 Setup Example (Home recording)
 |
UPC - 086792859866
View all Yamaha N12 manuals
Add to My Manuals
Save this manual to your list of manuals |
Page 22 highlights
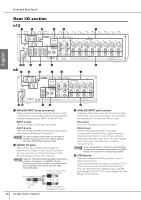
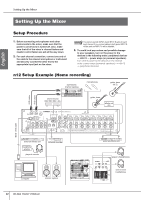
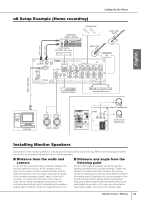
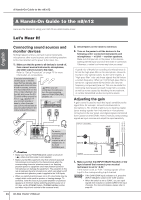
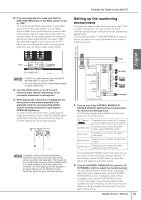
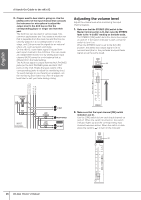
English Setting Up the Mixer Setting Up the Mixer Setup Procedure 1. Before connecting microphones and other instruments to the mixer, make sure that the power to all devices is turned off. Also, make sure that all of the mixer's channel faders and master control faders are set all the way down. 2. For each channel connection, connect one end of the cable to the relevant microphone or instrument and securely connect the other end to the appropriate input jack on the mixer. NOTE You cannot use both INPUT A and INPUT B jacks for each input channel. If you connect cables to both jacks, INPUT B will be used and INPUT A will be disabled. 3. To avoid loud pop noises and possible damage to your speakers, turn on the power to the devices in the following order: peripheral devices → n8/n12 → power amps (or powered speakers). Turn off the power to the devices in the reverse order: power amps (powered speakers) → n8/n12 → peripheral devices). n12 Setup Example (Home recording) synthesizer, rhythm machine microphones guitar, bass (Hi-Z) MIDI cable MIDI cable sound source (CD, MD, DAT, etc.) guitar, bass effects unit (DI) IEEE 1394 cable external effects unit headphone amplifier player's monitor external recorder computer monitor system 22 Owner's Manual external effects unit player's headphones control room headphones
-
 1
1 -
2
-
3
-
4
-
5
-
6
-
7
-
8
-
9
-
10
-
11
-
12
-
13
-
14
-
15
-
16
-
 17
17 -
 18
18 -
 19
19 -
 20
20 -
 21
21 -
 22
22 -
 23
23 -
 24
24 -
 25
25 -
 26
26 -
 27
27 -
28
-
29
-
30
-
31
-
32
-
33
-
34
-
35
-
36
-
37
-
38
-
39
-
40
-
41
-
42
-
43
-
44
-
45
-
46
-
47
-
48
-
49
-
50
-
51
-
52
-
53
-
54
-
55
-
56
-
57
-
58
-
59
-
60
-
61
-
62
 |
 |
