Yamaha N12 Owners Manual - Page 30
Panning and balancing, Mixing into stereo, Panning a monaural track, Adjusting the stereo track
 |
UPC - 086792859866
View all Yamaha N12 manuals
Add to My Manuals
Save this manual to your list of manuals |
Page 30 highlights
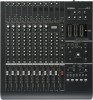
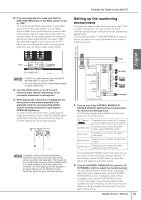
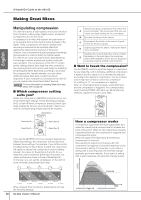
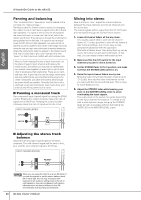
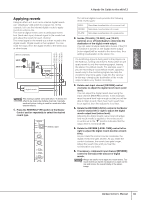
English A Hands-On Guide to the n8/n12 Panning and balancing "Pan" is derived from "panorama" and is related to the concept of a "stereo image." Panning creates the illusion of stereo space by changing the relative levels of each track's signal sent to the left and right speakers. If a signal is sent to only the left speaker, the sound will seem to come from the far left side of the stereo sound field. Thus we feel as though the instrument is being played on the left side. If a signal is sent at equal levels to both left and right speakers, our ears will tell us that the sound is located in the center of the stage. Not only does the way you pan your individual channels determine where the instruments seem to appear in the stereo sound field, but it is also vital to give each instrument its own "space" so that it does not conflict with other instruments. After you finish shaping the tone of each instrument, set the stereo image for each channel and balance the overall sound. Sometimes you may want to deliberately pan sounds close together, or even right on top of each other to emphasize their relationship. There are no hardand-fast rules. A good tip is to pan low-range instruments and any parts that are very important to the song to the center; meanwhile, pan other instruments left and right as symmetrically as possible. Normally (but this is not a rule) lead vocal, solo instruments, bass, bass drum, and snare drums will be panned to the center. ■ Panning a monaural track Pan a monaural input channel signal by turning the [PAN] control. Rotating the control clockwise raises the ratio of signal sent to the R bus. Rotating the control counterclockwise raises the ratio of signal sent to the L bus. INPUT CHANNEL(MONO) INPUT A PAN INPUT B STEREO BUS L STEREO BUS R Mixing into stereo Now it is time to "mix." Adjust the volume balance between the input channels and mix all channels into the stereo bus. The mixed signals will be output from the ST OUT jacks and monitored through the Control Room section. 1. Lower all channel faders all the way down. It is usually a good idea to start with all channel faders off. It is also possible to start with all faders at their nominal settings, but it is too easy to lose perspective (balance) with this approach. Start with all faders down, then bring them up one by one to fill out the mix with each instrument. In this way, you can easily create a well-balanced mix. 2. Make sure that the [ST] switch for the input channels you plan to mix is turned on. 3. Set the STEREO fader to the 0 position, and make sure that the STEREO [ON] switch is on. 4. Raise the input channel faders one by one. Bring the fader of the most important channel up to "0" (0 dB), then add the other instruments so that you can build the mix around that part. This is a key to a well-balanced mix. 5. Adjust the STEREO fader while keeping your eyes on the MASTER LEVEL meter to avoid overloading the input signals. The output level of the stereo mix varies depending on the input channel mix balance. To create a mix with a wide dynamic range, bring up the STEREO fader as high as possible without illuminating the OVER LED of the MASTER LEVEL meter. STEREO BUS L STEREO BUS R ■ Adjusting the stereo track balance Adjust the left and right volume balance of stereo channels. The odd channel signal will be sent to the L bus, and the even channel signal to the R bus. INPUT CHANNEL(STEREO) BALANCE L R NOTE When you are using the n8/n12 as a live SR mixer, if you pan the signals or set the stereo balance hard left or hard right, the mix may not sound wellbalanced to an audience sitting close to the left or right speakers. Use pan and balance with caution because mixes will sound different in live SR environments and recording environments. 30 Owner's Manual
-
 1
1 -
2
-
3
-
4
-
5
-
6
-
7
-
8
-
9
-
10
-
11
-
12
-
13
-
14
-
15
-
16
-
17
-
18
-
19
-
20
-
21
-
22
-
23
-
24
-
 25
25 -
 26
26 -
 27
27 -
 28
28 -
 29
29 -
 30
30 -
 31
31 -
 32
32 -
 33
33 -
 34
34 -
 35
35 -
36
-
37
-
38
-
39
-
40
-
41
-
42
-
43
-
44
-
45
-
46
-
47
-
48
-
49
-
50
-
51
-
52
-
53
-
54
-
55
-
56
-
57
-
58
-
59
-
60
-
61
-
62
 |
 |