Yamaha PSR-S650 Reference Manual - Page 37
Part Settings, Selecting a Recording Part, Selecting a Voice, Part Volume, Pan, Reverb Level
 |
View all Yamaha PSR-S650 manuals
Add to My Manuals
Save this manual to your list of manuals |
Page 37 highlights
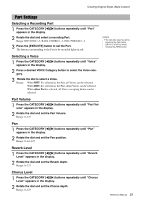
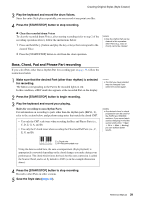
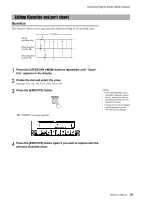
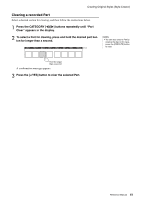
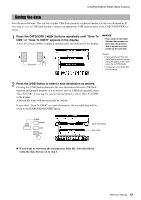
Creating Original Styles (Style Creator) Part Settings Selecting a Recording Part 1 Press the CATEGORY [] buttons repeatedly until "Part" appears in the display. 2 Rotate the dial and select a recording Part. Range: RHYTHM 1-2, BASS, CHORD 1-2, PAD, PHRASE 1-2 3 Press the [EXECUTE] button to set the Part. The button corresponding to the Part to be recorded lights in red. NOTE • You can also select a part by pressing the Part button ([RHY 1]-[PHR 2]) while holding the [REC] button. Selecting a Voice 1 Press the CATEGORY [] buttons repeatedly until "Voice" appears in the display. 2 Press a desired VOICE Category button to select the Voice category. 3 Rotate the dial to select a Voice. Range: When RHY 1 is selected as the Part, all Voices can be selected. When RHY 2 is selected as the Part, drum Voices can be selected. When other Part is selected, all Voices excepting drums can be selected. Part Volume 1 Press the CATEGORY [] buttons repeatedly until "Part Volume" appears in the display. 2 Rotate the dial and set the Part Volume. Range: 0-127 Pan 1 Press the CATEGORY [] buttons repeatedly until "Pan" appears in the display. 2 Rotate the dial and set the Pan position. Range: 0-64-127 Reverb Level 1 Press the CATEGORY [] buttons repeatedly until "Reverb Level" appears in the display. 2 Rotate the dial and set the Reverb depth. Range: 0-127 Chorus Level 1 Press the CATEGORY [] buttons repeatedly until "Chorus Level" appears in the display. 2 Rotate the dial and set the Chorus depth. Range: 0-127 Reference Manual 37
-
 1
1 -
2
-
3
-
4
-
5
-
6
-
7
-
8
-
9
-
10
-
11
-
12
-
13
-
14
-
15
-
16
-
17
-
18
-
19
-
20
-
21
-
22
-
23
-
24
-
25
-
26
-
27
-
28
-
29
-
30
-
31
-
 32
32 -
 33
33 -
 34
34 -
 35
35 -
 36
36 -
 37
37 -
 38
38 -
 39
39 -
 40
40 -
 41
41 -
 42
42 -
43
-
44
-
45
-
46
-
47
-
48
-
49
-
50
-
51
-
52
-
53
 |
 |