Yamaha PSR-S650 Reference Manual - Page 39
Bass, Chord, Pad and Phrase Part recording, Press the [START/STOP] button to begin recording.
 |
View all Yamaha PSR-S650 manuals
Add to My Manuals
Save this manual to your list of manuals |
Page 39 highlights
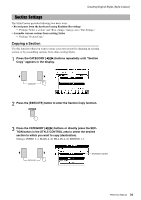
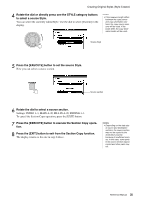
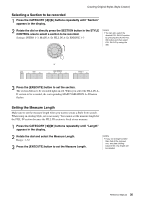
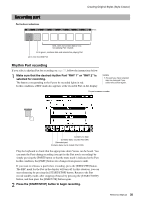
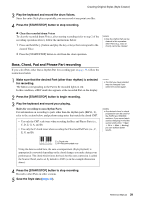
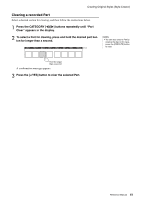
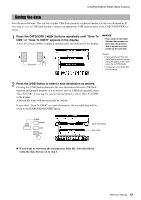
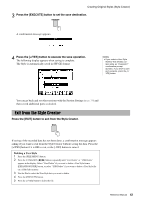
Creating Original Styles (Style Creator) 3 Play the keyboard and record the drum Voices. Since the entire Style plays repeatedly, you can record at any point you like. 4 Press the [START/STOP] button to stop recording. Clear the recorded drum Voices To clear the recorded drum Voices, after starting recording (refer to step 2 of the recording operation above), follow the instructions below. 1 Press and hold the [-] button and play the key or keys that correspond to the cleared Voice. 2 Press the [START/STOP] button to exit from the clear operation. NOTE • Only the rhythm Part can be cleared in this operation; other Parts (e.g., bass or chord) cannot be cleared. Bass, Chord, Pad and Phrase Part recording If you select Parts other than a rhythm Part for recording part on page 38, follow the instructions below. 1 Make sure that the desired Part (other than rhythm) is selected for recording. The button corresponding to the Part to be recorded lights in red. In this condition, a REC mark also appears at the recorded Part on the display. NOTE • The Part you have selected may be changed if you select the section again. 2 Press the [START/STOP] button to begin recording. 3 Play the keyboard and record your playing. Rules for recording to non-rhythm Parts: For information on recording to parts other than the rhythm parts (RHY1, 2), refer to the section below, and perform using notes that match the chord CM7. • Use only the CM7 scale tones when recording the Bass and Phrase Parts (i.e., C, D, E, G, A, and B). • Use only the C chord tones when recording the Chord and Pad Parts (i.e., C, E, G, and B). NOTE • Any desired chord or chord progression can be used for the INTRO and ENDING sections. If you record each sections keeping in mind the section shifts (Intro Main Fill in Main Ending), you can achieve better results. C = Chord note C R C C R C C, R = Recommended note Using the data recorded here, the auto accompaniment (Style playback) is appropriately converted depending on the chord changes you make during your performance. The chord which forms the basis for this note conversion is called the Source Chord, and is set by default to CM7 (as in the example illustration above) 4 Press the [START/STOP] button to stop recording. Record to other Parts in other sections. 5 Save the Style data (page 42). Reference Manual 39
-
 1
1 -
2
-
3
-
4
-
5
-
6
-
7
-
8
-
9
-
10
-
11
-
12
-
13
-
14
-
15
-
16
-
17
-
18
-
19
-
20
-
21
-
22
-
23
-
24
-
25
-
26
-
27
-
28
-
29
-
30
-
31
-
32
-
33
-
 34
34 -
 35
35 -
 36
36 -
 37
37 -
 38
38 -
 39
39 -
 40
40 -
 41
41 -
 42
42 -
 43
43 -
 44
44 -
45
-
46
-
47
-
48
-
49
-
50
-
51
-
52
-
53
 |
 |
