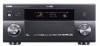
Yamaha RX-Z11 Owner's Manual
Yamaha RX-Z11 - AV Receiver Manual
 |
UPC - 027108929019
View all Yamaha RX-Z11 manuals
Add to My Manuals
Save this manual to your list of manuals |
Yamaha RX-Z11 manual content summary:
- Yamaha RX-Z11 | Owner's Manual - Page 1
UCA AV Receiver OWNER'S MANUAL English - Yamaha RX-Z11 | Owner's Manual - Page 2
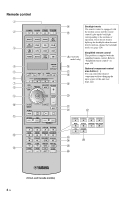
PROGRAM PUSH ENTER HDMI IN MENU TONE CONTROL USB PHONES OPTIMIZER MIC VIDEO AUX PURE DIRECT VOLUME D F G HIJ KL E M N AUDIO SELECT SPEAKERS A B SILENT CINEMA YPAO MULTI ZONE STRAIGHT TUNING MODE MEMORY EFFECT DISPLAY MAN'L/AUTO BAND PRESET/TUNING EDIT SEARCH MODE ZONE ON - Yamaha RX-Z11 | Owner's Manual - Page 3
POWER STANDBY POWER TV AV MULTI V-AUX PHONO MD TAPE BD HD DVD DVD CD CD-R 3 CBL SAT DTV DVR VCR TUNER DOCK NET USB XM 4 AMP TV SOURCE 5 OUT AUDIO SEL MUTE AUDIO C TV VOL TV CH TV 3D DSP INPUT D E (Australia model only) F G H I Backlight mode The remote control is - Yamaha RX-Z11 | Owner's Manual - Page 4
presence of important operating and maintenance (servicing) instructions for replacement of instructions contained in this manual, meets FCC requirements. Modifications not expressly approved by Yamaha may void your authority, granted by the FCC, to use the problem by using one of 300 ohm ribbon lead - Yamaha RX-Z11 | Owner's Manual - Page 5
-670-0108 AV Receiver RX-Z11 - This device must accept any interference received including interference that may cause undesired operation. See the "Troubleshooting" section at the end of this manual if interference to radio reception is suspected. We Want You Listening For A Lifetime Yamaha and - Yamaha RX-Z11 | Owner's Manual - Page 6
8 Features 10 Getting started 11 Quick start guide 13 Preparation Connections 20 Optimizing the speaker setting for your listening room (YPAO 46 Before starting the automatic setup 46 Using the quick automatic setup 47 Using the basic automatic setup 48 Reviewing the result of the automatic - Yamaha RX-Z11 | Owner's Manual - Page 7
controlling zone of the simplified remote control......132 Replacing the battery in the simplified remote control ...........132 Contents Using multi-zone configuration 133 Step1: Planning the multi-zone system 134 Step2: Connecting the speakers, external amplifiers, and/or other components 135 - Yamaha RX-Z11 | Owner's Manual - Page 8
the cover pages at the top of this manual for the information about each position of the Thomson. This receiver supports network connections YAMAHA CORPORATION hereby grants the user a nonexclusive, non-transferable, limited right of use their respective owners. iPodTM "iPod" is a trademark of Apple - Yamaha RX-Z11 | Owner's Manual - Page 9
Introduction Introduction Features 10 Getting started 11 Supplied accessories ...11 Using the remote control ...12 Opening and closing the front panel door 12 Quick start guide 13 Preparation: Check the items 13 Step 1: Set up your speakers ...14 Step 2: Connect your Blu-ray Disc/HD DVD player - Yamaha RX-Z11 | Owner's Manual - Page 10
◆ DOCK terminal to connect a Yamaha iPod universal dock (such as the YDS-10, sold separately), which supports iPod (Click and Wheel), iPod nano, and iPod mini Network features ☞ P. 80 ◆ NETWORK port to connect a PC and Yamaha MCX-2000 or access the Internet Radio via LAN ◆ DHCP automatic or manual - Yamaha RX-Z11 | Owner's Manual - Page 11
received all of the following parts. Remote control POWER POWER STANDBY POWER TV AV MULTI V-AUX PHONO BD HD DVD CBL SAT DVD DTV TUNER DOCK CD DVR NET USB MD TAPE CD-R VCR XM AMP AUDIO SEL AUDIO 3D DSP Simplified remote control STANDBY recommend that you use alkaline batteries. • 11 En - Yamaha RX-Z11 | Owner's Manual - Page 12
Using the remote control The remote control transmits a directional infrared ray. Be sure to aim the remote control directly at the remote control sensor on this unit during operation. Remote control sensor MAIN ZONE ON/OFF MASTER ON OFF INPUT AUDIO SELECT SPEAKERS position. AMP Operates the - Yamaha RX-Z11 | Owner's Manual - Page 13
Introduction Quick start guide The following steps describe the easiest way to enjoy Blu-ray Disc/HD DVD movie playback in your home theater. See pages 21 to 25 for details of the speaker placement. Left front presence Right front presence Front right Right subwoofer Surround right Front - Yamaha RX-Z11 | Owner's Manual - Page 14
of this unit. Right front presence speaker Right rear presence speaker Loosen Insert Tighten Surround right speaker Surround back right speaker Front right speaker Center speaker For other speaker configurations If you want to connect less than 11 speakers and 2 subwoofers, connect the - Yamaha RX-Z11 | Owner's Manual - Page 15
Quick start guide Left rear Left front presence speaker presence speaker Be sure speaker you are connecting. If the impedance of your speaker is 6-ohm, change the setting of "SPEAKER IMP." in "Advanced setup" (see page 142). Surround left speaker Surround back left speaker Front left speaker - Yamaha RX-Z11 | Owner's Manual - Page 16
unit. Blu-ray Disc/HD DVD player AV receiver HDMI output jack HDMI cable BD/HD Speaker impedance setting ☞ P. 43 For further connections • Using other kinds of speaker Yamaha iPod universal dock ☞ P. 38 • Using the REMOTE IN/OUT jacks ☞ P. 38 • Using the TRIGGER OUT jacks ☞ P. 38 • Using - Yamaha RX-Z11 | Owner's Manual - Page 17
speakers. If the speakers are 6-ohm speakers, set "SPEAKER IMP." to "6ΩMIN" before using this unit (see page 142). ■ After using this unit... Quick start guide amount of power in order to receive infrared signals from the remote troubles? Refer to "Troubleshooting" on pages 146 to 153 for other - Yamaha RX-Z11 | Owner's Manual - Page 18
to the volume level ☞ P. 102 • Adjusting the tonal quality of each channel manually by using the parametric equalizer ☞ P. 104 • Adjusting the audio and video synchronization ☞ P. 105 • Muting the selected speaker channel ☞ P. 106 • Setting the parameters related to the video signals ☞ P. 107 - Yamaha RX-Z11 | Owner's Manual - Page 19
Preparation Preparation Connections 20 Rear panel ...20 Placing speakers ...21 Connecting speakers ...23 Using subwoofers ...26 Using presence speakers ...27 Connecting the speaker cable 28 Information on jacks and cable plugs 29 Information on HDMI™ ...29 Audio and video signal flow 30 - Yamaha RX-Z11 | Owner's Manual - Page 20
IN ANTENNA-2 GND AM FM SPEAKERS + L REAR PRESENCE /ZONE FRONT PRESENCE /ZONE SURROUND (SINGLE) SUR. BACK/ BI-AMP B FRONT B/ ZONE EXTRA SP A FRONT A 9 0 AB Name 1 Speaker terminals 3 COMPONENT VIDEO jacks Video component jacks Zone video out jacks DOCK terminal 4 USB port 5 NETWORK port - Yamaha RX-Z11 | Owner's Manual - Page 21
provide more realistic front-to-back transitions. Front and rear presence left and right speakers See page 27 for details. Left and right subwoofers See page 26 for details. Using di-pole speakers It is recommended that you use di-pole speakers for surround left and right channels for the accurate - Yamaha RX-Z11 | Owner's Manual - Page 22
the placement in the 11.2/11.1-channel speaker layout. The surround back channel signals are directed to the surround left and right speakers when "Surround Back" is set to "None" (see page 100). Subwoofer See page 26 for details. y You can also use the front presence speakers (see page 27) instead - Yamaha RX-Z11 | Owner's Manual - Page 23
also use all speaker terminals of this unit for the Zone 2, Zone 3, and/or Zone 4 speakers (see page 143). ■ For the 11.2/11.1 (or 9.2/9.1) -channel speaker setting Right front presence speaker Right rear presence speaker Left rear presence speaker Left front presence speaker SPEAKERS + R REAR - Yamaha RX-Z11 | Owner's Manual - Page 24
SP A FRONT A Center speaker Surround right Surround back speaker right speaker Front right speaker Front left speaker Surround back Surround left left speaker * speaker * If you use a single surround back speaker, connect the speaker to the SUR.BACK/BI-AMP (SINGLE) speaker terminal. 24 En - Yamaha RX-Z11 | Owner's Manual - Page 25
speaker setting Connections SPEAKERS + R SURROUND B FRONT B/ ZONE EXTRA SP A FRONT A CENTER FRONT B speakers (U.S.A. model) SPEAKERS + L SURROUND B FRONT B/ ZONE EXTRA SP A FRONT A Surround right speaker Front right speaker Center speaker Front left speaker Surround left speaker 25 - Yamaha RX-Z11 | Owner's Manual - Page 26
Connections Using subwoofers The use of subwoofers with built-in amplifiers, such as the Yamaha Active Servo Processing Surround left/right SBL/SBR: Surround back left/right FSW/RSW: Front/rear subwoofer SL SR SBL SBR Speaker indications FL/FR: Front left/right C: Center SL/SR: Surround left - Yamaha RX-Z11 | Owner's Manual - Page 27
the vertical position of dialogues with using the front presence speakers (see page 91). Note If "Front Presence" is set to "None", the rear presence speakers also do not function and you cannot activate the CINEMA DSP HD³ mode. Front presence speakers 0.5 to 1 m (1 to 3 ft) FPL 1.8 m (6 ft) or - Yamaha RX-Z11 | Owner's Manual - Page 28
SUR. BACK/ BI-AMP B FRONT B/ ZONE EXTRA SP FRONT B/ A FRONT A 28 En Right Left Front speakers Note When you make the conventional connection, make sure that the shorting bars are put into the terminals of the speakers appropriately. Refer to the instruction manuals of the speakers for details. - Yamaha RX-Z11 | Owner's Manual - Page 29
on it. • Use a conversion cable (HDMI jack ↔ DVI-D jack) to connect this unit to other DVI components. • You can check the potential problem about the HDMI be output at the HDMI OUT jacks. Set "Conversion" to "On" in "Manual Setup" (see page 107) to activate this feature. • This unit is equipped - Yamaha RX-Z11 | Owner's Manual - Page 30
The following types of audio signals can be only input at HDMI input jacks: - DSD - Dolby TrueHD - Dolby Digital Plus - DTS-HD Master Audio - DTS-HD High OUT 1 and 2 outputs the same video signals and you can use both COMPONENT VIDEO OUT jacks simultaneously. • Digital video signals input at - Yamaha RX-Z11 | Owner's Manual - Page 31
HDMI component connected to the HDMI OUT jacks on the rear panel of this unit. Use the "Support Audio" parameter in "Option" to select the component to 105). Connect the video monitor to the HDMI OUT jacks of this unit to use the feature. Component video in Y PB PR Projector HDMI in OUT 1 HDMI - Yamaha RX-Z11 | Owner's Manual - Page 32
Connections Connecting other components Make sure that this unit and other components are unplugged from the AC wall outlets. Notes • When "Conversion" is set to "Off" (see page 107), be sure to make the same type of video connections as those made for your TV (see page 31). For example, if you - Yamaha RX-Z11 | Owner's Manual - Page 33
out S-video out Video out Audio out Component out DVD player Optical out Coaxial out ■ Connecting set-top boxes Component out Satellite receiver or cable TV receiver Optical out HDMI out Audio out Video out S-video out Y PB PR S COMPONENT VIDEO Y PB PR S VIDEO VIDEO IN 2 DTV 3 CBL - Yamaha RX-Z11 | Owner's Manual - Page 34
Connections ■ Connecting a DVD recorder COMPONENT VIDEO Y PB PR S VIDEO VIDEO IN 4 DVR HDMI VIDEO OUT 4 DVR VIDEO AUDIO IN 4 DVR 4 DVR AUDIO OUT L DVR D R IN4 DVR DVR 4 OPTICAL Y PB PR S V LR LR V S O DIGITAL IN (U.S.A. model) S-video in Video in Audio in Audio out Video - Yamaha RX-Z11 | Owner's Manual - Page 35
only compatible with a turntable with an MM or a high-output MC cartridge. To connect a turntable with a low-output MC cartridge to the PHONO jacks, use an in-line boosting transformer or an MC-head amplifier. • When you connect both the DIGITAL INPUT (OPTICAL) jack and the DIGITAL INPUT (COAXIAL - Yamaha RX-Z11 | Owner's Manual - Page 36
more power to the speaker output - when you want to use another amplifier for your presence of sounds - when you want to enjoy the 11.2-channel surround sound in the (see page 26) Surround back left/right * Front presence left/right Rear presence left/right Center Note * When you only connect one - Yamaha RX-Z11 | Owner's Manual - Page 37
Input Channels" to "8ch" in "Multi CH Assign" (see page 98), you can use the input jacks assigned as "Front Input" in "Multi CH Assign" (see page 100). We recommend that you connect at least a 5.1-channel speaker system before using this feature. For 6-channel input For 8-channel input Center out - Yamaha RX-Z11 | Owner's Manual - Page 38
is equipped with the DOCK terminal on the rear panel that allows you to connect a Yamaha iPod universal dock (such as the YDS-10, sold separately) where you can station your iPod and control playback of your iPod using the supplied remote control. Connect a Yamaha iPod universal dock (such as the - Yamaha RX-Z11 | Owner's Manual - Page 39
front panel Use the VIDEO AUX jacks on the front panel to connect a game console or a video camera to this unit. Caution Be sure to turn down the volume of this unit and other components before making connections. MAIN ZONE ON/OFF MASTER ON OFF INPUT AUDIO SELECT SPEAKERS A B SILENT CINEMA - Yamaha RX-Z11 | Owner's Manual - Page 40
the LAN ports on your router that supports the DHCP (Dynamic Host Configuration Protocol) server manually (see page 111). • Yamaha MCX-2000, MCX-A10 and MCX-C15 may not be for sale in same locations. Internet Yamaha MCX-2000 Yamaha MCX-C15 WAN LAN Modem Yamaha MCX-A10 (with optional speakers - Yamaha RX-Z11 | Owner's Manual - Page 41
Consult the nearest authorized Yamaha dealer or service center about outdoor antennas. "TUNER" in "Input Select" (see page 96) and in "Manual Setup" (see page 110). Indoor FM antenna (supplied) AM loop antenna Open the lever Insert Close the lever Outdoor AM antenna Use a 5 to 10 m (16 to 32 ft) - Yamaha RX-Z11 | Owner's Manual - Page 42
then plug the AC power cable into an AC wall outlet. AC IN To the AC wall outlet ■ AC OUTLET(S) (SWITCHED) Australia model 1 outlet U.S.A. and Canada models 2 outlets Use these outlet(s) to supply power to any connected components. Connect the power cable of your other components to these outlet - Yamaha RX-Z11 | Owner's Manual - Page 43
use 6-ohm speakers, set "SPEAKER IMP." to "6ΩMIN" as follows BEFORE using this unit. Before using this unit, set the speaker impedance of the connected speakers of power in order to receive infrared signals from the remote problems... • First, turn off and then turn on this unit again. • If problems - Yamaha RX-Z11 | Owner's Manual - Page 44
AUX USB DOCK VCR neural FR AAC CS t q TRUE HD HD 96 24 qDIGITAL PLUS MASTER AUDIO DSD qPL x qEX MATRIX DISCRETE PCM HD3 PRE AMP MP3 VIRTUAL selected. R: Rear USB port is selected. 5 Battery charge indicator Lights up when this unit charges the battery of the stationed iPod in the standby - Yamaha RX-Z11 | Owner's Manual - Page 45
is in the auto setup procedure (see page 46) or the speaker level setting procedure in the "Speaker Level" (see page 102). Presence speaker indicators Light up according to setting for "Front Presence" and "Rear Presence" (see page 100) in "Speaker Set" when this unit is in the auto setup procedure - Yamaha RX-Z11 | Owner's Manual - Page 46
Yamaha Parametric Room Acoustic Optimizer) technology which lets you avoid troublesome listening-based speaker Use this feature to customize the automatic setup and review to F AMP. Advanced automatic setup Use this feature to speakers. If this happens, THX Ltd. recommends setting them manually - Yamaha RX-Z11 | Owner's Manual - Page 47
that you move to the wall where speakers are not around. 3 Press MPROGRAM on off the GUI or use the basic automatic setup procedure (see page 48). GUI RX-Z11 2 Place the optimizer panel display. See the "Auto Setup" section in "Troubleshooting" on page 152 for a complete list of error messages - Yamaha RX-Z11 | Owner's Manual - Page 48
by this unit. This unit reduces the effects of the standing waves in the listening with the specially customized parametric equalizer. Angle (Speaker angle) For details, refer to "Using advanced automatic setup" on page 50. In the basic automatic setup, clear the check mark. Note When you - Yamaha RX-Z11 | Owner's Manual - Page 49
speaker setting for your listening room (YPAO) ■ Reviewing the result of the automatic setup Use this feature to review Input Select Manual Setup problems during the automatic setup procedure, error or warning messages appears in the result display. See the "Auto Setup" section in "Troubleshooting - Yamaha RX-Z11 | Owner's Manual - Page 50
. Press 9h repeatedly to switch the result of the front and rear speaker. Angle (Speaker angle) Displays the angles of the front speakers, surround speakers, front presence speakers and rear presence speakers at the measured point. y • You can reload the displayed result of the automatic setup - Yamaha RX-Z11 | Owner's Manual - Page 51
the remaining listening positions, press 9 n. 12 Repeat steps 10 and 11 until the measurements at all listening points are completed. 13 Once FRONT DIRECTION Note For the accurate measurements of the speaker angles, we strongly recommend that you use a tripod (etc.) to affix the microphone base at - Yamaha RX-Z11 | Owner's Manual - Page 52
setting for your listening room (YPAO) 15 Once the setting has been completed, press 9 ENTER. This unit starts the measurements of the speaker angles. 16 Once the following display appears in the video monitor, move the optimizer microphone to the "(2)" position on the microphone base. Equalizing - Yamaha RX-Z11 | Owner's Manual - Page 53
component 54 Selecting the HDMI OUT jack 55 Selecting the front speaker set 55 Using your headphones ...55 Playing video sources in the background of 58 Sound field program descriptions 58 Using CINEMA DSP HD³ mode 64 Enjoying unprocessed input sources 64 Using audio features 65 Enjoying pure - Yamaha RX-Z11 | Owner's Manual - Page 54
speakers. Check whether your CD player supports USB DOCK VCR manuals for the source component. • See page 68 for details about FM/AM tuning instructions. • (U.S.A. and Canada models only) See page 74 for details about XM Satellite Radio tuning instruction. • See page 78 for details about the iPod - Yamaha RX-Z11 | Owner's Manual - Page 55
speaker setting. ■ Using the Zone B feature When you set "Speaker B" to "ZoneB" (see page 109), you can use the speakers connected to the EXTRA SP speaker speaker terminals. • All digital multi-channel audio signals (except DSD CBL SAT DTV DVR VCR TUNER DOCK NET USB XM : Audio source buttons - Yamaha RX-Z11 | Owner's Manual - Page 56
the default the audio input jack select of this unit by using "Audio Select" in "Option" (see page 112). • select setting. Available input sources NET V-AUX USB DOCK VCR DVR CBL SAT DTV DVD BD HD DVD instructions for the source component. See page 68 for details about tuning instructions. - Yamaha RX-Z11 | Owner's Manual - Page 57
Video Basic Multi Zone Network Currently selected sound field program Menu area Manual Setup -40.0dB Current menu directory Volume level (see page 54) y • Set the operation mode selector to FAMP when you operate this unit by using GUI menu. • See page 88 for details about the contents in the - Yamaha RX-Z11 | Owner's Manual - Page 58
Yamaha digital sound field processing (DSP) chip containing several sound field programs which you can use to enhance your playback experience. y • The Yamaha CINEMA DSP Front Simple Program description Sound field indicators Presence sound field Surround left sound field Listening position - Yamaha RX-Z11 | Owner's Manual - Page 59
in which the balance is more towards either the front or rear. Simple Complex The sound field to be generated is evaluated according Vertical Simple Large Horizontal Complex Hall in Munich B HiFi DSP Size This hall is frequently used for recording orchestral music, and is a shoe-box type - Yamaha RX-Z11 | Owner's Manual - Page 60
downtown Stuttgart. Sound reflected off the concrete wall located to the left of listeners has a powerful presence. Size V/H balance Atmosphere Small Vertical Simple Hall in Vienna HiFi DSP This is an approximately 1700-seated, middle-sized concert hall with a shoebox shape that is traditional - Yamaha RX-Z11 | Owner's Manual - Page 61
Small Vertical Simple The Roxy Theatre HiFi DSP This is the sound field of a presence on the stage. The surround sound field is relatively moderate, but the data for concert hall effects are used Rear Powerful Large Horizontal Rear Powerful Large Horizontal Rear Powerful Large Horizontal Rear - Yamaha RX-Z11 | Owner's Manual - Page 62
ENTERTAIN 4 ENTERTAIN Disco HiFi DSP This program recreates the the sound field effects for movies and the sound field design used with "Action Game" to represent the depth and spatial movie theater", in which the audience is surrounded by beautiful reverberations from the left, right and rear. - Yamaha RX-Z11 | Owner's Manual - Page 63
as a classic movie in an atmosphere of a good old movie theater. The program produces the optimum expansion and reverberation to the original audio Stereo Use this program to mix down multi-channel sources to 2 channels. 11ch Stereo HiFi DSP Use this program to output sound from all speakers. When - Yamaha RX-Z11 | Owner's Manual - Page 64
Sound field programs ■ Using sound field programs without surround speakers (Virtual CINEMA DSP) Virtual CINEMA DSP allows you to enjoy the CINEMA DSP or HiFi DSP sound field programs without surround speakers. It creates virtual speakers to reproduce the natural sound field. When you set "Surround" - Yamaha RX-Z11 | Owner's Manual - Page 65
control to FAMP. Enjoying pure hi-fi sound Use the Pure Direct mode to enjoy the pure fidelity presence left speaker FP R Front presence right speaker RP L Rear presence left speaker RP R Rear presence right speaker y Once you press 8LEVEL on the remote control, you can also select the speaker - Yamaha RX-Z11 | Owner's Manual - Page 66
DTSencoded DVDs and CDs (when using a digital audio connection) on your DTS-compatible player, follow its operating instructions to make a setting so that signal on your VCR. • The analog audio and video signals input at the DOCK terminal can be output at the analog audio OUT (REC) jacks and DVR or - Yamaha RX-Z11 | Owner's Manual - Page 67
the XM™ Mini-Tuner Home Dock 74 Activating XM™ Satellite Radio 74 Basic XM™ Satellite Radio operations 75 Setting the XM™ Satellite Radio preset channels 76 Displaying the XM™ Satellite Radio information 77 Using iPod 78 Controlling iPod™ ...78 Using Network/USB features 80 Navigating - Yamaha RX-Z11 | Owner's Manual - Page 68
which the tuning information is displayed in the video monitor by using the "On Screen" parameter in "Manual Setup" (see page 108). • You can display the a station, the TUNED indicator lights up and the frequency of the received station is shown in the front panel display. • Rotate MPROGRAM rightward - Yamaha RX-Z11 | Owner's Manual - Page 69
Manual tuning If the signal received from the station you want to select is weak, tune into it manually. Note Manually manually. • Rotate MPROGRAM rightward to tune into a higher frequency. • Rotate MPROGRAM leftward to tune into a lower frequency. Direct frequency tuning Use • (Australia model only - Yamaha RX-Z11 | Owner's Manual - Page 70
(B). Automatic preset tuning (Canada and Australia models) You can use the automatic preset tuning feature to store strong signals. y To preset the AM stations, use the manual preset tuning feature. 1 Rotate the DINPUT selector ( number. • If the number of received stations does not reach 40 (E8), - Yamaha RX-Z11 | Owner's Manual - Page 71
preset tuning Use this feature to store the desired FM and AM stations manually. You can also store up to 40 stations (A1 to E8: 8 preset station numbers in each of the 5 preset station groups) manually. 1 Tune into the desired station. See pages 68 and 69 for tuning instructions. 2 Press JMEMORY - Yamaha RX-Z11 | Owner's Manual - Page 72
and reception as well as new data services. Furthermore, supplemental program services allow listeners to select from up to you want to use. Multi-zone configurations and the HD Radio tuning functions This unit has both an HD Radio receiver unit and a conventional FM/AM radio receiver unit. You can - Yamaha RX-Z11 | Owner's Manual - Page 73
types / Comment) Music information is available only when data programs are received. If the music information is long, it automatically scrolls to the HD Radio information is displayed in the video monitor by using the "On Screen" parameter in "Manual Setup" (see page 108). • You can display the - Yamaha RX-Z11 | Owner's Manual - Page 74
86). Connecting the XM™ Mini-Tuner Home Dock Connect XM Mini-Tuner and Home Dock (each sold separately) to the XM jack on the rear panel of this unit. For information on your XM Mini-Tuner and Home Dock, see the operating instructions provided with XM Mini-Tuner Dock. (U.S.A. and Canada models) XM - Yamaha RX-Z11 | Owner's Manual - Page 75
currently selected channel appears in the front panel display. Lights up NET V-AUX USB DOCK VCR DVR CBL SAT DTV DVD BD HD DVD MD TAPE CD-R CD PHONO , see "Direct Number Access mode" on page 76. y • You can use the Neural-THX Surround decoder to enjoy the XM HD surround sound content of - Yamaha RX-Z11 | Owner's Manual - Page 76
operations, set the operation mode selector on the remote control to FSOURCE and then press 3XM. Setting the XM™ Satellite Radio preset channels You can use this feature to store up to 40 XM Satellite Radio channels (A1 to E8: 8 preset channel numbers in each of the 5 preset channel groups). You - Yamaha RX-Z11 | Owner's Manual - Page 77
and Canada models only)" section in "Troubleshooting" on page 146 for appropriate remedies is displayed in the video monitor by using the "On Screen" parameter in "Manual Setup" (see page 108). • antenna of Home Dock so that " " or " " is displayed here. "no signal" is displayed if Home Dock is not - Yamaha RX-Z11 | Owner's Manual - Page 78
iPod" section in "Troubleshooting" on page 152. • Once your iPod is stationed in a Yamaha iPod universal dock (such as the YDS-10, sold separately) connected to the DOCK are replaced with underscores "_". • You cannot browse the photos or video clips stored on your iPod in the GUI screen. Use the - Yamaha RX-Z11 | Owner's Manual - Page 79
". • Press KDISPLAY again to turn off the iPod menu. iPod menu in the Zone OSD You can control your iPod by using the Zone OSD. The design and functions may be different from the iPod menu displayed in the video monitor in the main zone. Using iPod™ ■ The functions of the play information display - Yamaha RX-Z11 | Owner's Manual - Page 80
USB storage device and USB portable audio player or access the Internet Radio. Notes • Yamaha MCX-2000 may not be for sale in some locations. • For further details about networking, refer to the operation manuals supplied with your network devices. Also refer to technical reference books, if needed - Yamaha RX-Z11 | Owner's Manual - Page 81
NET/USB is automatically played. Lights up (U.S.A. model) NET V-AUX USB DOCK VCR DVR CBL SAT DTV DVD BD HD DVD MD TAPE CD-R CD PHONO GUI screen of the Network/USB is displayed in the video monitor by using "On Screen" in "Manual Setup" (see page 108). • Press KDISPLAY again to turn off - Yamaha RX-Z11 | Owner's Manual - Page 82
of this unit. For details about MAC address, see page 112. • To clear the registered client ID of this unit, use the "Manual Config" mode of your Yamaha MCX-2000 (refer to the instruction manual of MCX-2000) and then set "INITIALIZE" in the advanced setup menu of this unit to "NETWORK" (see page 142 - Yamaha RX-Z11 | Owner's Manual - Page 83
control while the selected Internet Radio station service is being broadcast. The stored Internet rear USB ports. Set "USB Select" in "Input Select" to "Front" or "Rear" to select the active USB port (see page 98). Notes • This unit supports USB mass storage class devices or USB MTP devices using - Yamaha RX-Z11 | Owner's Manual - Page 84
front panel display. NET V-AUX USB DOCK VCR DVR CBL SAT DTV DVD BD is temporary unavailable or out of service. - the directory of the selected and does not recall the correct item by using numeric buttons (1-8) (B) if you add or numeric buttons (1-8) (B), replace the registered items in the - Yamaha RX-Z11 | Owner's Manual - Page 85
Manual Setup (Basic) ...99 Manual Setup (Volume) ...102 Manual Setup (Sound) ...103 Manual Setup (Video) ...107 Manual Setup (Multi Zone 109 Manual Setup (Network) ...111 Manual 132 Using multi-zone configuration 133 Step1: Planning the multi-zone system 134 Step2: Connecting the speakers, - Yamaha RX-Z11 | Owner's Manual - Page 86
(or Dolby Pro Logic II) processing for music sources. The Pro Logic IIx decoder is not available when "Surround Back" is set to "None" or using headphones (see page 100). Decoder description Pro Logic Dolby Pro Logic processing for any sources. PLIIx Movie PLII Movie Dolby Pro Logic IIx (or Dolby - Yamaha RX-Z11 | Owner's Manual - Page 87
or "OFF". y Use this feature to activate the desired decoder manually when this unit cannot detect 94) or Pure Direct (see page 65) mode. - when "BI-AMP" is set to "ON" (see page 143). • When this unit multi-channel game audio. y To optimize the speaker settings for the THX Surround modes, set the - Yamaha RX-Z11 | Owner's Manual - Page 88
user interface (GUI) menu RX-Z11 GUI menu tree Stereo/Surround ☞ P. 91 Input Select ☞ P. 96 Manual Setup XM (U.S.A. and Canada models only) TUNER MULTI CH PHONO CD CD-R MD/TAPE BD/HD DVD DVD DTV CBL/SAT DVR VCR V-AUX DOCK NET/USB Volume ☞ P. 102 Adaptive DRC Adaptive DSP Lvl Max Volume Initial - Yamaha RX-Z11 | Owner's Manual - Page 89
Video Info. English Français Deutsch Español Graphical user interface (GUI) menu Speaker B Zone SP Assign Party Mode Set Zone2 Set Zone3 Set Zone4 Set Zone OSD Configuration Information Front Panel Disp. iPod Audio Select Decoder Mode EXTD Surround Memory Guard HDMI Set Trigger Output Main Load - Yamaha RX-Z11 | Owner's Manual - Page 90
this feature to select the input source and customize the parameters of each input source (see page 96). ■ Manual Setup (Manual setup menu) Use this feature to manually adjust speaker and system parameters. Volume (Volume menu) See page 102 for details. Sound (Sound menu) See page 103 for details - Yamaha RX-Z11 | Owner's Manual - Page 91
parameters. Adjusting the effect sound level of the sound field programs (DSP Level) Sound field programs add effect sounds (DSP effect sounds) to the original source sound to create sound field in the listening room. Use the "DSP Level" parameter to adjust the level of the effect sounds. Graphical - Yamaha RX-Z11 | Owner's Manual - Page 92
Features Decoder Type Decoder type. Selects the decoder used with the SUR. DECODE, THX, or MOVIE . This adjustment is especially effective for the CINEMA DSP programs. Control range: 1 to 99 ms ( 1 ms Large value = 99 ms Room size. Presence, surround, and surround back room size. Adjusts the - Yamaha RX-Z11 | Owner's Manual - Page 93
Sound field parameter Liveness Sur. Liveness SB. Liveness Graphical user interface (GUI) menu Features Liveness. Surround and surround back liveness. Adjusts the reflectivity of the virtual walls in the hall by changing the rate at which the early reflections decay. The early reflections of a - Yamaha RX-Z11 | Owner's Manual - Page 94
see page 65). • Select "Off" not to bypass the decoders, DSP processors and the tone control circuitry when "BASS" and "TREBLE" are presence left and presence right levels. Adjusts the volume level of each channel in the 11-channel stereo mode. The available parameters differ depending on the speaker - Yamaha RX-Z11 | Owner's Manual - Page 95
speakers) Initial setting: 3 Pro Logic IIx Music and Pro Logic II Music dimension. Adjusts the sound field either towards the front or towards the rear. Control range: -3 (towards the rear 9l) to cancel the program parameter initialization. y Use "DSP PARAM" of "INITIALIZE" in "Advanced setup" to - Yamaha RX-Z11 | Owner's Manual - Page 96
V-AUX I/O Assignment Audio Select - Decoder Mode Volume Trim Rename DOCK Volume Trim - Rename NET/USB PC/MCX Volume Trim Play effective to both "PC/MCX" and "USB". ■ Station Search (U.S.A. model only) Use this feature to select the preset HD Radio stations by the name of the stations. - Yamaha RX-Z11 | Owner's Manual - Page 97
by pressing FAUDIO SELECT (or OAUDIO SEL). See page 56 for details. • You can set the default audio input jack select of this unit by using "Audio Select" in "Option" (see page 112). Note This feature is not available when no digital input jack (OPTICAL, COAXIAL and HDMI) are assigned. In - Yamaha RX-Z11 | Owner's Manual - Page 98
, no sound is output at the surround back speakers even if you set "Input Channels" to "8ch of this parameter. ■ BGV (Back ground video) Use this feature to select the video source played in the front or rear USB port as the input source (see page 40). Choice Front Rear Functions Selects - Yamaha RX-Z11 | Owner's Manual - Page 99
function. Activates the Loudness Plus function in the THX Surround modes. ■ Speaker Set (Speaker settings) Use to manually adjust any speaker setting. y If you are not satisfied with the bass sounds from your speakers, you can change these settings according to your preference. Measure for the - Yamaha RX-Z11 | Owner's Manual - Page 100
", you cannot activate the CINEMA DSP HD³ mode (see page 64). • "Dialogue Lift" is available when "Front Presence" is set to "Yes" and headphones are not connected. Rear Presence (Rear presence speakers) Use this feature if you want to use the rear presence speakers connected to this unit. Choice - Yamaha RX-Z11 | Owner's Manual - Page 101
Distance (Speaker distance) Use this feature to manually adjust the distance of each speaker and the delay applied to the respective channel. Ideally, each speaker should be the same distance from the main listening position. However, this is not possible in most home situations. Thus, a certain - Yamaha RX-Z11 | Owner's Manual - Page 102
Rear Presence R Rear presence right speaker Subwoofer L Subwoofer left Subwoofer R Subwoofer right y • If your subwoofer can adjust the output volume and the crossover frequency, set the volume to about half way (or slightly less) and set the crossover frequency to the maximum. • If you use - Yamaha RX-Z11 | Owner's Manual - Page 103
Manual Setup (Sound) Use this menu to adjust the sound parameters. ■ LFE Level (Low-frequency effect level) Use 1.0 dB Speakers (Speaker low-frequency effect level) Select to adjust the speaker LFE level range control is always active regardless of the instruction of the input source signals. • MIN: - Yamaha RX-Z11 | Owner's Manual - Page 104
speaker Front right speaker Center speaker Surround left speaker Surround right speaker Surround back left speaker Surround back right speaker Front presence left speaker Front presence right speaker Rear presence left speaker Rear presence right speaker Subwoofer left Subwoofer right Test Tone Use - Yamaha RX-Z11 | Owner's Manual - Page 105
Speaker" affects the front left/right, center, presence left/ right speaker channels and Subwoofer channel. Graphical user interface (GUI) menu Bass (Bass control) Use do not want to use the automatic lip sync. Use "Manual" to adjustment the audio and video synchronization. Advanced Operation 105 - Yamaha RX-Z11 | Owner's Manual - Page 106
only activates the limited video features. Note You cannot use the GUI menu while this unit is in the Presence L Front Presence R Rear Presence L Front presence left speaker Front presence right speaker Rear presence left speaker Rear Presence R Subwoofer L Subwoofer R Rear presence right speaker - Yamaha RX-Z11 | Owner's Manual - Page 107
menu to adjust the video parameters. Note Use the "VIDEO" in "INITIALIZE" to set the parameters in "Manual Setup (Video)" (except "Short Message" and "On Screen") to the factory presets (see page 144). ■ Conversion (Video conversion) Use this feature to activate or deactivate the video scaling - Yamaha RX-Z11 | Owner's Manual - Page 108
are input - when HDMI video signals are input ■ On Screen (On-screen display time) Use this feature to set the time for which the AM/FM tuning information, HD Radio information, XM Satellite Radio information, iPod menu, or NET/USB menu is displayed in the video monitor after you perform a certain - Yamaha RX-Z11 | Owner's Manual - Page 109
Manual Setup (Multi Zone) Use this menu to set the functions of the multi-zone configuration. ■ Speaker B (Speaker B setting) Use this feature to select the location of the FRONT B speakers. Choice Descriptions Main ZoneB Select this setting when you use the speakers 11-channel stereo) Use - Yamaha RX-Z11 | Owner's Manual - Page 110
the ANTENNA-2 terminals. Receives HD Radio station signals from the ANTENNA-1 terminals. ■ Zone OSD (Zone on-screen display) Use this feature to display the operational status of Zone 2, Zone 3, and Zone 4 on the Zone 2 video monitor connected to the ZONE VIDEO jacks on the rear panel of this unit - Yamaha RX-Z11 | Owner's Manual - Page 111
this unit can obtain the network parameters from the DHCP server of the connected network. Off Select this setting when you set the network parameters manually. IP Address (IP address) Use this parameter to specify an IP address assigned to this unit. This value must not duplicate the one - Yamaha RX-Z11 | Owner's Manual - Page 112
Manual Setup (Option) This menu adjusts the optional system settings. ■ Front Panel Disp. (Front panel display setting) Dimmer (Dimmer) Use DOCK iPod (iPod settings) Standby Charge (iPod charge on the standby mode) Use this feature to select whether this unit charges the battery of the stationed iPod - Yamaha RX-Z11 | Owner's Manual - Page 113
- GUI menu parameters - speaker levels settings y When you support audio. Support Audio (Support audio) Use this feature to select whether to play back HDMI audio signals on this unit or on another HDMI component connected to the HDMI OUT jacks on the rear panel of this unit. Choice RX-Z11 - Yamaha RX-Z11 | Owner's Manual - Page 114
(Trigger output) Use this feature to select the functions of each TRIGGER OUT jack of this unit. Choice Trigger1 Trigger2 Function Sets the functions for the TRIGGER OUT 1 jack. Sets the functions for the TRIGGER OUT 2 jack. Trigger operation mode Choice Power Source Manual Descriptions Select - Yamaha RX-Z11 | Owner's Manual - Page 115
can save the current system settings stored in "Memory1" to "Memory10" by using the "System Memory" menu in the GUI menu. 1 Press IMENU on . The top menu appears in the video monitor. Stereo/Surround Input Select Manual Setup Auto Setup System Memory Volume Sound Video Main Zone2 Zone3 Main Load - Yamaha RX-Z11 | Owner's Manual - Page 116
✓ Option Save Save: ENTER y You can cancel the saving by pressing 9l. 8 Press IMENU again to exit from the GUI menu. ■ Renaming the stored settings Use this feature to rename the stored settings. The name of each memory number appears in the GUI menu or front panel display. 1 Press IMENU on - Yamaha RX-Z11 | Owner's Manual - Page 117
Range 103 Tone Control 105 Pure Direct 106 CINEMA DSP HD³ ON/OFF 64 Volume Volume level 54 SP Config S-Wave Control 103 Parametric EQ 104 THX Set 99 Speaker Set 99 Speaker Distance 101 Speaker Level 102 Speaker B 109 Information (Auto Setup) 49 Setup Menu (Auto Setup - Yamaha RX-Z11 | Owner's Manual - Page 118
Saving and recalling the system settings (System Memory) Loading the stored system settings • Before performing the following operations, set the operation mode selector on the remote control to FAMP. • This unit overwrites the stored settings to the current settings of this unit. If you do not - Yamaha RX-Z11 | Owner's Manual - Page 119
3 jack on the speakers of the TV connected to the HDMI OUT 1 jack to enjoy TV programs, use the following settings. service, use the following settings. You can recall the desired input source, Internet radio service (see page 102) "Adaptive DSP Lvl" setting: Auto (see page 102) Saved parameter - Yamaha RX-Z11 | Owner's Manual - Page 120
a Web browser. You can select the input source and sound field program, browse the iPod or network/USB contents, select the preset items, and adjust the parameters of this unit by using the graphical user interface (Web Control Center) that appears in the Web browser. Check the IP address of this - Yamaha RX-Z11 | Owner's Manual - Page 121
can also operate other audiovisual components made by Yamaha and other manufacturers. To control your TV DSP *1 *3 (Australia model only) Set to AMP *1 *2 *1 *2 *3 POWER POWER STANDBY POWER TV AV MULTI BD HD DVD CBL SAT TUNER V-AUX DVD DTV DOCK PHONO CD DVR NET USB MD TAPE CD-R VCR XM AMP - Yamaha RX-Z11 | Owner's Manual - Page 122
the function of each control button used to control other components assigned to AV MULTI BD HD DVD CBL SAT TUNER V-AUX DVD DTV DOCK PHONO CD DVR NET USB MD TAPE CD-R VCR XM AMP HDMI OUT AUDIO SEL MUTE AUDIO TV VOL TV CH TV 3D DSP INPUT [7] [8] [9] [10] (U.S.A. and Canada models) Blu- - Yamaha RX-Z11 | Owner's Manual - Page 123
erase the learned functions of each button. EX-IR Extended IR code mode. This feature is for the authorized custom installers only. LIGHT Backlight mode. Use this feature to set the light up mode of the remote control. Page - 126 124 127 129 130 131 - 124 3 After the configurations, press - Yamaha RX-Z11 | Owner's Manual - Page 124
control using a manual Yamaha BD HD DVD DVD Yamaha DVD DVD Yamaha CD CD Yamaha CD-R CD-R Yamaha CBL SAT - - DTV - - DVR DVR Yamaha VCR - - TUNER SOURCE Yamaha DOCK SOURCE Yamaha NET USB SOURCE Yamaha XM (U.S.A. and Canada models) SOURCE Yamaha (TAPE) (Australia - Yamaha RX-Z11 | Owner's Manual - Page 125
the component you want to use. For a complete list of available remote control codes, refer to "List of remote control codes" at the end of this manual. y You can also Yamaha components). If operation is not possible with any of the remote control codes, program the new remote control function using - Yamaha RX-Z11 | Owner's Manual - Page 126
STANDBY POWER TV AV MULTI BD HD DVD CBL SAT TUNER V-AUX DVD DTV DOCK PHONO CD DVR NET USB MD TAPE CD-R VCR XM AMP TV SOURCE SELECT AUDIO 3D DSP Set to SOURCE (U.S.A. and Canada models) Notes • The remote control transmits infrared rays. If the other remote control also uses infrared rays - Yamaha RX-Z11 | Owner's Manual - Page 127
TUNER SELECT AV V-AUX DVD DTV DOCK PHONO CD DVR NET USB SETUP ID MACRO MODE ZONE SYSTEM MEMORY MD TAPE CD-R VCR XM AMP TV SOURCE the function to be programmed is continuous or uncommon. BD/HD 2 Press GSETUP using a ballpoint pen or similar object. "SETUP" appears in the display window. - Yamaha RX-Z11 | Owner's Manual - Page 128
(see page 129). ■ Recalling programmed macro-operations POWER POWER STANDBY POWER TV AV MULTI BD HD DVD CBL SAT TUNER V-AUX DVD DTV DOCK PHONO CD DVR NET USB MD TAPE CD-R VCR XM Macro buttons AMP TV SOURCE SELECT SETUP ID MACRO MODE ZONE SYSTEM MEMORY 1 2 3 4 MACRO (U.S.A. and - Yamaha RX-Z11 | Owner's Manual - Page 129
DOCK NET (*2) USB XM (*2) (Australia model) *1 Set the appropriate remote control code for TV in advance (see page 124). *2 This unit plays the last received a new macro is programmed for a button. The default macro can be used again when the programmed macro is cleared. • It is not possible to - Yamaha RX-Z11 | Owner's Manual - Page 130
POWER POWER STANDBY TV AV 3 2 MULTI V-AUX PHONO POWER MD TAPE BD HD DVD CBL SAT DVD CD 1 DTV DVR CD-R VCR TUNER DOCK NET USB XM the selected input area. • The position of the operation mode selector (AMP/TV/SOURCE) affects the assigned function. When the operation mode selector is - Yamaha RX-Z11 | Owner's Manual - Page 131
setup mode. ■ Clearing a learned function (ERASE) 1 Press GSETUP using a ballpoint pen or similar object. "SETUP" appears in the display window 5SELECT l / h repeatedly. • If you want to erase the function learned in the AMP or TV control area, set the operation mode selector to FAMP or FTV. 4 Press - Yamaha RX-Z11 | Owner's Manual - Page 132
playback of the iPod or Network/USB contents. ☞ P. 78, 81 MUTE MUTE Mutes the audio output. ☞ P. 56 Remove the insulation sheet before using the remote control range of the simplified remote control decreases. Use a straight pin to remove the cover. Replace the battery with a new CR2025 battery - Yamaha RX-Z11 | Owner's Manual - Page 133
connections, turn on this unit and then set the parameters in "Multi Zone" menu (see page 109). - Use "Zone SP Assign" to designate the speaker terminals of this unit to each zone. ☞ P. 139 - Use "Zone2 Set", "Zone3 Set", or "Zone4 Set" parameters to set the volume settings and other functions in - Yamaha RX-Z11 | Owner's Manual - Page 134
with your nearest authorized Yamaha dealer or service center for the planning and setup of the multi-zone system that best meet your requirements. Pre-amplifier mode If you want use the external amplifiers for the all channels in the main zone, you can use all the speaker terminals of this unit - Yamaha RX-Z11 | Owner's Manual - Page 135
of your Receiver. To make the system of the example, connect the speakers in the main zone and other zones as follows: Right speaker terminals + R REAR PRESENCE /ZONE Zone 4 Left speaker terminals + SPEAKERS L REAR PRESENCE /ZONE FRONT PRESENCE /ZONE SURROUND SUR. BACK/ BI-AMP B FRONT B/ ZONE - Yamaha RX-Z11 | Owner's Manual - Page 136
(see page 141), this unit can output the audio signals input at the HDMI IN jacks or DIGITAL IN jacks at the ZONE OUT jacks. ■ Using the ZONE DIGITAL OUT (COAXIAL) jack When you connect an external amplifier in Zone 2 to the ZONE DIGITAL OUT (COAXIAL) jack, you can play back - Yamaha RX-Z11 | Owner's Manual - Page 137
Using multi-zone configuration ■ Connecting Zone video monitor Connect the video monitor(s) in Zone 2 to the ZONE OUT VIDEO and/or ZONE OUT COMPONENT VIDEO jacks. - Yamaha RX-Z11 | Owner's Manual - Page 138
you own these products, you may not need to use an infrared emitter. Up to six Yamaha components can be connected as shown. REMOTE IN REMOTE OUT IN REMOTE OUT IN REMOTE OUT Infrared signal receiver This unit Yamaha component Yamaha component TRIGGER OUT jacks This unit is equipped with two - Yamaha RX-Z11 | Owner's Manual - Page 139
PRESENCE speaker terminals EXTRA: EXTRA SP speaker terminals FRONT: FRONT A speaker terminals CENTER: CENTER speaker terminals SUR.: SURROUND speaker terminals S.BACK: SUR.BACK speaker terminals R.PRNS: REAR PRESENCE speaker the zone you want to control by using the control buttons on the front panel - Yamaha RX-Z11 | Owner's Manual - Page 140
Satellite Radio operations, see "XM™ Satellite Radio tuning (U.S.A. and Canada models only)" on page 74. • Select "DOCK" as the input source to use the iPod features in the selected zone. For details about the iPod operations, see "Using iPod™" on page 78. • Select "NET/USB" as the input source to - Yamaha RX-Z11 | Owner's Manual - Page 141
useful to play back a back ground music in multiple zone in a home party. MAIN ZONE ON/OFF MASTER ON OFF INPUT AUDIO SELECT SPEAKERS are replaced with underscores "_". • You can set the time for which the Zone OSD is displayed in the Zone video monitor by using "On Screen" in "Manual Setup" - Yamaha RX-Z11 | Owner's Manual - Page 142
the front panel display. 6ΩMIN Select this setting to set the speaker impedance to 6 Ω. The impedance of each speaker must be 6 Ω or higher. ■ Remote sensor REMOTE SENSOR Use this feature to activate or deactivate the signal-receiving capability of the remote control sensor on the front panel of - Yamaha RX-Z11 | Owner's Manual - Page 143
control is set to "ID2" Setting remote control ID Use this feature to set the remote control ID. This feature is useful when you control multiple Yamaha AV receiver or amplifier with using the remote control. Press GID repeatedly using a ballpoint pen or similar object on the remote control - Yamaha RX-Z11 | Owner's Manual - Page 144
client ID of this unit on your Yamaha MCX-2000 is cleared (see page 82). ■ MAC address filter MAC FILTER Use this feature to filter the access to CHECK Use this feature to activate or deactivate the monitor check function of this unit. Choice Descriptions YES SKIP This unit receives the - Yamaha RX-Z11 | Owner's Manual - Page 145
Additional Information Additional Information Troubleshooting 146 Resetting the system 154 Glossary 155 Sound field program information 160 Parametric equalizer information 164 Block diagrams 165 Specifications 167 Index 169 - Yamaha RX-Z11 | Owner's Manual - Page 146
Troubleshooting Refer to the table below when this unit does not function properly. If the problem you are experiencing is not listed below or if the instruction below does not help, turn off this unit, disconnect the power cable, and contact the nearest authorized Yamaha dealer or service - Yamaha RX-Z11 | Owner's Manual - Page 147
Troubleshooting Problem The sound suddenly goes off. Sound is heard from the speaker on one side only. Only the center speaker outputs substantial sound. No sound is heard from the center speaker. No sound is heard from the presence speakers. No sound is heard from the surround speakers. No sound - Yamaha RX-Z11 | Owner's Manual - Page 148
Troubleshooting Problem plug it in again after about 30 seconds. Make sure all speaker cables are connected correctly. 23 Move this unit further away problem when the transmitter is too far away or the antenna input is poor. Try using a high-quality directional FM antenna. - Use the manual - Yamaha RX-Z11 | Owner's Manual - Page 149
"List of remote control codes" at the end of this manual. Match the remote control ID of this unit and the remote control. Program the necessary functions independently into the programmable buttons using the Learn feature. Replace the batteries. Place the remote controls at the proper distance - Yamaha RX-Z11 | Owner's Manual - Page 150
Troubleshooting ■ HDMI Problem Cause Remedy No picture or sound The number of the connected HDMI components Reduce the number of the connected HDMI components. is over the limit. HDCP authentication failed. Check that the connected HDMI components support the HDCP copy protection standards. - Yamaha RX-Z11 | Owner's Manual - Page 151
updated Bookmark ON Bookmark OFF Empty Memory! Not found! USB Overloaded Troubleshooting player. There is a problem with the signal path sure Windows Media Player 11 or Windows Media - preparing a network exclusively for use with this unit to - is providing the 83 service. Preset the desired - Yamaha RX-Z11 | Owner's Manual - Page 152
is a problem with the signal path from your Turn off this unit and reconnect the Yamaha iPod universal iPod to this unit. dock to the DOCK terminal of this unit. Try resetting your iPod. The iPod being used is not supported by this unit. Only iPod (Click and Wheel), iPod nano, and iPod mini are - Yamaha RX-Z11 | Owner's Manual - Page 153
or move them away from the optimizer microphone. Connect surround speakers when you use surround back speakers. Connect the supplied optimizer microphone to the OPTIMIZER MIC jack on the front panel. Check the rear presence speaker connections. Run "Auto Setup" again. Run "Auto Setup" again. See - Yamaha RX-Z11 | Owner's Manual - Page 154
Resetting the system Resetting the system Use this feature to reset all the parameters of this unit to the initial factory settings. Notes • This procedure completely resets all the parameters of this - Yamaha RX-Z11 | Owner's Manual - Page 155
technical term that involves both a problem and a capability of maintaining audio and influence the sound in some way. The internal crossover of the speaker consists of a LPF (low pass filter) and a HPF Supported by HDMI version 1.3 and designed for the optical disc players and AV receivers/ - Yamaha RX-Z11 | Owner's Manual - Page 156
master, offering a high-definition home theater experience. Supporting bitrates up to 18.0 Mbps, Dolby TrueHD can carry up to 8 discrete channels of 24-bit/96 kHz audio simultaneously. Supported by HDMI version 1.3 and designed for the optical disc players and AV receivers/amplifiers of the future - Yamaha RX-Z11 | Owner's Manual - Page 157
. It is said to be capable of compressing the data quantity by about 1/11 (128 kbps) while maintaining a similar audio quality to music CD. ■ MPEG data at a bit rate lower than that of MPEG-2 AAC, it is used among others for mobile telephones, portable audio players and other low-capacity devices - Yamaha RX-Z11 | Owner's Manual - Page 158
Matching to the surround speaker channels. ■ THX Games Ltd. In a movie theater, film soundtracks that have been home consumer market may exhibit wording to that effect on the packaging. A list of movies created using this technology can be found on the Dolby web site at www.dolby.com. Only receiver - Yamaha RX-Z11 | Owner's Manual - Page 159
THX Set" of "Manual Setup". ■ ASA (Advanced Speaker Array) ASA is a proprietary THX technology which processes the sound fed to 2 side and 2 back surround speakers to provide the optimal surround sound experience. When you set up your home theater system using all eight speaker outputs (Left, Center - Yamaha RX-Z11 | Owner's Manual - Page 160
is exactly what Yamaha has done with the digital sound field processor. ■ CINEMA DSP Since the Dolby Surround and DTS systems were originally designed for use in movie theaters, their effect is best felt in a theater having many speakers designed for acoustic effects. Since home conditions, such as - Yamaha RX-Z11 | Owner's Manual - Page 161
be used partially when they are adjusted to specific aspects of movies, such as special sound effects, etc. L Front left speaker SR Surround right speaker FPR Front presence right speaker C Center speaker SBL Surround back left speaker RPL Rear presence left speaker R Front right speaker SBR - Yamaha RX-Z11 | Owner's Manual - Page 162
Sound field program information *1 qEX / qPL x / *2 qEX / qPL x / / neural : OFF / neural : ON or discrete 6.1/7.1-channel audio signals are input. Program CLASSICAL1 Hall in Munich A Hall in Munich B Hall in Frankfurt Hall in Stuttgart Hall in Vienna Hall in Amsterdam CLASSICAL2 Hall in USA A - Yamaha RX-Z11 | Owner's Manual - Page 163
. Liveness Sur. Room Size Sur. Init.Delay Liveness Room Size Init. Delay DSP Level Decoder Type ■ Available parameters for each sound field program Note Available sound field parameter may differ depending on the speaker settings. CLASSICAL1 Hall in Munich A Hall in Munich B Hall in Frankfurt Hall - Yamaha RX-Z11 | Owner's Manual - Page 164
Yamaha Parametric Room Acoustic Optimizer (YPAO) technology, together with the Parametric EQ settings (see page 104), to optimize the frequency characteristics of its parametric equalizer to match your listening environment. YPAO uses , the sound leaving a speaker and the sound reflecting off - Yamaha RX-Z11 | Owner's Manual - Page 165
XM: U.S.A. and Canada models Only NET NET PHY USB USB (Front) USB (Rear) USB Selector Block diagrams DIR Main Zone HDMI HDMI Rx NET/USB Selector DSP Decoder HDMI Main Zone Audio DAC Switch Volume Cinema DSP Amp Assign SEL Switch(Replay) MULTI CH INPUT SURR SB/FRONT C, SW AUDIO IN PHONO - Yamaha RX-Z11 | Owner's Manual - Page 166
IN (Front) IN 1 IN 2 IN 3 IN 4 HDMI Selector HDMI Rx HDMI Video I/P Converter Video Selector Selector Selector HDMI Tx HDMI Tx HDMI OUT OUT 1 OUT 2 COMPONENT VIDEO IN BD/HD DVD DVD CBL/SAT DVR S VIDEO IN V-AUX DVD DTV CBL/SAT DVR VCR DOCK INPUT Selector Video Decoder GUI Processor Video - Yamaha RX-Z11 | Owner's Manual - Page 167
Center, Surround, Surround back 140 W Front presence, Rear presence 50 W • Dynamic Power (IHF) Front dBf) • Usable Sensitivity (IHF 1.0 µV (11.2 dBf) • Selectivity (400 kHz 70 Australia model 1 (100 W maximum) • Dimensions (W x H x D 435 x 210 x 497 mm (17-1/8 x 8-1/4 x 19-9/16 in) • Weight - Yamaha RX-Z11 | Owner's Manual - Page 168
Linear PCM 8ch, 32-192 kHz, 16/ DVD-Audio, etc. 20/24 bit DSD 2/5.1ch, 2.8224 MHz, 1 bit SACD, etc. Bitstream Dolby Digital, DTS using the following connections: - multi-channel analog audio input (see page 37) - DIGITAL INPUT OPTICAL (or COAXIAL) • Refer to the supplied instruction manuals - Yamaha RX-Z11 | Owner's Manual - Page 169
iPod universal dock 38 Connecting audio components 35 Connecting external amplifiers 36 Connecting network 40 Connecting power cable 42 Connecting speaker cable 28 Connecting subwoofers 26 Connecting the USB memory devices 40 Connecting to the rear USB ports 40 Connecting XM Mini-Tuner Home - Yamaha RX-Z11 | Owner's Manual - Page 170
83 Internet Radio, network menu 80 IP Address 111 IP address 111 iPod 112 iPod charge on the standby mode 112 iPod settings 112 iPod universal dock connection 38 iPod using 78 iPod, troubleshooting 152 ■J Jacks 29 ■L LAN STANDBY 143 LAN standby 143 LANGUAGE 144 Language 144 Language - Yamaha RX-Z11 | Owner's Manual - Page 171
Presence R Level 94 Rear presence speakers 27, 100 Rear USB port connection 40 Recital/Opera 61 RECOUT indicator, Front panel display ......... 44 REMOTE CON AMP 143 Remote control code default settings 124 Remote control codes settings 124 Remote control ID setting 143 Remote control using - Yamaha RX-Z11 | Owner's Manual - Page 172
Manual Setup 107 Village Gate 60 Village Vanguard 60 Virtual CINEMA DSP Home Dock connection ........ 74 XM Satellite Radio activation 74 XM Satellite Radio information display .......... 77 XM Satellite radio tuning 74 XM Satellite Radio, troubleshooting Assign 109 Zone speaker assignment 109 - Yamaha RX-Z11 | Owner's Manual - Page 173
List of remote control codes TV ACURA 00101 ADDISON 01201, 01601, 08401 ADMIRAL 01301, 02201, 05801 ADVENT 09601 AGB 06801 AIKO 01201 AKAI 00101, 00301, 02901, 04601, 06801, 08901, 10501 AKURA 03701 ALBA 00101, 00401, 04801, 08501 AMERICA ACTION 02701, AMPRO 09401 AMSTRAD - Yamaha RX-Z11 | Owner's Manual - Page 174
VOXSON 02201 WALTHAM 04501 WARDS 00301, 00801, 02601, 11301 WATSON 00401, 04101 WAYCON 02101 WHITE WESTINGHOUSE 00401, 04101, 05801, 07901 Yamaha 00301, 01801, 08301, 10001, 11001, 13501, 13601, 13701, 13801, 14001, 14101, 14201 YAPSHE 03401 YOKO 00401, 03701 ZENITH 00201 - Yamaha RX-Z11 | Owner's Manual - Page 175
VILLAIN 00002 WARDS 00002, 00302, 00702, 01002, 01102, 01202, 01402, 01502, 02002 WHITE WESTINGHOUSE 01402 XR-1000 00002, 00302, 01402 Yamaha 00602 YAMISHI 01402 YOKAN 01402 YOKO 02002 ZENITH 00002, 00202, 00502, 04402 CABLE ABC 00103, 00203 AMERICAST 02003 BELL SOUTH 02003 - Yamaha RX-Z11 | Owner's Manual - Page 176
UHER 00710 VENTURER 03810 VICTOR 00110 WARDS 00410 Yamaha 00510, 01410, 03110, 04810, 05510, 05610, 05710, 05810 Yamaha (iPod) 05310 Yamaha (NET) 05410 Yamaha (TUNER ID1) 04910 Yamaha (TUNER ID2) 05510 Yamaha (XM ID1) 05110 Yamaha (XM ID2) 05610 TAPE DECK AIWA 00111 CARVER - Yamaha RX-Z11 | Owner's Manual - Page 177
-BEAUBOURG 77312 MARNE-LA-VALLEE CEDEX02, FRANCE YAMAHA ELECTRONICS (UK) LTD. YAMAHA HOUSE, 200 RICKMANSWORTH ROAD WATFORD, HERTS WD18 7GQ, ENGLAND YAMAHA SCANDINAVIA A.B. J A WETTERGRENS GATA 1, BOX 30053, 400 43 VÄSTRA FRÖLUNDA, SWEDEN YAMAHA MUSIC AUSTRALIA PTY, LTD. 17-33 MARKET ST., SOUTH
-
 1
1 -
 2
2 -
 3
3 -
 4
4 -
 5
5 -
 6
6 -
 7
7 -
8
-
9
-
10
-
11
-
12
-
13
-
14
-
15
-
16
-
17
-
18
-
19
-
20
-
21
-
22
-
23
-
24
-
25
-
26
-
27
-
28
-
29
-
30
-
31
-
32
-
33
-
34
-
35
-
36
-
37
-
38
-
39
-
40
-
41
-
42
-
43
-
44
-
45
-
46
-
47
-
48
-
49
-
50
-
51
-
52
-
53
-
54
-
55
-
56
-
57
-
58
-
59
-
60
-
61
-
62
-
63
-
64
-
65
-
66
-
67
-
68
-
69
-
70
-
71
-
72
-
73
-
74
-
75
-
76
-
77
-
78
-
79
-
80
-
81
-
82
-
83
-
84
-
85
-
86
-
87
-
88
-
89
-
90
-
91
-
92
-
93
-
94
-
95
-
96
-
97
-
98
-
99
-
100
-
101
-
102
-
103
-
104
-
105
-
106
-
107
-
108
-
109
-
110
-
111
-
112
-
113
-
114
-
115
-
116
-
117
-
118
-
119
-
120
-
121
-
122
-
123
-
124
-
125
-
126
-
127
-
128
-
129
-
130
-
131
-
132
-
133
-
134
-
135
-
136
-
137
-
138
-
139
-
140
-
141
-
142
-
143
-
144
-
145
-
146
-
147
-
148
-
149
-
150
-
151
-
152
-
153
-
154
-
155
-
156
-
157
-
158
-
159
-
160
-
161
-
162
-
163
-
164
-
165
-
166
-
167
-
168
-
169
-
170
-
171
-
172
-
173
-
174
-
175
-
176
-
177
 |
 |
UCA
AV Receiver
OWNER’S MANUAL
English