Yamaha RX-Z11 Owner's Manual - Page 128
Macro programming features
 |
UPC - 027108929019
View all Yamaha RX-Z11 manuals
Add to My Manuals
Save this manual to your list of manuals |
Page 128 highlights
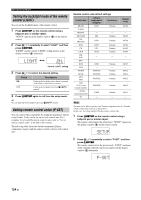
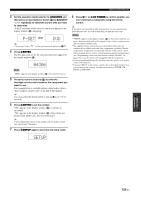
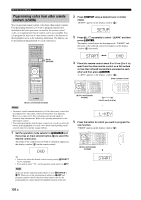
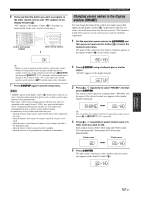
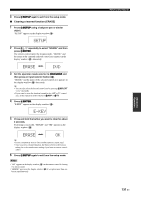
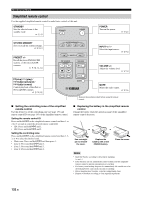
Remote control features 6 Press 9l / h repeatedly to move the cursor (_) to the position you want to edit. 7 Press 9k / n repeatedly to select and enter the desired character. Pressing 9k changes the character as follows: A to Z, a to z, 0, 1 to 9, space, - (minus), + (plus), / (slash) and : (colon). y Pressing 9n changes the characters in reverse order. 8 Repeat steps 6 and 7 until you change all the letters you want. 9 Press 9ENTER to set the new name. "OK" appears in the display window (4) on the remote control if renaming was successful. y When you want to rename the another name of the selected control area, press the input selector button (3) or 5SELECT l / h repeatedly to select the desired control area and then press 9ENTER and then carry out the operations of steps 4 through 9. 10 Press GSETUP again to exit the setup menu. The new name of the control area appears in the display window (4). HDDVD Note "ERROR" appears in the display window (4) on the remote control if you press a button not indicated in the respective step, or when you press more than one button simultaneously. Macro programming features The macro programming feature makes it possible to perform a series of operations with the press of a single button. For example, when you want to play a CD, normally you would turn on the components, select the CD input, and press the play button to start playback. The macro programming feature lets you perform all of these operations simply by pressing the CD macro button. The buttons listed as macro buttons below are factory set with macro programs. You can also program your own macros (see page 129). ■ Recalling programmed macro-operations POWER POWER STANDBY POWER TV AV MULTI BD HD DVD CBL SAT TUNER V-AUX DVD DTV DOCK PHONO CD DVR NET USB MD TAPE CD-R VCR XM Macro buttons AMP TV SOURCE SELECT SETUP ID MACRO MODE ZONE SYSTEM MEMORY 1 2 3 4 MACRO (U.S.A. and Canada models) 1 Press HMACRO on the remote control. MACRO 2 Press the desired macro button. "M:the 3-letter name of the selected control area" (for example, "M:DVD") appears in the display window (4), and this unit transmits the programmed functions. When you press DSTANDBY or EPOWER, "M:STB" or "M:PWR" appears in the display window (4), and this unit transmits the programmed functions. 3 Press HMACRO again to exit from the macro- operation mode. Notes • While the remote control is running a macro program, it does not accept any other operation until it has completed running the program (the transmission indicator in the display stops flashing). • Continue to aim the remote control at the component the macro is operating until the macro operation is complete. • If you do not complete each of the operations within 30 seconds, this unit automatically exits from the macro-operation mode. 128 En
-
 1
1 -
2
-
3
-
4
-
5
-
6
-
7
-
8
-
9
-
10
-
11
-
12
-
13
-
14
-
15
-
16
-
17
-
18
-
19
-
20
-
21
-
22
-
23
-
24
-
25
-
26
-
27
-
28
-
29
-
30
-
31
-
32
-
33
-
34
-
35
-
36
-
37
-
38
-
39
-
40
-
41
-
42
-
43
-
44
-
45
-
46
-
47
-
48
-
49
-
50
-
51
-
52
-
53
-
54
-
55
-
56
-
57
-
58
-
59
-
60
-
61
-
62
-
63
-
64
-
65
-
66
-
67
-
68
-
69
-
70
-
71
-
72
-
73
-
74
-
75
-
76
-
77
-
78
-
79
-
80
-
81
-
82
-
83
-
84
-
85
-
86
-
87
-
88
-
89
-
90
-
91
-
92
-
93
-
94
-
95
-
96
-
97
-
98
-
99
-
100
-
101
-
102
-
103
-
104
-
105
-
106
-
107
-
108
-
109
-
110
-
111
-
112
-
113
-
114
-
115
-
116
-
117
-
118
-
119
-
120
-
121
-
122
-
 123
123 -
 124
124 -
 125
125 -
 126
126 -
 127
127 -
 128
128 -
 129
129 -
 130
130 -
 131
131 -
 132
132 -
 133
133 -
134
-
135
-
136
-
137
-
138
-
139
-
140
-
141
-
142
-
143
-
144
-
145
-
146
-
147
-
148
-
149
-
150
-
151
-
152
-
153
-
154
-
155
-
156
-
157
-
158
-
159
-
160
-
161
-
162
-
163
-
164
-
165
-
166
-
167
-
168
-
169
-
170
-
171
-
172
-
173
-
174
-
175
-
176
-
177
 |
 |
