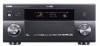
Yamaha RX-Z11 Owner's Manual - Page 132
Simplified remote control, Setting the controlling zone of the simplified, remote control
 |
UPC - 027108929019
View all Yamaha RX-Z11 manuals
Add to My Manuals
Save this manual to your list of manuals |
Page 132 highlights
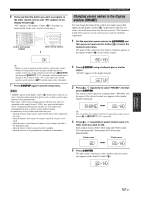
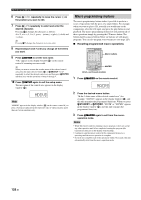
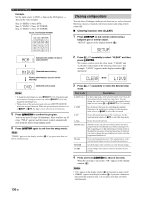
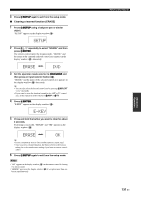
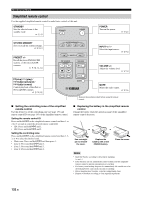
Remote control features Simplified remote control Use the supplied simplified remote control to make basic controls of this unit. STANDBY Sets the selected zone to the standby mode. ☞ P. 43 STANDBY POWER POWER Turn on the power. ☞ P. 43 SYSTEM MEMORY Save or recall the system settings. ☞ P. 115 PRESET +/- Recall the preset FM/AM, XM stations, or the network/USB contents. ☞ P. 70, 74, 84 SYSTEM MEMORY 1 2 3 4 INPUT INT SOURCE PRESET VOLUME INPUTl / h Select the input source. ☞ P. 54 VOLUME +/- Adjust the volume level. ☞ P. 54 s(stop) / p(play) / b(skip backward) / a(skip forward) Control playback of the iPod or Network/USB contents. ☞ P. 78, 81 MUTE MUTE Mutes the audio output. ☞ P. 56 Remove the insulation sheet before using the remote control. ■ Setting the controlling zone of the simplified remote control Use this feature to set the controlling zone (see page 139) and remote control ID (see page 143) of the simplified remote control. Setting the remote control ID Press and hold b on the simplified remote control and then 1 or 2 for 3 seconds to select the desired remote control ID. • ID1: Press and hold b and 1. • ID2: Press and hold b and 2. Setting the controlling zone Press and hold a on the simplified remote control and then 1, 2, 3, or 4 to select the desired zone. • Main zone: Press and hold a and then press 1. • Zone 2: Press and hold a and 2. • Zone 3: Press and hold a and 3. • Zone 4: Press and hold a and 4. ■ Replacing the battery in the simplified remote control Change the battery when the operation range of the simplified remote control decreases. Use a straight pin to remove the cover. Replace the battery with a new CR2025 battery. Close the cover. Notes • Insert the battery according to the polarity markings (+ and -). • If the batteries run out, immediately remove them from the simplified remote control to prevent an explosion or acid leak. • If a battery starts leaking, dispose of it immediately. Be careful not to let the leaking battery acid touch your skin or clothing. • Before inserting new batteries, wipe the compartment clean. • Dispose of batteries according to your regional regulations. 132 En
-
 1
1 -
2
-
3
-
4
-
5
-
6
-
7
-
8
-
9
-
10
-
11
-
12
-
13
-
14
-
15
-
16
-
17
-
18
-
19
-
20
-
21
-
22
-
23
-
24
-
25
-
26
-
27
-
28
-
29
-
30
-
31
-
32
-
33
-
34
-
35
-
36
-
37
-
38
-
39
-
40
-
41
-
42
-
43
-
44
-
45
-
46
-
47
-
48
-
49
-
50
-
51
-
52
-
53
-
54
-
55
-
56
-
57
-
58
-
59
-
60
-
61
-
62
-
63
-
64
-
65
-
66
-
67
-
68
-
69
-
70
-
71
-
72
-
73
-
74
-
75
-
76
-
77
-
78
-
79
-
80
-
81
-
82
-
83
-
84
-
85
-
86
-
87
-
88
-
89
-
90
-
91
-
92
-
93
-
94
-
95
-
96
-
97
-
98
-
99
-
100
-
101
-
102
-
103
-
104
-
105
-
106
-
107
-
108
-
109
-
110
-
111
-
112
-
113
-
114
-
115
-
116
-
117
-
118
-
119
-
120
-
121
-
122
-
123
-
124
-
125
-
126
-
 127
127 -
 128
128 -
 129
129 -
 130
130 -
 131
131 -
 132
132 -
 133
133 -
 134
134 -
 135
135 -
 136
136 -
 137
137 -
138
-
139
-
140
-
141
-
142
-
143
-
144
-
145
-
146
-
147
-
148
-
149
-
150
-
151
-
152
-
153
-
154
-
155
-
156
-
157
-
158
-
159
-
160
-
161
-
162
-
163
-
164
-
165
-
166
-
167
-
168
-
169
-
170
-
171
-
172
-
173
-
174
-
175
-
176
-
177
 |
 |
