Acer G540-E5405 Altos G540 User's Guide EN - Page 141
their appropriate ports on the rear panel., Go to for related instructions.
 |
UPC - 750519186893
View all Acer G540-E5405 manuals
Add to My Manuals
Save this manual to your list of manuals |
Page 141 highlights
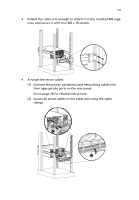
131 3 Extend the cable arm enough to attach it to the installed M6 cage nuts, and secure it with two M6 x 18 screws. 4 Arrange the server cables. (1) Connect the power, peripheral and networking cables into their appropriate ports on the rear panel. Go to page 28 for related instructions. (2) Secure all server cables to the cable arm using the cable clamps.
-
 1
1 -
2
-
3
-
4
-
5
-
6
-
7
-
8
-
9
-
10
-
11
-
12
-
13
-
14
-
15
-
16
-
17
-
18
-
19
-
20
-
21
-
22
-
23
-
24
-
25
-
26
-
27
-
28
-
29
-
30
-
31
-
32
-
33
-
34
-
35
-
36
-
37
-
38
-
39
-
40
-
41
-
42
-
43
-
44
-
45
-
46
-
47
-
48
-
49
-
50
-
51
-
52
-
53
-
54
-
55
-
56
-
57
-
58
-
59
-
60
-
61
-
62
-
63
-
64
-
65
-
66
-
67
-
68
-
69
-
70
-
71
-
72
-
73
-
74
-
75
-
76
-
77
-
78
-
79
-
80
-
81
-
82
-
83
-
84
-
85
-
86
-
87
-
88
-
89
-
90
-
91
-
92
-
93
-
94
-
95
-
96
-
97
-
98
-
99
-
100
-
101
-
102
-
103
-
104
-
105
-
106
-
107
-
108
-
109
-
110
-
111
-
112
-
113
-
114
-
115
-
116
-
117
-
118
-
119
-
120
-
121
-
122
-
123
-
124
-
125
-
126
-
127
-
128
-
129
-
130
-
131
-
132
-
133
-
134
-
135
-
 136
136 -
 137
137 -
 138
138 -
 139
139 -
 140
140 -
 141
141 -
 142
142 -
 143
143 -
 144
144 -
 145
145 -
 146
146
 |
 |

131
3
Extend the cable arm enough to attach it to the installed M6 cage
nuts, and secure it with two M6 x 18 screws.
4
Arrange the server cables.
(1)
Connect the power, peripheral and networking cables into
their appropriate ports on the rear panel.
Go to page 28 for related instructions.
(2)
Secure all server cables to the cable arm using the cable
clamps.