Acer G540-E5405 Altos G540 User's Guide EN - Page 48
Pre-installation instructions, Reinstall any expansion boards, peripherals, bracket s
 |
UPC - 750519186893
View all Acer G540-E5405 manuals
Add to My Manuals
Save this manual to your list of manuals |
Page 48 highlights
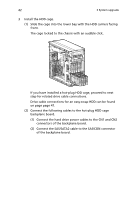
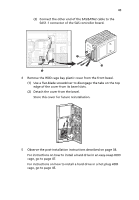
38 3 System upgrade Pre-installation instructions Perform the steps below before you open the server or before your remove or replace any component. Warning! Failure to properly turn off the server before you start perform any hardware configuration may cause serious damage and bodily harm. Do not attempt the procedures described in the following sections unless you are a qualified service technician. 1 Turn off the server and all connected peripherals. 2 Unplug all power cables from their outlets. 3 Disconnect all telecommunication cables from their ports. 4 Place the server on a flat, stable surface. 5 Open the server according to the instructions on page 39. 6 Follow the ESD precautions described in the previous section when handling a server component. Post-installation instructions Perform the steps below after installing a server component. 1 See to it that all components are installed according to the described step-by-step instructions. 2 Reinstall any expansion board(s), peripheral(s), bracket (s) and system cable(s) that have previously been removed. 3 Reinstall the side panel. 4 Reconnect the power, peripheral, and telecommunication cables. 5 Turn on the system.
-
 1
1 -
2
-
3
-
4
-
5
-
6
-
7
-
8
-
9
-
10
-
11
-
12
-
13
-
14
-
15
-
16
-
17
-
18
-
19
-
20
-
21
-
22
-
23
-
24
-
25
-
26
-
27
-
28
-
29
-
30
-
31
-
32
-
33
-
34
-
35
-
36
-
37
-
38
-
39
-
40
-
41
-
42
-
 43
43 -
 44
44 -
 45
45 -
 46
46 -
 47
47 -
 48
48 -
 49
49 -
 50
50 -
 51
51 -
 52
52 -
 53
53 -
54
-
55
-
56
-
57
-
58
-
59
-
60
-
61
-
62
-
63
-
64
-
65
-
66
-
67
-
68
-
69
-
70
-
71
-
72
-
73
-
74
-
75
-
76
-
77
-
78
-
79
-
80
-
81
-
82
-
83
-
84
-
85
-
86
-
87
-
88
-
89
-
90
-
91
-
92
-
93
-
94
-
95
-
96
-
97
-
98
-
99
-
100
-
101
-
102
-
103
-
104
-
105
-
106
-
107
-
108
-
109
-
110
-
111
-
112
-
113
-
114
-
115
-
116
-
117
-
118
-
119
-
120
-
121
-
122
-
123
-
124
-
125
-
126
-
127
-
128
-
129
-
130
-
131
-
132
-
133
-
134
-
135
-
136
-
137
-
138
-
139
-
140
-
141
-
142
-
143
-
144
-
145
-
146
 |
 |