Acer G540-E5405 Altos G540 User's Guide EN - Page 70
Installing an expansion card, I/O interface
 |
UPC - 750519186893
View all Acer G540-E5405 manuals
Add to My Manuals
Save this manual to your list of manuals |
Page 70 highlights
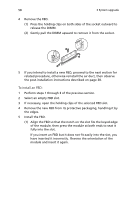
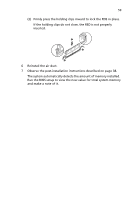
60 3 System upgrade Installing an expansion card This section explains how to install an expansion card. I/O interface Altos G540 has six PCI bus slots with of three separate bus segments, namely: • PCI-E 1, PCI-E 4, and PCI-E 5 - PCI Express x8 slots • PCI-X 2 and PCI-X 3 - 64-bit, 66/100 MHz PCI-X slots • PCI7 - One 32-bit/33 MHz PCI bus slot In addition to these six expansion slots, Altos G540 also has one dedicated PCI-X expansion slot for the optional SAS controller board (SODIMM1) slot. To install an expansion card: 1 Perform the pre-installation instructions described on page 37. 2 If necessary, remove any cables that prevent access to the processor sockets. 3 Locate an empty expansion slot that is compatible with the specification of the card you intend to install. 4 Install the expansion card. (1) Press the release latch of the slot cover opposite the selected expansion slot. (2) Pull out the slot cover and store it for reassembly later. Caution: Do not discard the slot cover. If the expansion card is removed in the future, the slot cover must be reinstalled to maintain proper system cooling. Remove the expansion card from its protective packaging, handling it by the edges.
-
 1
1 -
2
-
3
-
4
-
5
-
6
-
7
-
8
-
9
-
10
-
11
-
12
-
13
-
14
-
15
-
16
-
17
-
18
-
19
-
20
-
21
-
22
-
23
-
24
-
25
-
26
-
27
-
28
-
29
-
30
-
31
-
32
-
33
-
34
-
35
-
36
-
37
-
38
-
39
-
40
-
41
-
42
-
43
-
44
-
45
-
46
-
47
-
48
-
49
-
50
-
51
-
52
-
53
-
54
-
55
-
56
-
57
-
58
-
59
-
60
-
61
-
62
-
63
-
64
-
 65
65 -
 66
66 -
 67
67 -
 68
68 -
 69
69 -
 70
70 -
 71
71 -
 72
72 -
 73
73 -
 74
74 -
 75
75 -
76
-
77
-
78
-
79
-
80
-
81
-
82
-
83
-
84
-
85
-
86
-
87
-
88
-
89
-
90
-
91
-
92
-
93
-
94
-
95
-
96
-
97
-
98
-
99
-
100
-
101
-
102
-
103
-
104
-
105
-
106
-
107
-
108
-
109
-
110
-
111
-
112
-
113
-
114
-
115
-
116
-
117
-
118
-
119
-
120
-
121
-
122
-
123
-
124
-
125
-
126
-
127
-
128
-
129
-
130
-
131
-
132
-
133
-
134
-
135
-
136
-
137
-
138
-
139
-
140
-
141
-
142
-
143
-
144
-
145
-
146
 |
 |
