Belkin F1DP216G User Manual - Page 20
Connecting to a target server, Configuring the System, Network > Configuration
 |
View all Belkin F1DP216G manuals
Add to My Manuals
Save this manual to your list of manuals |
Page 20 highlights
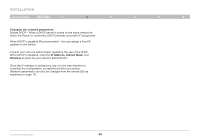
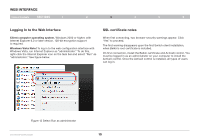
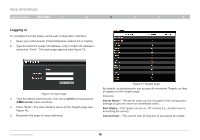
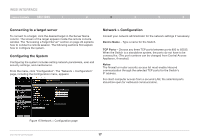
WEB INTERFACE Table of Contents sections 1 2 3 4 5 6 Connecting to a target server To connect to a target, click the desired target in the Server Name column. The screen of the target appears inside the remote console window. The "Accessing a Target Server" section on page 28 explains how to conduct a remote session. The following sections first explain how to configure the system. Configuring the System Configuring the system includes setting network parameters, user and security settings, and maintenance. From the menu, click "Configuration". The "Network > Configuration" page, including the Configuration menu, appears: Network > Configuration Consult your network administrator for the network settings if necessary. Device Name - Type a name for the Switch. TCP Ports - Choose any three TCP ports between ports 800 to 65535. When the Switch is a standalone system, the ports do not have to be consecutive. (The port numbers can be changed from Central Access Appliance, if needed.) Notes The firewall or router security access list must enable inbound communication through the selected TCP ports for the Switch's IP address. For client computer access from a secured LAN, the selected ports should be open for outbound communication. Figure 15 Network > Configuration page OmniViewIP 5216K/5232K 17
-
 1
1 -
2
-
3
-
4
-
5
-
6
-
7
-
8
-
9
-
10
-
11
-
12
-
13
-
14
-
 15
15 -
 16
16 -
 17
17 -
 18
18 -
 19
19 -
 20
20 -
 21
21 -
 22
22 -
 23
23 -
 24
24 -
 25
25 -
26
-
27
-
28
-
29
-
30
-
31
-
32
-
33
-
34
-
35
-
36
-
37
-
38
-
39
-
40
-
41
-
42
-
43
-
44
-
45
-
46
-
47
-
48
-
49
-
50
-
51
-
52
-
53
-
54
-
55
-
56
-
57
 |
 |