Belkin F1DP216G User Manual - Page 48
Moving the Confirmation label - F1, Tuning - F5
 |
View all Belkin F1DP216G manuals
Add to My Manuals
Save this manual to your list of manuals |
Page 48 highlights
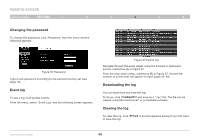
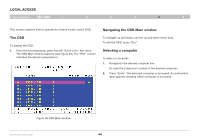
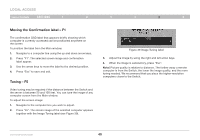
LOCAL ACCESS Table of Contents sections 1 2 3 4 5 6 Moving the Confirmation label - F1 The confirmation OSD label that appears briefly showing which computer is currently accessed can be positioned anywhere on the screen. To position the label from the Main window: 1. Navigate to a computer line using the up and down arrow keys. 2. Press "F1". The selected screen image and confirmation label appear. 3. Use the arrow keys to move the label to the desired position. 4. Press "Esc" to save and exit. Tuning - F5 Video tuning may be required if the distance between the Switch and the server is between 50 and 100 feet. You can tune the image of any computer screen from the Main window. To adjust the screen image: 1. Navigate to the computer line you wish to adjust. 2. Press "F5". The screen image of the selected computer appears together with the Image Tuning label (see Figure 39). Figure 39 Image Tuning label 3. Adjust the image by using the right and left arrow keys. 4. When the image is satisfactory, press "Esc". Note! Picture quality is relative to distance. The farther away a remote computer is from the Switch, the lower the image quality, and the more tuning needed. We recommend that you place the higher-resolution computers closer to the Switch. OmniViewIP 5216K/5232K 45
-
 1
1 -
2
-
3
-
4
-
5
-
6
-
7
-
8
-
9
-
10
-
11
-
12
-
13
-
14
-
15
-
16
-
17
-
18
-
19
-
20
-
21
-
22
-
23
-
24
-
25
-
26
-
27
-
28
-
29
-
30
-
31
-
32
-
33
-
34
-
35
-
36
-
37
-
38
-
39
-
40
-
41
-
42
-
 43
43 -
 44
44 -
 45
45 -
 46
46 -
 47
47 -
 48
48 -
 49
49 -
 50
50 -
 51
51 -
 52
52 -
 53
53 -
54
-
55
-
56
-
57
 |
 |
